Find the Benefits of Concrete Block Retaining Walls
A concrete block retaining wall is a fantastic solution for homeowners and property managers seeking effective erosion control, landscape improvement, slope management, and aesthetic appeal.
Here’s what you need to know about concrete block retaining walls:
- Erosion Control: Retaining walls prevent soil from washing away, especially on sloped terrains.
- Landscape Improvement: They add visual interest and functionality, making your yard more attractive and manageable.
- Slope Management: These walls help you carve out level spaces in hilly areas, perfect for gardens or patios.
- Aesthetic Appeal: With various styles and finishes, retaining walls can complement and lift your outdoor space.
Understanding these key benefits will help you master the art of building a durable and attractive retaining wall that meets your landscape needs.

Choosing the Right Materials for Your Concrete Block Retaining Wall
Selecting the right materials is key to building a strong and lasting concrete block retaining wall. Let’s dive into the types of blocks, adhesives, and mortars you’ll need.
Types of Concrete Blocks
Concrete blocks come in different styles, each with unique benefits:
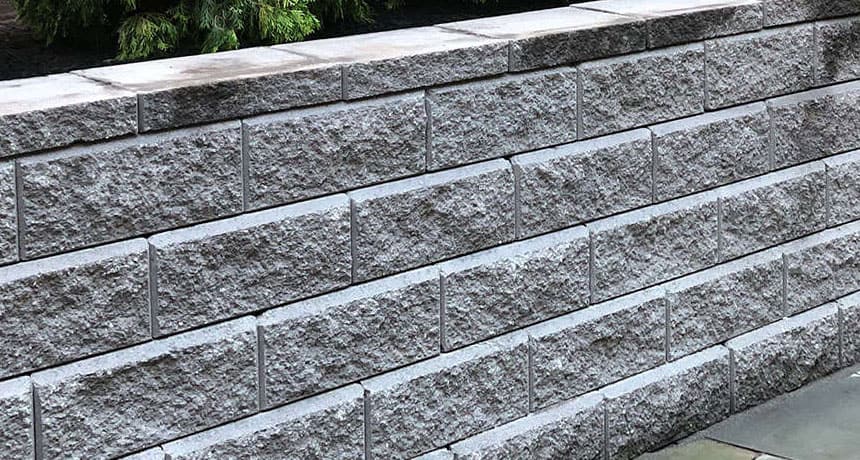
- Split-faced blocks: These have a rough texture, giving a natural stone appearance. They are perfect for decorative walls.
- Traditional cinder blocks: Often used for their strength and affordability. They are ideal for taller, more structural walls.
- Interlocking blocks: Designed to fit together without mortar. These are great for DIY projects because they are easy to assemble.
Comparing Adhesives and Mortar
When it comes to holding your blocks together, you have two main options: masonry adhesive and mortar.
Masonry Adhesive
– Strength: Adequate for shorter walls where structural integrity is less critical.
– Drying Time: Cures faster than mortar, usually within 7 days.
– Waterproof Qualities: Both adhesives and mortar are waterproof, but adhesives offer easier application.
Mortar
– Strength: Provides superior strength, making it suitable for taller and more structural walls.
– Drying Time: Takes longer to cure, up to a month. This slower drying time can be a drawback for quick projects.
– Waterproof Qualities: Equally effective in waterproofing, but requires proper mixing.
Capstones
Capstones are the finishing touch on your wall. They not only add aesthetic appeal but also protect the wall from weather damage. Use concrete adhesive to secure them in place.
By carefully selecting the right concrete blocks, adhesive, or mortar, and finishing with capstones, you can build a retaining wall that is both functional and beautiful.
Next, let’s move on to planning and preparing your retaining wall project.
Planning and Preparing Your Retaining Wall Project
Before you start building your concrete block retaining wall, thorough planning and preparation are crucial. This will ensure your wall is both effective and durable. Here are the key steps:
Site Assessment
First, evaluate the area where you plan to build your retaining wall. Look for:
- Slope: How steep is the slope? This affects the wall’s height and design.
- Soil Type: Some soils are more stable than others. Sandy soils may require additional reinforcement.
- Water Flow: Identify how water moves through the area to plan for proper drainage.
Local Building Codes
Check your local building codes and regulations. Some areas require permits for retaining walls over a certain height. You might need to:
- Obtain Permits: Ensure you have the necessary permissions to avoid legal issues.
- Follow Guidelines: Adhere to local guidelines for wall construction, especially for taller walls.
Material Calculation
Calculate the materials you’ll need accurately. This includes:
- Concrete Blocks: Determine the number of blocks based on your wall’s dimensions.
- Gravel and Sand: Essential for creating a solid foundation.
- Adhesive or Mortar: Choose based on your preference and wall type.
- Capstones: These are optional but recommended for a polished finish.
Drainage Planning
Proper drainage is vital to prevent water buildup behind the wall, which can cause it to fail. Plan for:
- Gravel Backfill: Use compactable gravel behind the wall to improve drainage.
- Drainage Pipes: Install perforated pipes at the base to direct water away from the wall.
- Weep Holes: These allow water to escape through the wall.
Importance of a Solid Foundation
A strong foundation is the backbone of your retaining wall. Here’s how to build it:
- Compactable Gravel: Lay at least 6 inches of compactable gravel at the base. Compact it to ensure stability.
- Leveling Sand: Add a 1-inch layer of leveling sand on top of the gravel for a smooth surface.
- Footer Depth: The footer should be at least 1/8 of the wall’s height. For example, a 4-foot wall needs a 6-inch footer.
Tools and Equipment Needed
Having the right tools will make your project smoother and more efficient. Gather:
- Shovel: For digging the trench and moving materials.
- Level: Ensures each row of blocks is even.
- Trowel: Useful for applying mortar if you’re using it.
- Wheelbarrow: For transporting gravel, sand, and blocks.
- Tape Measure: For accurate measurements.
By assessing your site, understanding local codes, accurately calculating materials, planning for drainage, and ensuring a solid foundation, you set the stage for a successful retaining wall project.
Step-by-Step Guide to Building a Concrete Block Retaining Wall
Laying the First Row of Blocks
Excavation: Start by digging a trench where your retaining wall will go. The trench should be wider than the blocks and deep enough to accommodate a gravel base and the first row of blocks. Aim for a depth that allows for at least 6 inches of compactable gravel.
Footing Setting: Fill the trench with compactable gravel. This base layer should be about 6 inches deep, ensuring proper drainage and stability. Use a tamper to compact the gravel firmly.
Leveling: Once the gravel base is compacted, add a layer of leveling sand. Use a long level or a straight board to ensure the sand is perfectly level.
Positioning: Place the first row of blocks directly onto the sand. Start at one end and work your way to the other, making sure each block is level. Use a rubber mallet to tap the blocks into place if necessary.
Using a String Line: To keep the first row straight, set up a string line along the path of the wall. This will serve as a guide, helping you keep the blocks aligned as you lay them.
Adding Additional Rows
Overlap Joints: As you start the second row, make sure to stagger the joints. This means the seams between blocks should not line up with those in the row below. This overlapping pattern adds strength to the wall.
Use of Pins or Adhesive: Depending on the type of blocks you’re using, you may need to secure each row with pins or masonry adhesive. This helps keep the wall stable and prevents the blocks from shifting over time.
Checking for Level: After laying each row, use your level to ensure everything is even. Adjust as needed by adding or removing sand under the blocks.
Backfilling: As you build each row, backfill the space behind the wall with gravel or crushed stone. This improves drainage and adds stability. Compact the backfill material as you go to prevent settling.
By following these steps, you’ll ensure that your concrete block retaining wall is both sturdy and attractive. Each layer builds upon the last, creating a structure that can withstand the test of time and elements.
Next, we’ll cover the finishing touches and maintenance tips to keep your retaining wall in top shape.
Finishing Touches and Maintenance of Your Retaining Wall
Installing Capstones and Sealing Joints
Once your concrete block retaining wall has reached the desired height, it’s time to add the capstones. These top pieces not only provide a finished look but also help direct water away from the wall.
- Apply Concrete Adhesive: Use a high-quality concrete adhesive to secure the capstones. This ensures they stay in place and adds an extra layer of stability.
- Create a Drip Edge: When installing the capstones, slightly angle them to create a drip edge. This helps water runoff, preventing it from pooling on the wall and causing damage.
- Seal the Joints: Before the mortar between the joints fully cures, use a trowel to smooth out any imperfections. Once cured, apply a sealant to protect the joints from moisture infiltration.
Long-Term Care and Inspection
Maintaining your concrete block retaining wall is key to its longevity. Here are some tips for long-term care:
- Routine Checks: Regularly inspect your wall for any signs of wear or damage. Look for cracks, loose blocks, or signs of shifting.
- Erosion Monitoring: Keep an eye on the backfill and surrounding soil. Ensure that drainage is working effectively to prevent erosion, which can undermine the wall’s stability.
- Vegetation Management: Plants can add beauty to your retaining wall, but be cautious. Avoid planting trees or large shrubs too close, as their roots can disrupt the wall’s structure. Opt for smaller, non-invasive plants.
- Reapply Sealant: Over time, the sealant on your wall’s joints may wear off. Reapply it every few years to maintain a strong moisture barrier.
By following these steps, your concrete block retaining wall will remain functional and attractive for years to come. Proper installation and regular maintenance are essential to ensure its durability and effectiveness.
Next, we’ll address some frequently asked questions about concrete block retaining walls.
Frequently Asked Questions about Concrete Block Retaining Walls
Can you use concrete blocks for a retaining wall?
Yes, you can use concrete blocks for a retaining wall. They are a popular choice due to their durability and versatility. Concrete blocks come in various styles, such as split-faced, traditional cinder blocks, and interlocking blocks, making them suitable for different aesthetic and structural needs. According to Lawn Care Plus Inc., concrete blocks are commonly used for both functional and decorative retaining walls. The key is to ensure proper installation, including a solid foundation and adequate drainage.
Is a concrete retaining wall cheaper than blocks?
The cost comparison between a solid concrete retaining wall and one made of blocks can vary based on several factors. Generally, a concrete block retaining wall can be more cost-effective for shorter walls. According to Forbes, wood and masonry retaining wall block are among the cheapest materials, with DIY costs ranging from $1,000 to $2,300 for 100 square feet. In contrast, solid concrete walls may require more materials and labor, making them more expensive. However, for taller walls, solid concrete might become more economical due to its structural integrity and reduced need for additional reinforcement.
How long will a cinder block retaining wall last?
A cinder block retaining wall can last a very long time, typically between 50 to 100 years, depending on the quality of materials used and the conditions it’s exposed to. Proper construction and maintenance are crucial for longevity. This includes ensuring a solid foundation, adequate drainage, and routine inspections to address any potential issues like erosion or root intrusion. According to Forbes, while wood retaining walls last up to 40 years, masonry walls, including those made from cinder blocks, have a much longer lifespan.
Next, we’ll wrap up with some concluding thoughts and client testimonials.
Conclusion
Building a concrete block retaining wall is a rewarding project that can improve your landscape, prevent erosion, and add value to your property. At Lawn Care Plus Inc., we specialize in creating durable, beautiful retaining walls that stand the test of time.
Sustainable Landscaping
We believe in sustainable landscaping practices that not only beautify your outdoor space but also contribute to environmental health. Our team uses high-quality materials and modern techniques to ensure your retaining wall is both functional and eco-friendly. From strategic tree placement to efficient irrigation systems, we integrate various elements to maximize energy efficiency and reduce air pollution.
Client Testimonials
Our clients have seen the benefits of our expertise. Here’s what some of them have to say:
“Lawn Care Plus transformed our sloping backyard into a stunning, tiered garden. The retaining wall they built not only looks amazing but has also made our garden more accessible and easier to maintain.” — Sarah M.
“We needed a retaining wall to prevent erosion on our property. Lawn Care Plus did an excellent job. The wall is solid, and the whole area looks so much better now. Highly recommend their services!” — John D.
We take pride in our work and are committed to exceeding your expectations. If you’re ready to improve your landscape with a concrete block retaining wall, contact us today.
Explore our retaining wall services and let us help you create a landscape that is both beautiful and sustainable.
Thank you for choosing Lawn Care Plus Inc. for your landscaping needs. We look forward to working with you!
