Why Your Basement Needs a Waterguard Drainage Channel
A waterguard drainage channel is an interior basement drainage system that sits above your foundation footer to capture wall and floor seepage before it enters your living space. Unlike traditional French drains that clog with mud and debris, this PVC conduit system stays clean and functional for decades.
Quick Facts About Waterguard Drainage Channels:
- Installation: Placed inside basement perimeter, hidden under concrete floor
- Design: Large-diameter channel with wall flange to collect seepage
- Warranty: 20-year clog warranty, lifetime transferable coverage
- Compatibility: Works with block, poured concrete, and stone foundations
- Flow: Connects to sump pump system for automatic water removal
- Benefits: Prevents basement flooding, mold growth, and musty odors
If you’ve noticed water stains on your basement walls, musty smells, or actual puddles after heavy rain, you’re dealing with hydrostatic pressure pushing groundwater through your foundation. This isn’t just a minor inconvenience – it’s a serious threat to your home’s structural integrity and your family’s health.
The research shows that Waterguard is the most widely used basement drainage system in the USA and Canada by professional installers. It works by creating a hidden pathway for water to flow to your sump pump instead of pooling on your basement floor or soaking into your walls.
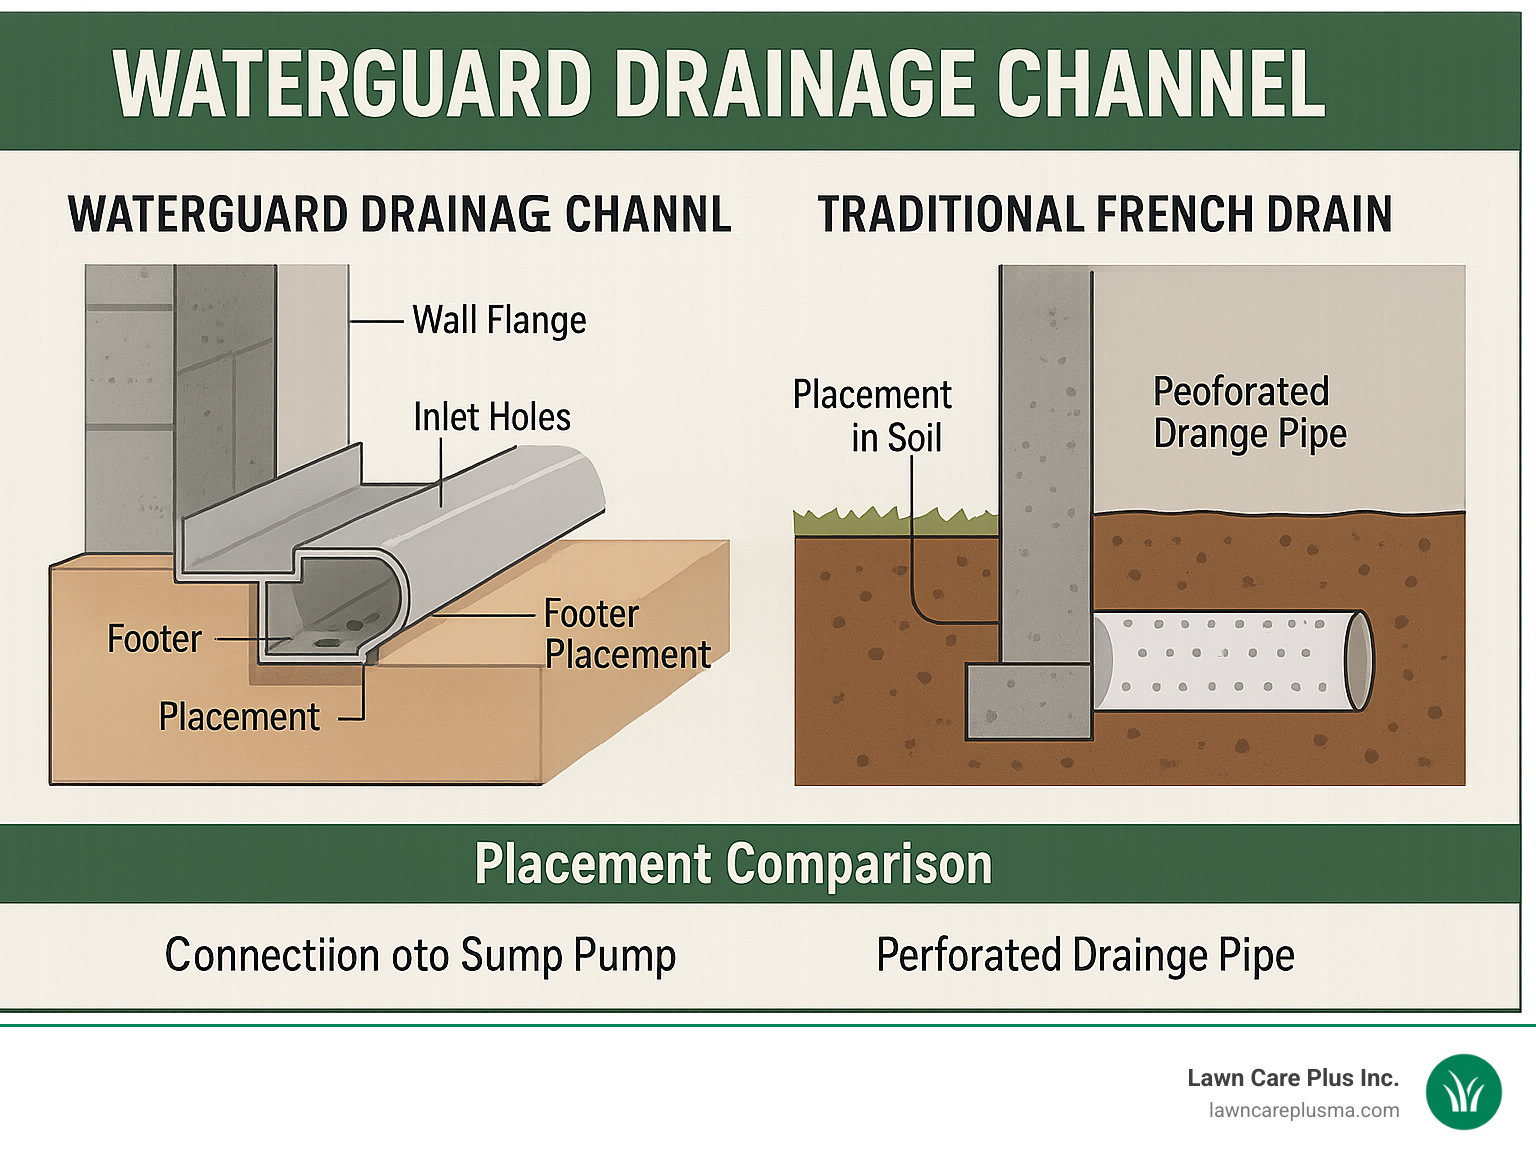
Traditional exterior French drains often fail because they sit in the “mud zone” where silt and roots cause blockages. Waterguard solves this by staying above the footer in a clean, accessible location that won’t clog with debris.
What Is a Waterguard Drainage Channel & Why Your Basement Needs One
A waterguard drainage channel is essentially a sub-floor drainage system that revolutionizes how we handle basement water problems. This engineered PVC conduit sits strategically above your foundation footer, creating a permanent solution that won’t fail like traditional drainage methods.
The key innovation lies in its above-footer positioning. While conventional drain tiles sit alongside or below the footer where they’re constantly exposed to silt, mud, and root intrusion, Waterguard stays clean and accessible. This positioning prevents the clogging issues that plague traditional systems and gives you decades of reliable performance.
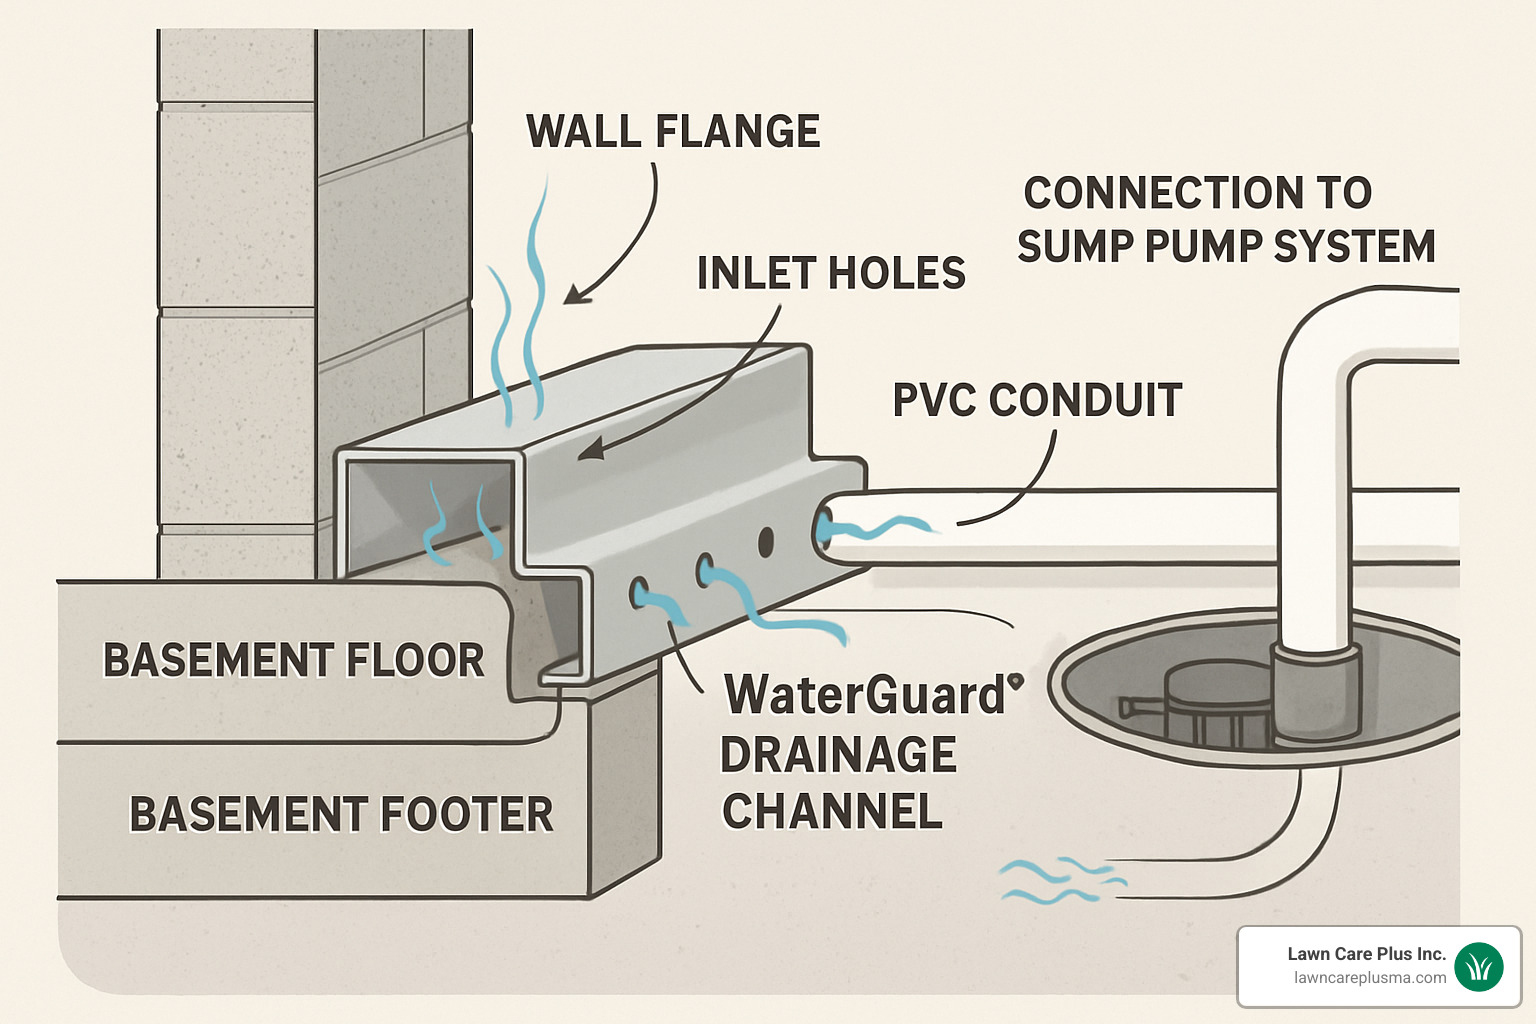
The system features a built-in wall flange that creates a small gap between your basement wall and floor. This seemingly minor detail is actually crucial – it allows wall seepage to flow directly into the drainage channel instead of pooling at the wall-floor joint where it can cause damage and create perfect conditions for mold growth.
How the Waterguard Drainage Channel Works
The genius of Waterguard lies in its simple yet effective design. The channel features strategically placed inlet holes along its length that capture water seepage from both the walls and floor. These holes are sized to allow water in while keeping debris out – a critical balance that maintains system performance over time.
Once water enters the channel through these inlet holes, it flows along the perimeter of your basement toward the lowest point where it connects to your sump pump system. The large-diameter design ensures smooth water flow even during heavy rain events when water volume is at its peak.
The system provides hydrostatic relief by giving groundwater a controlled path to follow. Instead of building up pressure against your foundation walls and floor, water naturally flows into the channel and gets pumped away. This pressure relief is what prevents the wall cracks and floor heaving that can occur with unmanaged water pressure.
Key Features & Benefits of Waterguard
The non-clogging design is perhaps the most significant advantage of Waterguard over traditional drainage systems. By staying out of the soil zone, the channel avoids the silt and debris that inevitably clog conventional French drains. This means you won’t face the expensive and disruptive maintenance that other systems require.
The hidden installation is another major benefit. Once installed, only the wall flange remains visible – a thin line where the wall meets the floor. Your basement floor is restored to its original appearance, and you can finish the space or use it for storage without worrying about exposed drainage components.
The transferable warranty adds significant value to your home. The 20-year clog warranty and lifetime transferable coverage mean that future homeowners will also benefit from your investment. This warranty protection is backed by a network of over 350 trusted basement contractors across North America.
Mold prevention is a crucial health benefit. By eliminating standing water and controlling humidity, Waterguard creates an environment where mold and mildew can’t thrive. This protection is especially important for families with allergies or respiratory conditions.
More info about Inside Basement Drainage Systems
Planning Your Project: Sizing, Versions & Compatible Foundations
Proper planning is essential for a successful Waterguard installation. The system comes in standard channel lengths that can be customized to fit your basement’s unique layout. Understanding the different versions and accessories available will help you create a comprehensive drainage solution.
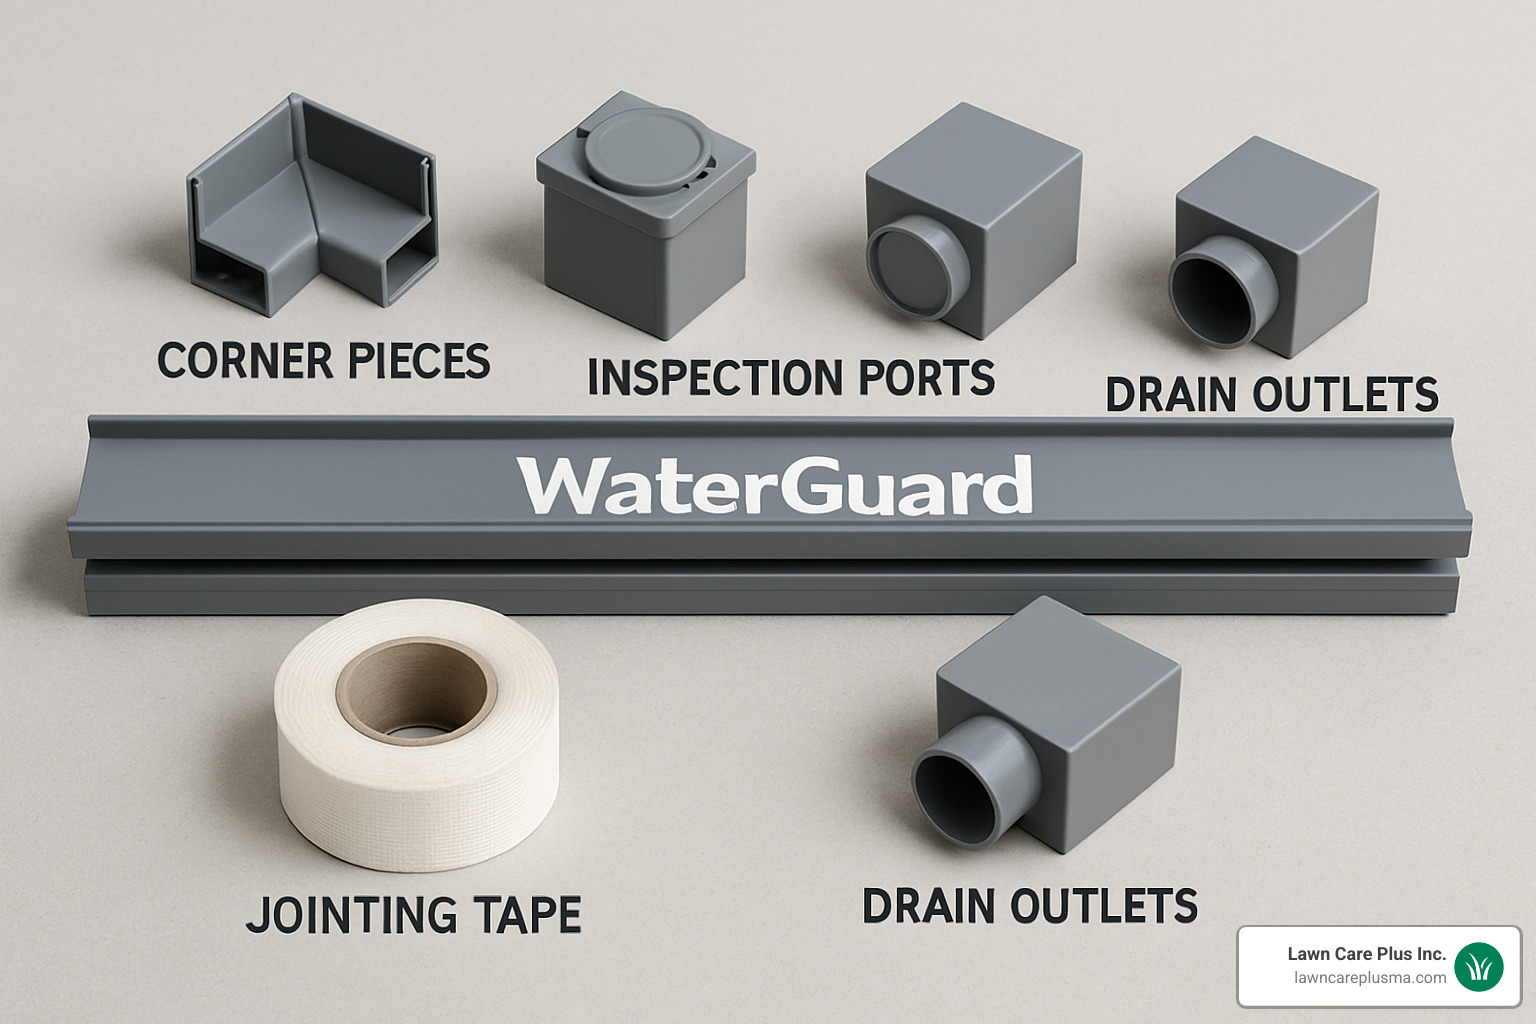
The basic system includes straight channel sections, but most installations require additional components. Corner pieces handle direction changes, inspection ports provide access for maintenance, and drain outlets connect to your sump pump system. Each component is designed to work together seamlessly.
Foundation compatibility is excellent across all common types. Whether you have block walls, poured concrete, or stone foundations, Waterguard can be adapted to work effectively. Block walls may require drilling weep holes to allow trapped water to escape into the channel, while poured concrete installations are more straightforward.
Waterguard Drainage Channel Sizes & Accessories Explained
Standard Waterguard channels come in 2-metre lengths (approximately 6.56 feet) and are typically sold in bulk boxes of 8 channels. For smaller projects, you can purchase individual 3 ft 9 in segments. This flexibility allows you to buy exactly what you need without excessive waste.
The jointing tape is a critical accessory that seals connections between channel sections. One 48-meter roll of jointing tape is sufficient to install up to 600 feet of Waterguard channel. This tape creates watertight seals that prevent leaks and maintain system integrity.
Drain outlets are specialized fittings that connect your channel system to the sump pump. These outlets feature a 2¾ inch (65mm) diameter pipe section that provides adequate flow capacity for most residential applications. The outlets are designed to maintain proper slope for gravity drainage.
Hinged inspection ports are telescopic components that can be set flush with your finished floor. These ports provide access for system maintenance and monitoring. The air-tight seal prevents odors and gases from entering your basement while allowing easy access when needed.
Choosing the Right Version for Your Slab Type
Standard slab installations use the flanged version of Waterguard. This version includes the built-in wall drain flange that’s essential for collecting wall seepage. Most basement installations use this version because it provides comprehensive water collection.
Monolithic slab foundations present special challenges because the floor and footer are poured as one unit. For these applications, the DryTrak alternative installs over the floor surface to avoid extensive jackhammering. This baseboard-style system is less invasive but still provides effective drainage.
Thin floor applications may require the FlowGuard alternative, which sits in front of the footing in drainage stone. This system works well when concrete depth over the footer is insufficient for standard Waterguard installation. The drainage stone bed prevents mud-zone clogging while providing proper support.
Crawl space retrofits often use the flangeless version for cross-floor runs or isolated hydrostatic spots. This version lacks the wall flange but provides the same reliable drainage performance for specific applications where wall collection isn’t needed.
Installing a Waterguard Drainage Channel Step-by-Step
Installing a waterguard drainage channel requires careful planning and execution, but the process is straightforward when broken down into manageable steps. The key is proper trench preparation, accurate channel placement, and professional-quality concrete restoration.
The installation begins with marking the channel route around your basement perimeter. This layout should follow the wall-floor joint and slope toward your sump pump location. Proper slope is critical – even a slight uphill section can cause water to back up and create problems.
Trench preparation involves cutting through your concrete floor to expose the foundation footer. This step requires specialized equipment and creates significant dust and debris. The trench must be sized correctly to accommodate the channel, pea gravel bed, and surrounding concrete.
Basement Conversion Waterguard Drainage Channel Basement Installation
DIY vs. Professional Installation: What to Consider
The skill level required for Waterguard installation is substantial. You’ll need experience with concrete cutting, excavation, plumbing connections, and concrete finishing. Most homeowners find the project beyond their comfort zone, especially considering the potential for costly mistakes.
Tool requirements include a concrete saw, jackhammer, excavation tools, and concrete mixing equipment. Renting these tools can be expensive, and using them safely requires experience. Professional contractors already own this equipment and know how to use it efficiently.
Local building codes may require permits and inspections for basement drainage work. Professional installers understand these requirements and can ensure your installation meets all applicable standards. This compliance is important for insurance coverage and future home sales.
Time commitment for DIY installation typically ranges from several days to weeks, depending on basement size and complexity. Professional installation usually takes 1-2 days, minimizing disruption to your home. The time savings alone often justifies professional installation.
Safety considerations include dust exposure, heavy lifting, and power tool operation. Concrete cutting creates silica dust that requires proper respiratory protection. Professional installers have the safety equipment and training to manage these hazards effectively.

Detailed Installation Steps
Floor cutting begins with marking the channel route and setting up dust containment. The concrete saw cuts through the floor along the marked lines, creating a trench approximately 125mm wide by 100mm deep. This trench exposes the foundation footer where the channel will sit.
Footer exposure requires careful excavation to avoid damaging the foundation. The goal is to create a clean, level surface on top of the footer where the channel will rest. Any debris or loose material must be removed to ensure proper channel support.
Channel assembly involves connecting individual sections with jointing tape or mechanical clips. The assembled channel must maintain proper slope toward the drain outlet. Dry-fitting the entire system before final installation helps identify and resolve any issues.
Sump connection requires installing the drain outlet and connecting it to your sump pump system. This connection must be watertight and properly sloped. The outlet should be positioned to allow easy access for future maintenance.
Wall weep holes are drilled in block foundations to allow trapped water to escape into the channel. These holes should be positioned just above the channel flange and angled slightly downward. Poured concrete walls typically don’t require weep holes.
Concrete patching restores your floor to its original condition. The channel is surrounded with concrete, leaving only the wall flange visible. Proper concrete mixing and finishing techniques ensure a durable, attractive repair that blends with the existing floor.
Aftercare: Maintenance, Troubleshooting & Long-Term Performance
Proper maintenance ensures your Waterguard system provides decades of reliable service. The good news is that maintenance requirements are minimal compared to other drainage systems. Regular inspections and occasional cleaning are usually sufficient to keep everything working properly.
The flush ports (inspection ports) should be checked annually to ensure they’re clean and accessible. These ports allow you to inspect the channel interior and flush out any debris that might accumulate over time. Most homeowners can perform this basic maintenance themselves.
Annual inspection should include checking the sump pump operation, inspecting visible portions of the channel, and testing the system during heavy rain. Look for any signs of water backup, unusual odors, or changes in system performance. Early detection of problems prevents major issues.
Debris removal is rarely necessary with Waterguard due to its above-footer design, but occasional flushing through the inspection ports helps maintain peak performance. A garden hose can be used to flush the system and verify proper drainage flow.
The 20-year clog warranty provides peace of mind, but proper maintenance helps ensure you never need to use it. This warranty coverage is unique in the drainage industry and reflects the confidence manufacturers have in the system’s design.
More info about French Drain Inside Basement
Common Issues & Quick Fixes
Airlock gurgling can occur when air gets trapped in the channel system. This usually resolves itself as the system operates, but persistent gurgling may indicate a blockage or improper slope. Flushing the system through inspection ports often resolves this issue.
Port blockage is rare but can happen if debris enters through damaged inspection port covers. Removing the cover and clearing the blockage usually restores normal operation. Ensure port covers are properly sealed to prevent future problems.
Pump failure is the most common system issue, but it’s related to the sump pump rather than the Waterguard channel. Regular pump maintenance and backup power systems help prevent water damage during pump failures.
Slab shrinkage cracks can develop around the channel installation as concrete cures and settles. These hairline cracks are normal and don’t affect system performance. Larger cracks may require professional evaluation and repair.
When to Call an Expert
Persistent seepage after installation may indicate incomplete system coverage or other drainage issues. Professional evaluation can identify the source of continued water problems and recommend appropriate solutions.
Structural cracks in foundation walls or floors require immediate professional attention. These cracks may indicate foundation settlement or hydrostatic pressure issues that need expert diagnosis and repair.
Mold growth despite proper drainage suggests other moisture sources or ventilation problems. Professional mold remediation and moisture control experts can identify and address these complex issues.
Insurance claims related to water damage often require professional documentation and repair. Working with qualified contractors helps ensure proper claim processing and complete restoration.
Cost & Warranty Insights You Should Know
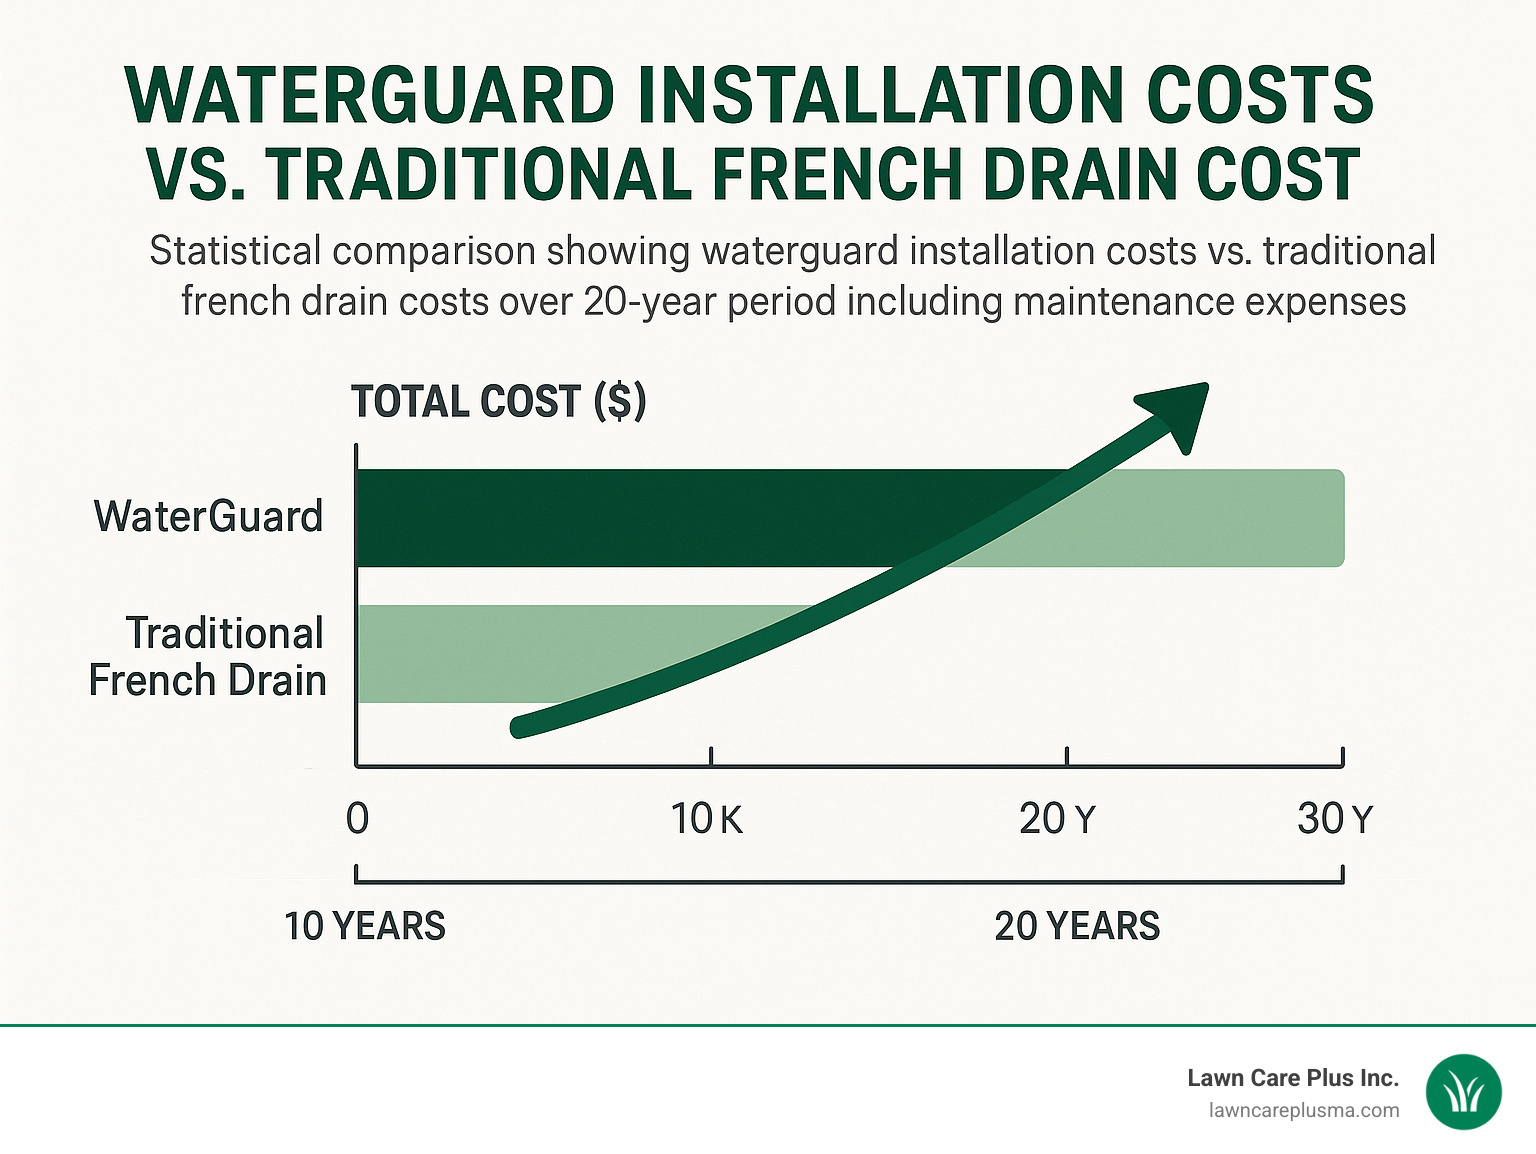
Understanding the investment required for Waterguard installation helps you budget appropriately and compare options. Based on internet research data, average installation costs typically range from $3,000 to $12,000 for most residential basements, though costs can vary significantly based on basement size, complexity, and regional labor rates.
Several factors influence the total project cost. Basement perimeter length is the primary driver, as more linear feet means more materials and labor. Accessibility affects installation difficulty – basements with low ceilings or limited access points require more time and effort.
Regional labor rates vary considerably across different markets. Urban areas typically have higher labor costs than rural regions, but may also have more contractor competition. Getting multiple quotes helps ensure fair pricing for your specific market.
High-end installations can reach $30,000 or more for large basements with complex layouts, multiple corners, or challenging access conditions. These projects might include extensive concrete work, electrical modifications, or coordination with other basement improvements.
The lifetime transferable warranty adds significant value to your investment. This warranty protection transfers to future homeowners, making your property more attractive to buyers. The warranty coverage includes both the channel system and installation workmanship.
Value vs. Traditional French Drains
Traditional French drains require exterior excavation around your foundation, which can cost $10,000 to $25,000 or more depending on landscaping, driveways, and other obstacles. This extensive excavation disrupts your property and may require landscape restoration.
Root intrusion is a major problem with exterior French drains. Tree and shrub roots naturally grow toward water sources, gradually clogging the drain system. This clogging typically occurs within 5-10 years, requiring expensive maintenance or replacement.
Maintenance burden for exterior systems includes periodic cleaning, root removal, and eventual replacement. Interior Waterguard systems require minimal maintenance and are designed to last for decades without major service.
Resale value considerations favor interior drainage systems because they’re less visible and don’t affect landscaping or property appearance. Buyers appreciate the warranty coverage and low maintenance requirements of professionally installed Waterguard systems.
Frequently Asked Questions About the Waterguard Drainage Channel
How is a waterguard drainage channel different from a French drain?
A waterguard drainage channel installs inside your basement above the foundation footer, while traditional French drains install outside in the soil alongside or below the footer. This interior positioning prevents the clogging issues that plague exterior systems.
French drains sit in the “mud zone” where silt, debris, and roots cause blockages over time. Waterguard stays clean and accessible, providing decades of reliable performance without the maintenance headaches of exterior systems.
The installation process is also different. French drains require extensive exterior excavation that disrupts landscaping and may damage driveways or walkways. Waterguard installation is contained within your basement, minimizing property disruption.
Can I install Waterguard in a stone foundation basement?
Yes, Waterguard works effectively with stone foundations, though the installation may require additional considerations. Stone foundations often have irregular surfaces that need careful preparation to ensure proper channel placement and sealing.
The key is creating a level surface on top of the footer where the channel can sit properly. This may require some additional concrete work to level irregularities in the stone foundation. Professional installers have experience adapting the system to various foundation types.
Stone foundations may also require additional sealing around the channel installation to prevent water from bypassing the system. This extra attention to detail ensures complete water collection and system effectiveness.
What maintenance does Waterguard require each year?
Annual maintenance for Waterguard is minimal compared to other drainage systems. The primary tasks include checking inspection ports, testing sump pump operation, and visually inspecting the system during heavy rain events.
Inspection ports should be opened annually to verify the channel interior is clean and flowing properly. A flashlight allows you to see inside the channel and check for any debris accumulation. Most systems remain completely clean due to the above-footer design.
Sump pump maintenance is more critical than channel maintenance. Test your pump monthly during wet seasons, check the float switch operation, and ensure the discharge line is clear. Consider installing a backup pump system for additional protection.
The 20-year clog warranty means you shouldn’t experience blockage issues, but annual inspection helps identify any problems early. Most homeowners find the maintenance requirements much easier than caring for exterior drainage systems.
Conclusion & Next Steps
A waterguard drainage channel represents a smart investment in your home’s long-term protection and your family’s health. By choosing an interior drainage system that won’t clog or fail, you’re solving basement water problems permanently rather than just temporarily.
The key benefits – non-clogging design, hidden installation, transferable warranty, and minimal maintenance – make Waterguard superior to traditional drainage solutions. Your basement can become a dry, usable space that adds value to your home rather than being a source of ongoing problems.
At Lawn Care Plus Inc., we understand that basement water problems cause stress and concern for homeowners throughout the Boston Metro-West area. Our experienced team has helped countless families in Belmont, Newton, Brookline, and surrounding communities create dry, healthy basements with professional drainage solutions.
Taking the next step is simple – schedule a consultation to evaluate your specific situation and discuss your options. Every basement is unique, and a professional assessment ensures you get the right solution for your home’s needs.
Addressing basement water problems early prevents more serious issues like structural damage, mold growth, and indoor air quality problems. The investment in proper drainage pays dividends in home value, health protection, and peace of mind for years to come.
More info about Channel Drainage System
