Why Flagstone Patios Are the Perfect Outdoor Living Solution
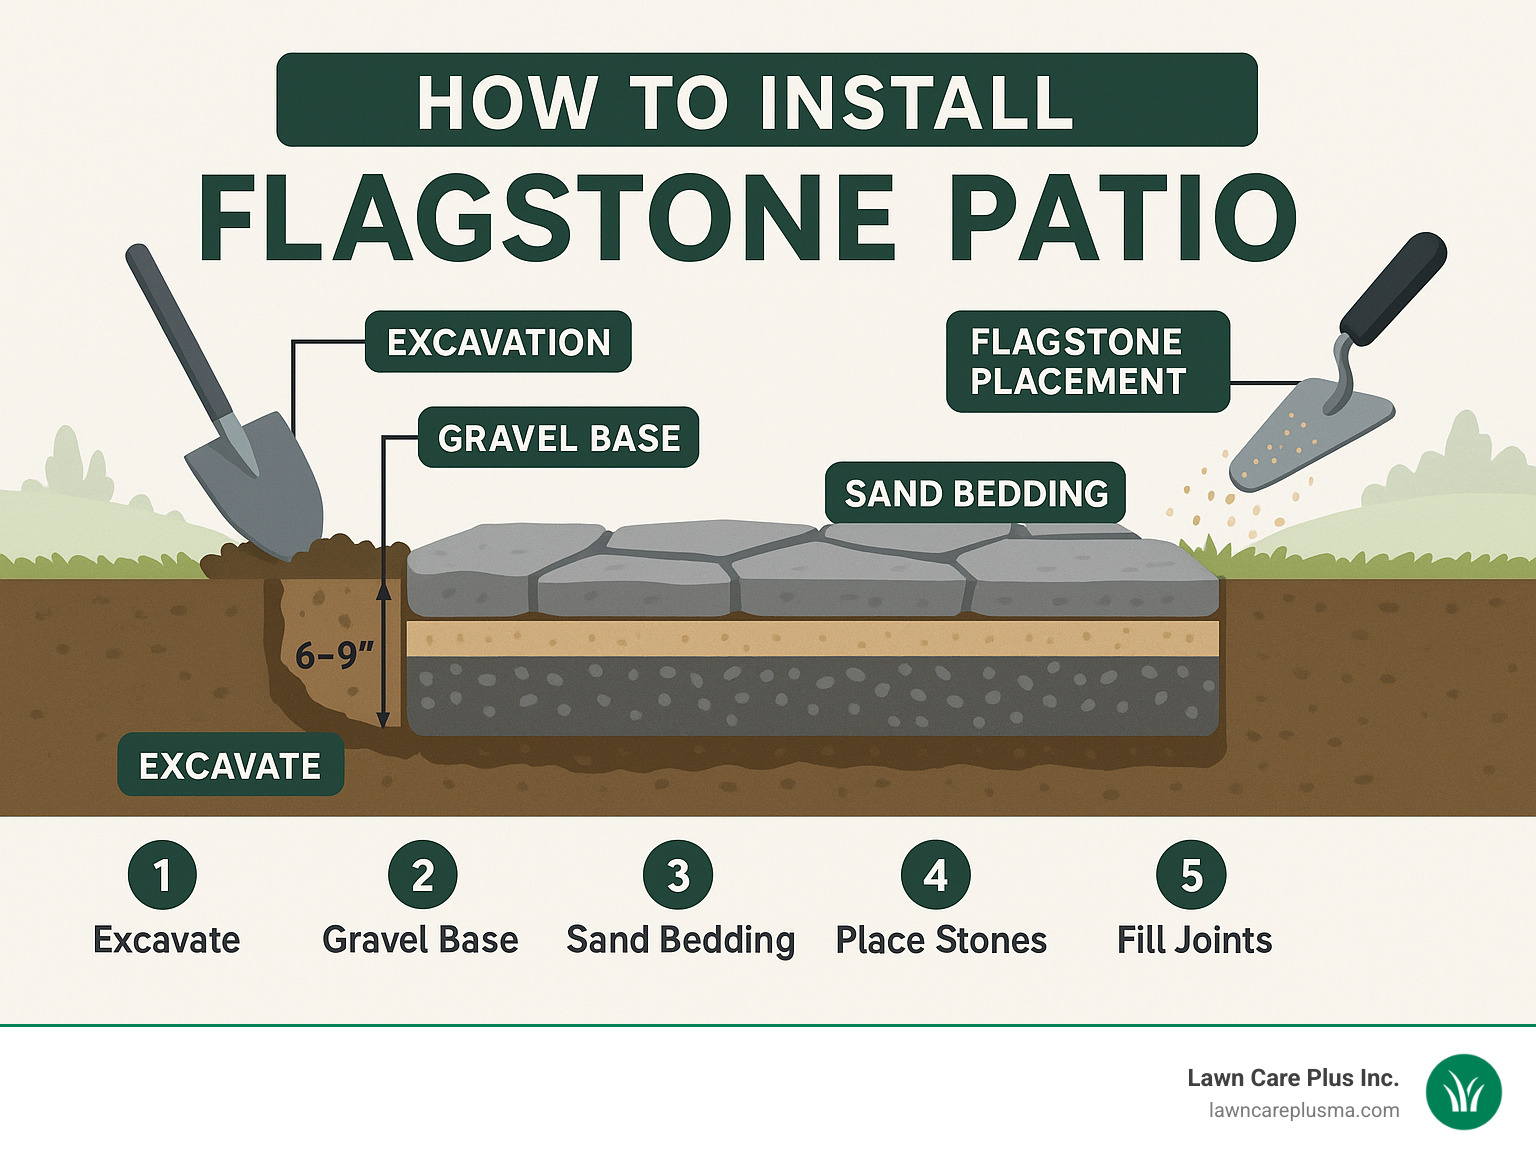
How to install flagstone patio involves excavating 6-9 inches deep, creating a compacted gravel base, adding a sand or decomposed granite layer, placing flagstones in your desired pattern, and filling joints with sand or stone dust. This natural stone option creates a durable, slip-resistant surface that can last for decades with minimal maintenance.
Quick Installation Overview:
- Plan & Mark – Layout your patio area with stakes and string
- Excavate – Dig 6-9 inches deep depending on stone thickness
- Build Base – Install 4-6 inches of compacted gravel
- Add Bedding – Spread 1-2 inches of sand or decomposed granite
- Place Stones – Arrange flagstones with consistent gaps
- Fill Joints – Sweep sand or stone dust between stones
- Settle & Clean – Mist with water and clean surface
Flagstone patios offer the perfect blend of natural beauty and practical durability. These timeless stone surfaces provide an inviting foundation for entertaining, dining, and relaxing outdoors.
Flagstone delivers several key advantages over other patio materials. The natural texture provides excellent slip resistance even when wet, making it safer than smooth concrete or tile. Each stone’s unique color and pattern creates visual interest that complements any landscape style.
Most homeowners can complete a flagstone patio installation as a rewarding DIY project. A typical 120 square foot patio takes 1-2 days to complete using the dry-laid method. The stones are forgiving to work with – if one settles unevenly, you can easily lift it and adjust the base material underneath.
The low-maintenance nature of flagstone makes it especially appealing for busy property owners. Unlike wooden decks that require regular staining or concrete that can crack and stain, properly installed flagstone patios need only occasional joint refilling and basic cleaning to look great for decades.
Must-know how to install flagstone patio terms:
– patio construction
– outdoor patios
– patio designers near me
Benefits & Types of Flagstone
When you’re learning how to install flagstone patio surfaces, understanding the material itself makes all the difference in creating an outdoor space that truly stands the test of time.
Flagstone delivers exceptional longevity that puts other patio materials to shame. When properly installed, these natural stone surfaces can last for several decades with only occasional re-leveling needed. The secret lies in flagstone’s incredible durability – it handles heavy furniture, high foot traffic, and Mother Nature’s worst weather without breaking a sweat.
The slip resistance alone makes flagstone a smart choice for families. Unlike smooth concrete or tile that becomes treacherous when wet, flagstone’s naturally rough surface provides excellent traction even during rainstorms.
Individual stone replacement offers a huge advantage over other patio materials. If one stone cracks (which rarely happens), you can simply lift it out and drop in a replacement without disturbing the surrounding area. Try doing that with a concrete slab!
The timeless appeal of flagstone never goes out of style. Natural variations in color and texture complement any landscape design, from rustic country gardens to modern minimalist spaces.
Choosing the right flagstone type depends on your climate, budget, and aesthetic preferences. Sandstone offers warm earth tones ranging from buff to reddish-brown, and it’s relatively soft and easy to cut – perfect for DIY enthusiasts. Pennsylvania bluestone, a popular sandstone variety, provides exceptional durability with beautiful blue-gray to brownish hues.
Slate delivers rich, dramatic colors from deep grays to purples and greens. Its fine grain creates smooth surfaces, though it can be slightly more slippery when wet than rougher stone types. Limestone provides neutral colors from cream to gray and works beautifully in most settings, though it benefits from sealing in harsh winter climates due to its naturally porous nature.
For the ultimate in durability, quartzite offers the hardest option with sparkling mineral content that catches sunlight beautifully. Colors range from white to gold to reddish tones.
Thickness matters significantly for long-term success. Select flagstones at least 1.5 to 2 inches thick to prevent cracking under normal foot traffic. If you’re planning to place heavy furniture or live in an area with severe freeze-thaw cycles, go with stones that are 2+ inches thick.
When planning your material needs, a ton of flagstone typically covers approximately 120 square feet of patio surface. This coverage varies based on stone thickness and how wide you make the joints between stones.
For material sourcing, you can explore options at Stone Pavers Stone Pavers. Home Depot. to see what’s available locally. If you’d prefer professional installation throughout the Boston Metro-West area, our team offers comprehensive Flagstone Patio Installation services.
Planning & Design for Your Patio
Before you start digging, take time to plan your flagstone patio properly. A few hours of planning now will save you days of headaches later.
Site selection sets the foundation for success. You’ll want your patio close enough to your house for convenient access, but not so close that water drains toward your foundation. Consider how the sun moves across your yard throughout the day.
Call 811 before you dig anything. This free utility marking service can take several days to respond, so make this your first step. Hitting a gas line or electrical cable while digging isn’t just expensive – it’s dangerous.
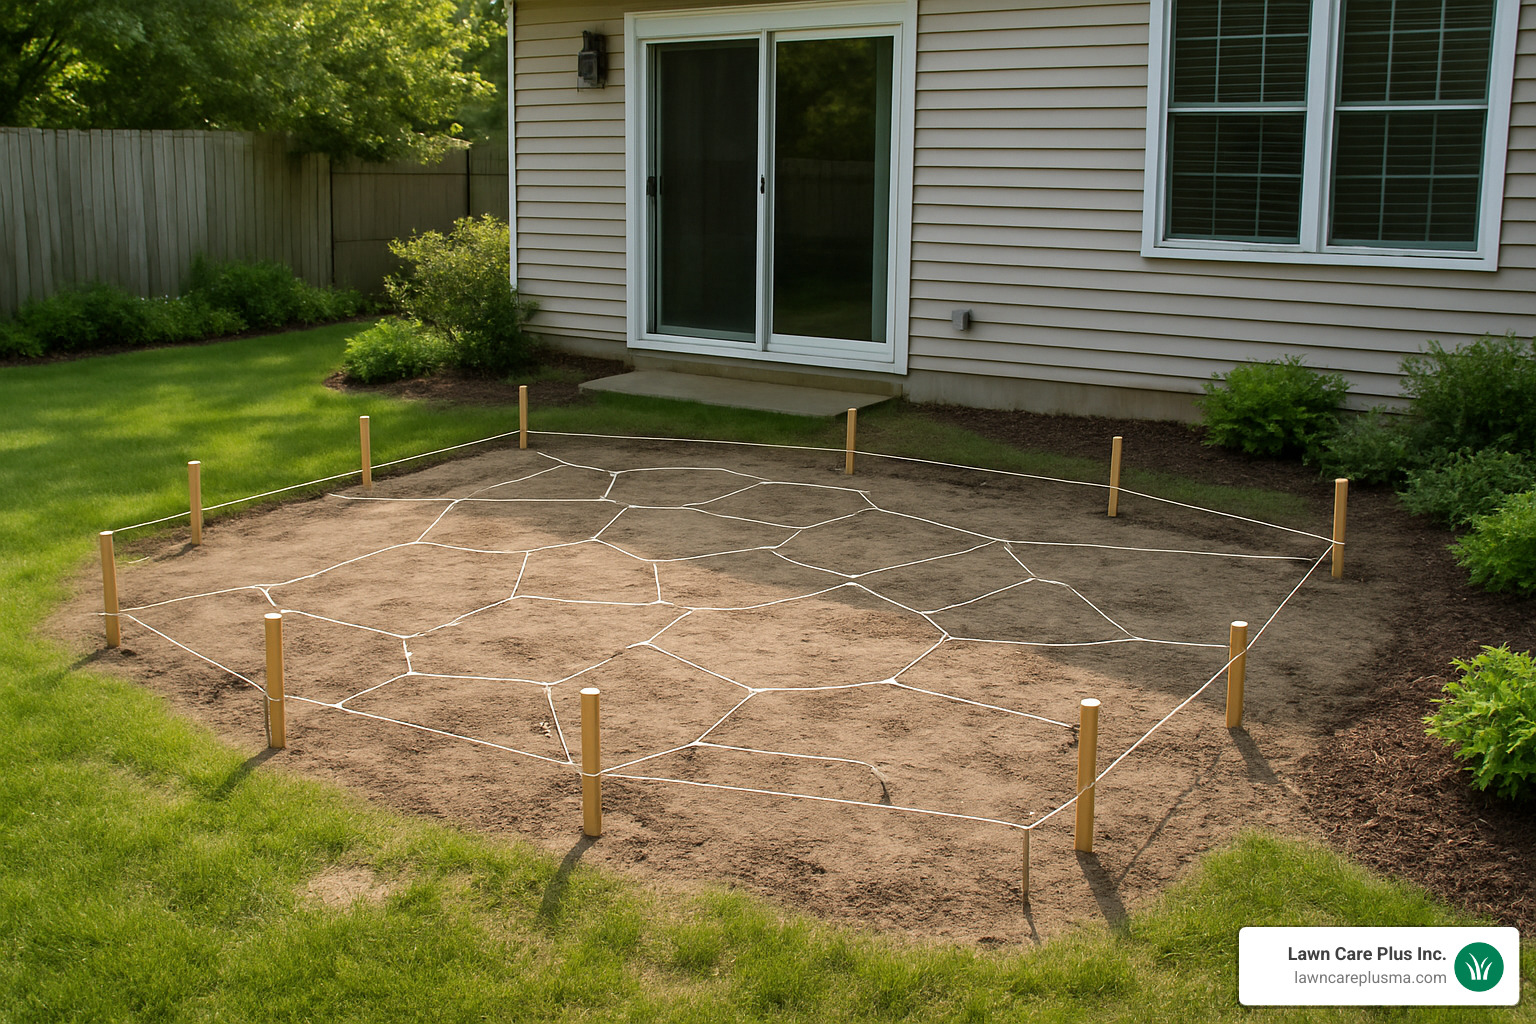
Once utilities are marked, grab some wooden stakes and mason’s line to mark your patio boundaries. This simple step helps you visualize the final size and make adjustments before you’ve committed to digging.
Calculate your square footage by measuring length times width for rectangular patios. For curved or irregular shapes, break the area into smaller rectangles and add them together. Order about 10% extra stone – you’ll need it for cuts and inevitable breakage.
Drainage slope is critical. Your patio needs to slope away from your house at about 1 inch for every 4 feet of distance. Use a line level on your layout strings to check this slope. Water that pools on your patio will eventually find its way under the stones, causing settling and frost damage.
Excavation depth depends on your climate and soil conditions. Plan for 6-9 inches total depth – that’s 4-6 inches for your compacted gravel base, 1-2 inches for sand or decomposed granite bedding, plus the thickness of your stones. In Massachusetts and other freeze-prone areas, go deeper (8-9 inches) and add weed barrier fabric between the soil and gravel to prevent frost heave.
You’ll need the right tools for how to install flagstone patio successfully. A flat-nose shovel and spade shovel handle the digging, while a wheelbarrow moves materials efficiently. Rent a plate compactor if you’re doing more than a small patio. A 4-foot level, line level, measuring tape, and rubber mallet are essential for getting stones level and properly positioned.
Safety planning matters more than you might think. Flagstones are deceptively heavy – a 2-inch thick stone covering just 4 square feet can weigh 80 pounds. Plan your lifting technique, wear proper safety glasses and gloves, and don’t be too proud to ask for help moving the big pieces.
For more design inspiration custom to smaller spaces, check out our Patio Design Ideas for Small Backyards guide.
How to Install Flagstone Patio: Dry-Laid Method
The dry-laid approach to how to install flagstone patio projects is popular because it is forgiving, quick, and DIY-friendly. Stones rest on a compacted gravel and bedding layer—no concrete, no mortar—so if a piece sits unevenly you simply lift, adjust, and reset.
| Aspect | Dry-Laid Method | Mortared Method |
|---|---|---|
| Skill Level | Beginner–Intermediate | Advanced/Professional |
| Install Time* | 1–2 days (120 sq ft) | 3–4 days plus curing |
| Base | Gravel + sand/DG | Concrete slab preferred |
| Flexibility | Moves with freeze-thaw | Rigid—can crack |
| Repair Ease | Lift individual stones | Chisel & re-mortar |
| Avg. DIY Cost* | $855–$2,200 | $2,500–$7,500 |
*Average internet data, not actual Lawn Care Plus Inc. pricing.
Key Materials
- Gravel (2A modified/road base): 4-6 inches, compacted in two lifts.
- Decomposed granite or stone dust: 1-2 inches as bedding. Avoid fine play sand—it washes away and invites ants.
For more detail, see A Dry-Set Flagstone Patio Is DIY-Friendly and our Beginner’s Guide to Installing a Patio.
Step-by-Step Dry-Laid Process
- Mark & Measure – Stake corners, run mason’s line, confirm square by matching diagonals.
- Excavate – Dig 6-9 in. deep, removing all roots and organic matter.
- Compact Subgrade – Tamp soil until firm; rent a plate compactor for patios over 100 sq ft.
- Install Gravel Base – Spread 2-3 in., compact; repeat to reach total depth.
- Add Bedding Layer – Screed 1-2 in. of decomposed granite or stone dust level.
- Lay Stones – Start with larger perimeter pieces; maintain 3/8–1/2 in. gaps; tap level with a rubber mallet.
- Cut as Needed – Score with an angle grinder and diamond blade; always wear eye, ear, and dust protection.
- Fill Joints – Sweep stone dust, DG, or polymeric sand into gaps and compact lightly.
- Mist & Clean – Lightly water to settle filler, then brush off residue. Your patio is ready for use.
Mortared Flagstone Patio Installation
The mortared approach to how to install flagstone patio creates a rock-solid, permanent surface that’s perfect when you want that polished, upscale look. Think of it as the “dress shirt and tie” version of patio installation – more formal, more refined, but definitely requiring more skill to pull off properly.
Unlike the forgiving dry-laid method where you can easily pop up a stone and make adjustments, mortared installation is pretty much a “one shot, get it right” situation. Once that mortar sets, you’re committed. But when done correctly, you’ll have a patio that looks absolutely stunning and requires virtually no maintenance for decades.
The wet-set method works best when you’re building over an existing concrete slab or planning to pour a new 4-inch reinforced concrete base. This solid foundation prevents the inevitable settling that would crack mortar joints over time.
Type S or Type M mortar provides the strength needed for flagstone work. Type S offers excellent lateral strength and works well for most residential projects, while Type M delivers higher compressive strength for heavy-duty applications.
Based on average internet data, professional mortared installations typically range from $2,500-$7,500 for a standard patio, though costs can vary dramatically based on stone selection, pattern complexity, and regional factors. The higher labor skill requirements and longer installation timeline contribute to these increased costs compared to dry-laid methods.
For those considering professional installation, quality paver sealant application after curing helps protect the investment. Our team at Lawn Care Plus Inc. offers comprehensive Patio Installation Service throughout the Boston Metro-West area.
Step-by-Step Mortared Process for how to install flagstone patio
Preparing your concrete slab foundation sets the stage for everything that follows. The surface needs to be clean, stable, and properly sloped for drainage – typically that same 1-inch drop per 4 feet we discussed earlier.
Mixing mortar correctly makes the difference between a professional-looking job and a disaster. Follow the manufacturer’s ratios precisely and only mix what you can use within 30 minutes.
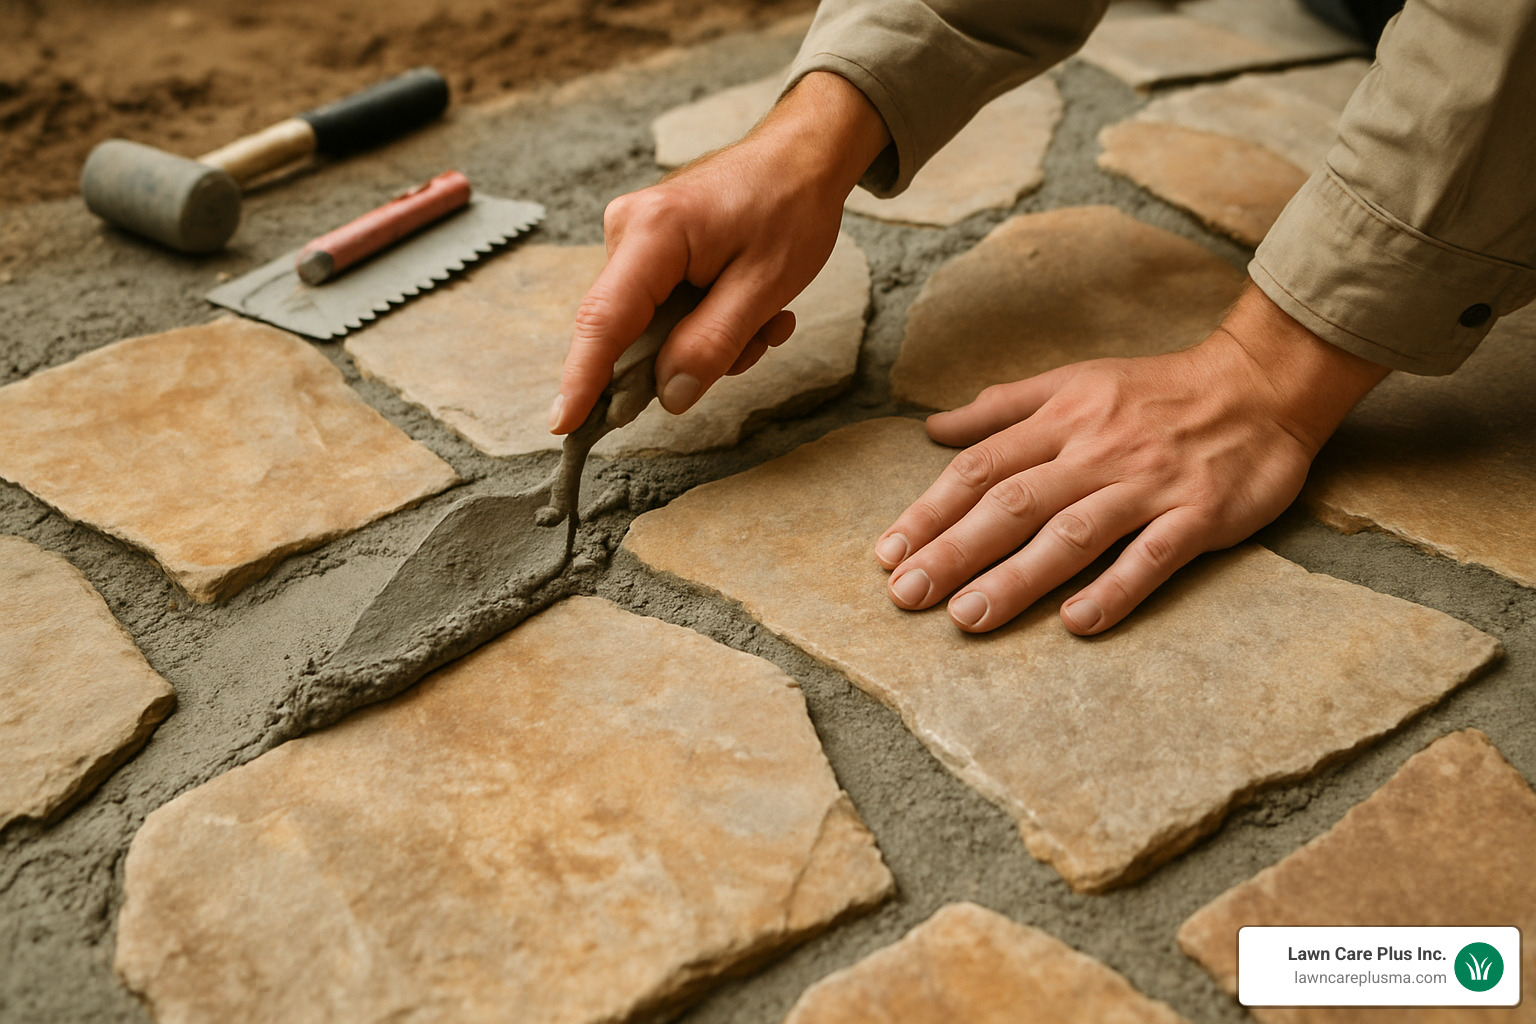
The mortar bed application requires working in manageable sections to prevent the surface from skinning over. Spread about 1/2 inch of mortar using a notched trowel, maintaining consistent thickness across your work area.
Setting and leveling each stone demands immediate attention to detail. Press stones firmly into the mortar bed with a slight twisting motion to eliminate air pockets. Use your rubber mallet for final positioning, checking level frequently.
Cleaning excess mortar from stone surfaces must happen immediately – waiting even 15 minutes can make this job much harder. Use a damp sponge to wipe stone faces clean.
Joint tooling happens after the mortar firms up but before it fully sets – usually 30-60 minutes after installation. Use a pointing trowel to create consistent joint profiles that are slightly recessed below the stone surface.
The curing and protection phase requires patience. Cover completed sections with plastic sheeting or damp burlap to keep the mortar moist during the critical first 24-48 hours.
Joint Options, Maintenance & Costs
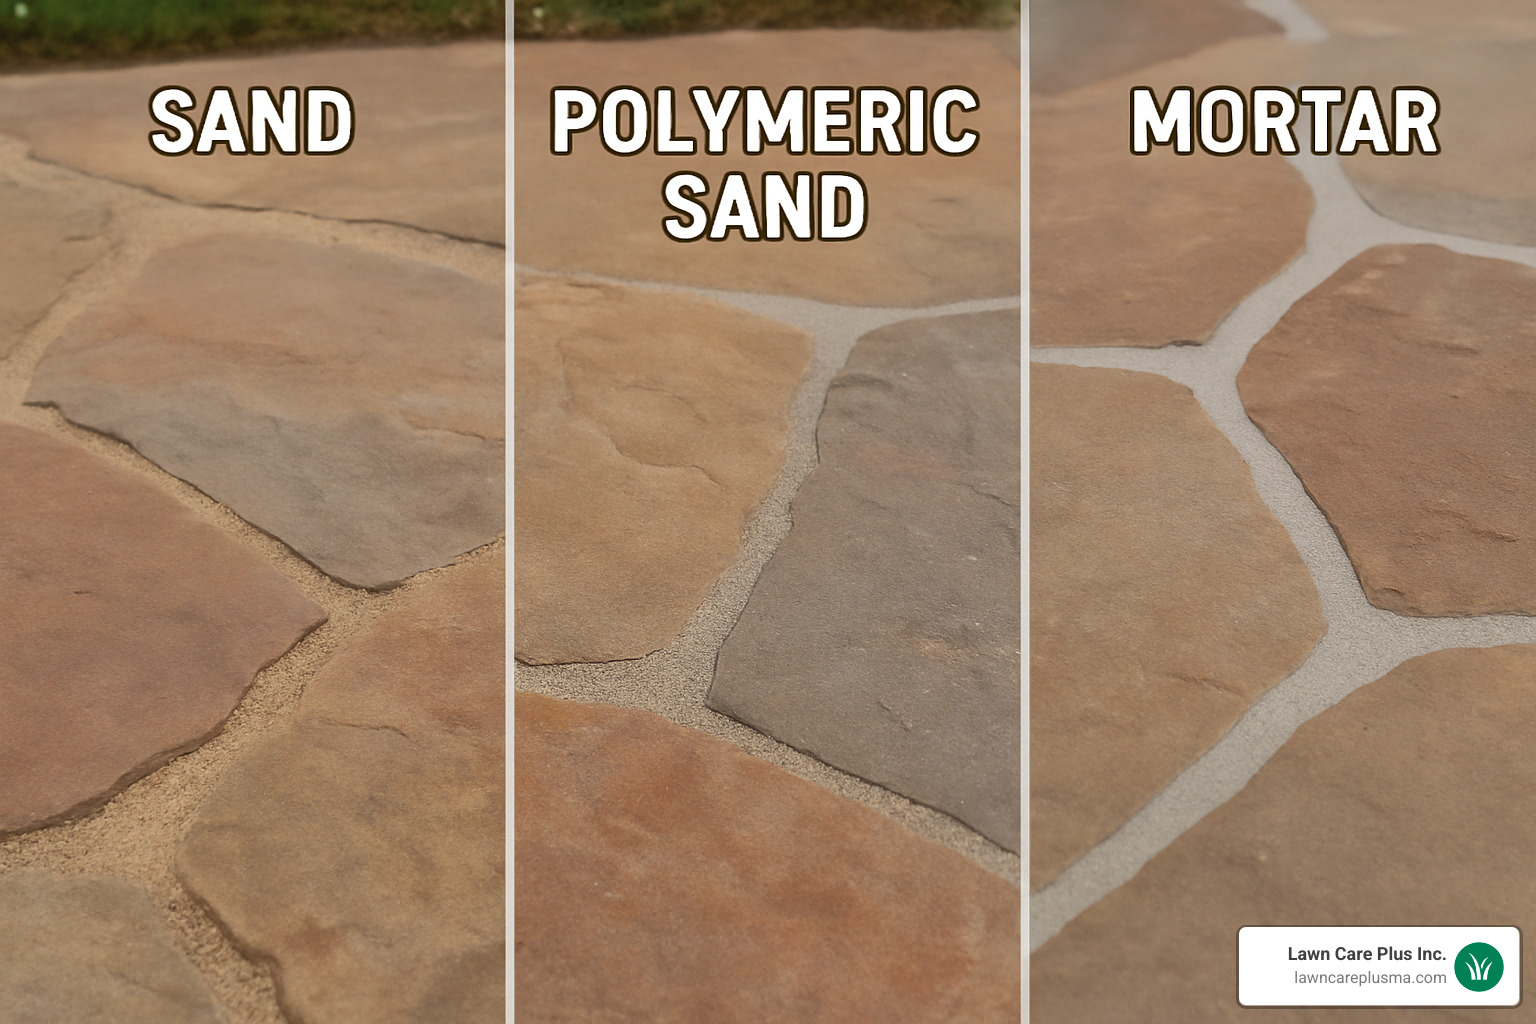
The material you sweep between stones determines appearance, drainage, and long-term upkeep.
- Stone dust/screenings – Most common for New England. Compacts well, drains, and discourages weeds. Top up every year or two.
- Polymeric sand – Adds adhesive polymers for a near-permanent joint and excellent weed control. Harder to remove if you ever need to lift a stone.
- Regular sand – Budget-friendly and easy to install, but washes out faster. Skip ultra-fine play sand.
- Pea gravel or small decorative rock – Great drainage and unique texture; rarely needs replacement.
- Living joints (soil + groundcover) – Plant creeping thyme, moss, or sedum for a cottage-garden effect; requires gardening attention.
- Mortar joints – Formal look but vulnerable to freeze-thaw cracking in Massachusetts.
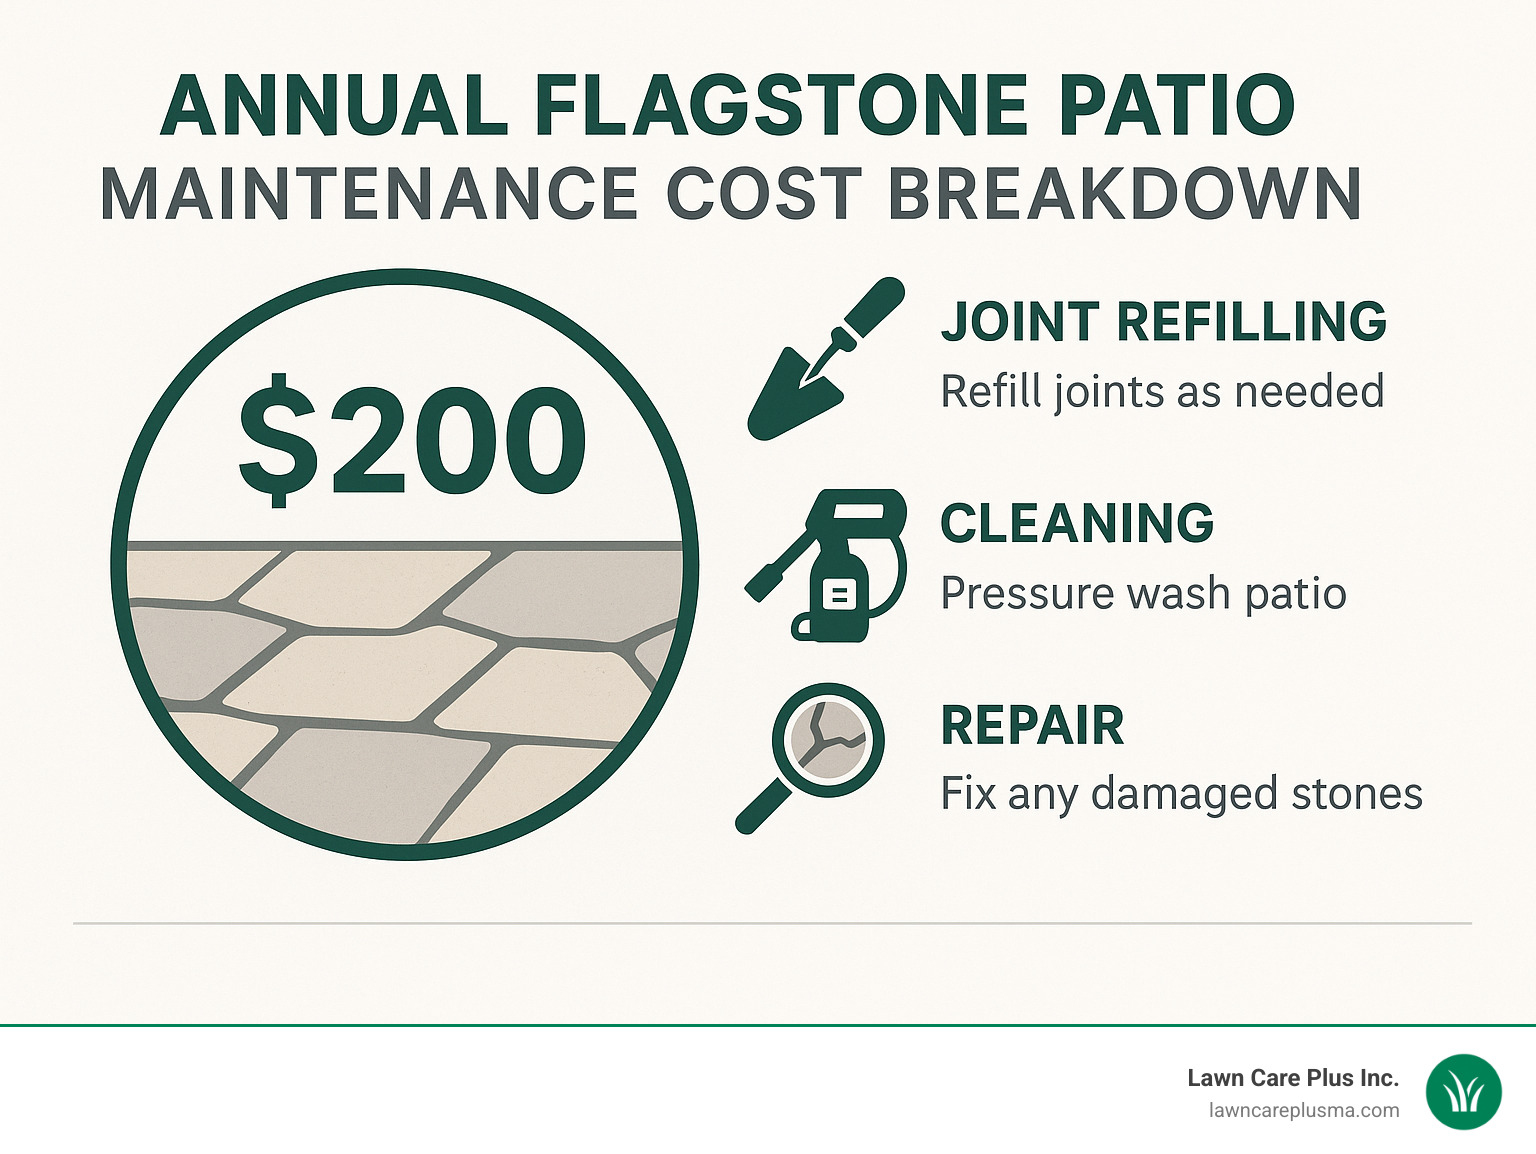
Easy Maintenance Routine
- Monthly sweep to remove debris and spot loose stones.
- Spring check-up – Refill low joints, re-level any shifted stones.
- Occasional rinse – Low-pressure wash to remove grime; avoid blasting joint filler.
- Leaf removal in fall to prevent stains.
Most homeowners spend $50–$200 per year on sand or stone dust—far less than staining a deck or repairing cracked concrete.
Based on average internet data, full professional flagstone patio installation ranges $2,500–$15,000, depending on stone choice, size, and pattern complexity. DIY material costs typically fall between $855–$6,600. These are averages only and not actual Lawn Care Plus Inc. pricing.
Common Mistakes & Climate Tips
We regularly help Boston Metro-West homeowners correct early missteps. Avoid these to keep your how to install flagstone patio project on track.
- Shallow excavation – Dig 8-9 inches in Massachusetts to beat frost heave.
- Skipping compaction – Loose soil and gravel settle later. Tamp each layer thoroughly.
- Wrong base material – Use angular, compactible gravel (2A modified/road base), never fine sand or topsoil.
- Insufficient slope – Pitch patio 1 in. per 4 ft. away from foundations to prevent puddles that freeze.
- No edge restraint – Metal edging, concrete curbing, or large border stones stop outward creep.
- Ignoring safety – Call 811 before digging, lift with your legs, wear eye/ear protection when cutting.
Massachusetts-Specific Advice
- Geotextile fabric between soil and gravel blocks upward soil movement during freeze-thaw.
- Clay soils hold water; excavate an extra 2-3 inches or add a French drain if your yard stays soggy.
- Best installation window – Late spring to early fall when ground is neither frozen nor saturated.
Need backup? Our crew at How to Install Patio Pavers has the local experience to handle tricky soil or drainage situations.
Frequently Asked Questions about Flagstone Patios
Can I install flagstone over an existing concrete slab?
Absolutely! Installing flagstone over existing concrete is actually one of the smartest shortcuts for how to install flagstone patio projects. If you already have a concrete patio that’s structurally sound, you can skip all that back-breaking excavation work.
Your concrete needs to meet a few basic requirements before it can serve as a flagstone base. The slab should be free of major cracks, settling, or structural damage. Clean off any oil stains, old paint, or other contaminants that might prevent proper adhesion. Most importantly, check that water drains away from your house.
You have several installation options when working over concrete. The mortared method involves applying a half-inch mortar bed directly to the concrete and setting your stones in place. For a dry-set approach, spread 1-2 inches of sand or decomposed granite over the concrete, then place your flagstones normally.
How thick should each flagstone be to avoid cracking?
Stone thickness makes a huge difference in how long your patio will last, especially here in New England where we get those brutal freeze-thaw cycles. Choose flagstones at least 1.5 to 2 inches thick for typical residential patios that handle normal foot traffic and patio furniture.
Thicker stones cost more upfront but save money long-term through reduced maintenance and replacement needs. A 2-inch thick stone might cost 30-50% more than a 1.5-inch stone, but it could easily last twice as long in challenging conditions.
Heavy-duty applications require 2+ inch thickness – think areas supporting hot tubs, outdoor kitchens, or that massive dining set you’ve been eyeing. These thicker stones resist point loads and impact damage much better than thinner options.
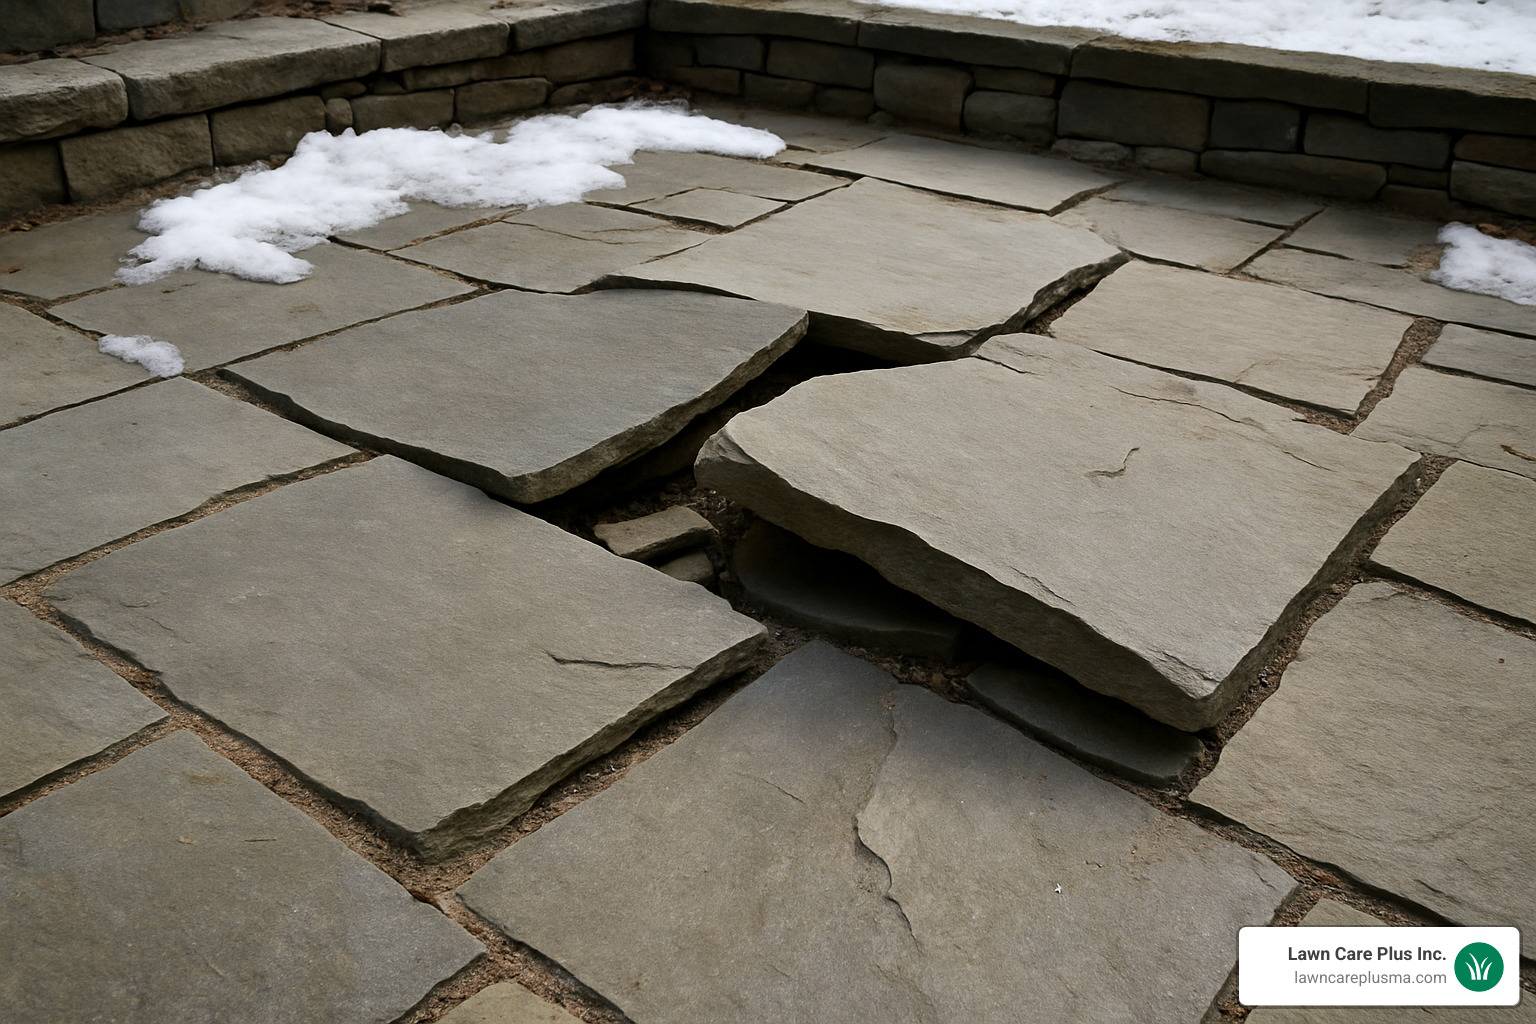
How do I repair a sunken or loose flagstone?
Here’s where dry-laid flagstone really shines – individual stone repairs are surprisingly simple and don’t require disturbing the rest of your patio. Unlike concrete that cracks and needs major patches, you can fix problem flagstones in about an hour with basic tools.
The repair process is straightforward but requires some muscle. Start by removing joint filler from around the problem stone using a stiff brush or shop vacuum. Lift the stone carefully – get help for large pieces since they’re heavier than they look. Check what’s happening underneath – you’ll usually find that base material has washed away or settled, creating a void.
Fill any low spots with decomposed granite or stone dust, then compact and level the material so it matches the surrounding base height. Reset your stone, tap it level with a rubber mallet, and sweep joint filler back into the gaps. A light misting helps everything settle properly.
Conclusion
Congratulations! You’ve now learned everything you need to know about how to install flagstone patio projects from start to finish. Whether you’re dreaming of morning coffee on natural stone or hosting evening gatherings under the stars, a flagstone patio creates the perfect foundation for outdoor memories.
The beauty of flagstone installation lies in its forgiving nature – especially with the dry-laid method we’ve covered. Unlike concrete pours that must be perfect the first time, flagstone allows you to adjust, level, and even completely redo sections without starting over. This flexibility makes it an ideal choice for first-time DIY hardscaping projects.
Your path to success starts with thorough planning and patient base preparation. The foundation you can’t see determines whether your patio will look great for decades or develop problems within a few years. Take time with excavation, don’t skimp on base materials, and compact each layer properly.
The dry-laid versus mortared decision often comes down to your skill level and local climate. Most Massachusetts homeowners find excellent results with dry-laid installation, which handles our freeze-thaw cycles better than rigid mortared joints.
Choosing the right stone thickness and type makes a huge difference in long-term satisfaction. Those extra dollars spent on 2-inch thick stones instead of 1.5-inch pieces often pay for themselves in reduced maintenance and replacement costs.
Don’t underestimate the importance of proper drainage in our New England climate. That 1/8-inch per foot slope might seem minimal, but it prevents the ice damage that destroys beautiful patios every winter.
The maintenance reality is simpler than most people expect. Annual joint refilling, occasional stone releveling, and basic cleaning represent the extent of most flagstone patio care. Compare that to wooden decks requiring staining every few years or concrete that cracks and stains permanently.
If you’re feeling overwhelmed by the scope of excavation, base preparation, or stone handling, that’s completely normal. Many homeowners successfully tackle flagstone installation as a weekend project, but there’s no shame in calling professionals for the heavy lifting or technical aspects.
At Lawn Care Plus Inc., we’ve guided countless families through their flagstone patio dreams throughout the Boston Metro-West area. Whether you need complete installation services or just want expert consultation for your DIY project, we understand the unique challenges of Massachusetts soil, climate, and regulations.
Your new flagstone patio represents more than just another home improvement project – it’s an investment in your family’s outdoor lifestyle that will provide enjoyment for generations.
Ready to get started? Check out our comprehensive More info about patio builders resources for professional guidance, or dive into your DIY project with confidence knowing you have all the knowledge needed for success.
