Refresh Your Yard: The Importance of Spring Cleanup
Spring cleanup is the essential process of preparing your yard for the growing season by removing winter debris, pruning dead growth, and rejuvenating your lawn and garden beds.
Quick Answer: What is spring cleanup?
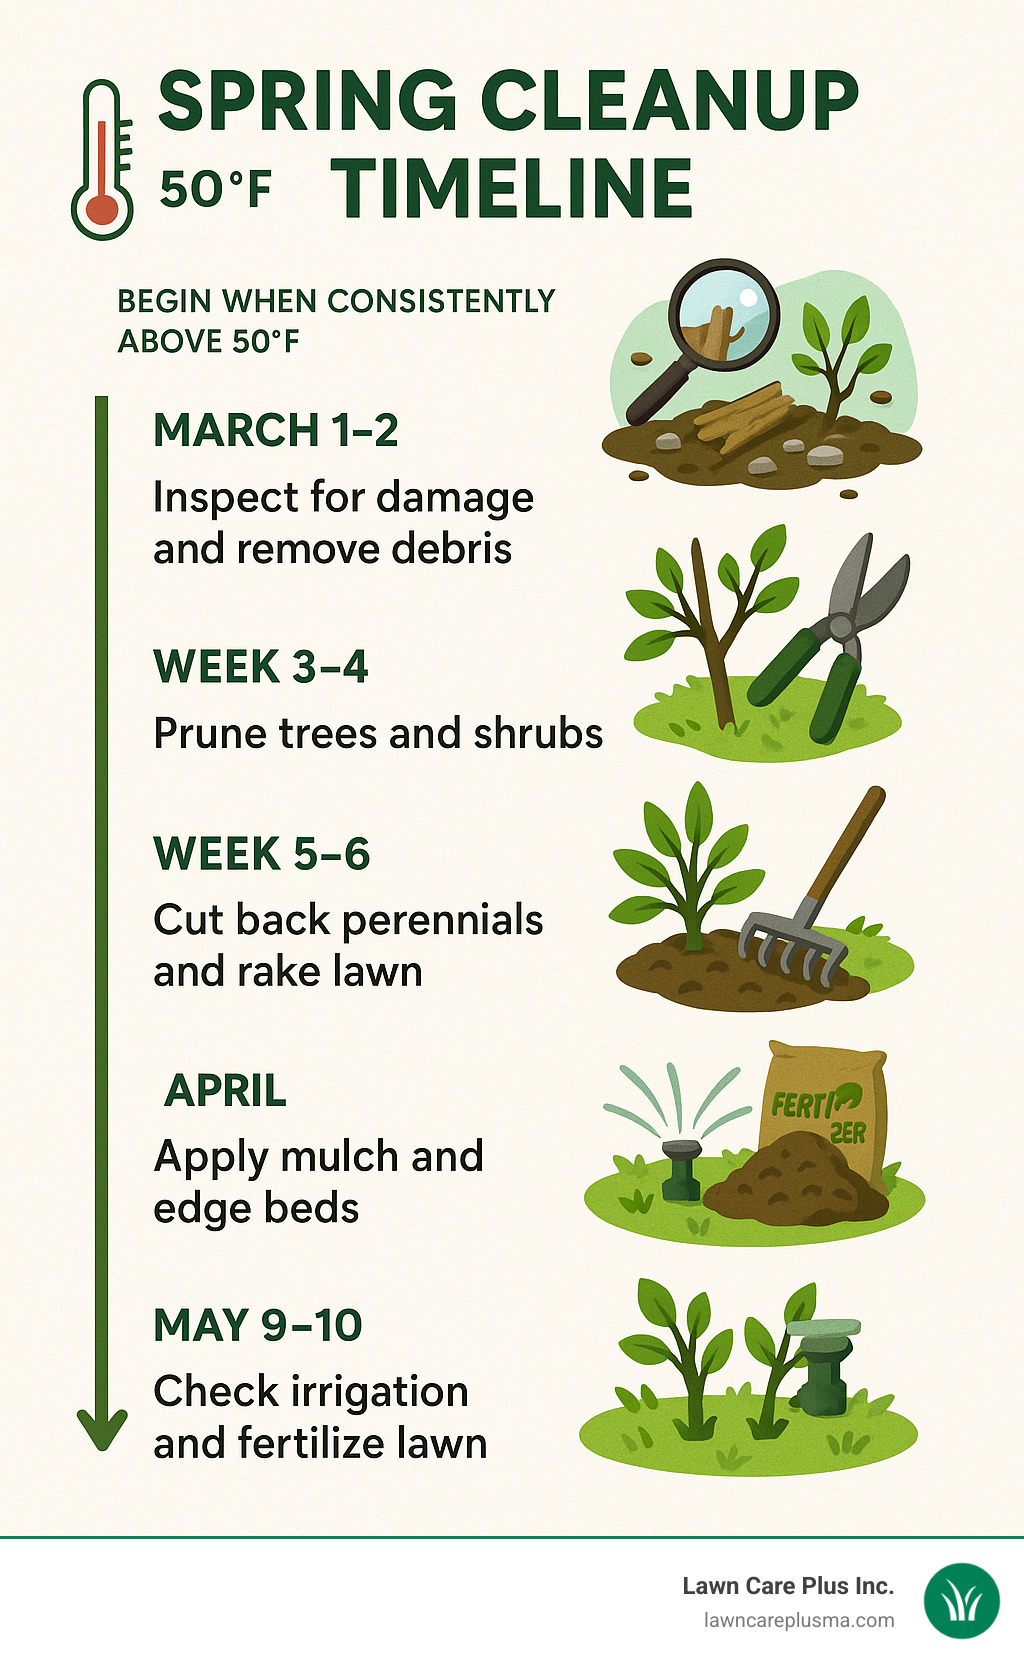
Spring cleanup involves removing winter debris, pruning damaged branches, cutting back perennials, raking and dethatching lawns, edging beds, applying mulch, checking irrigation systems, and preparing garden beds for new growth. Ideally, start when temperatures consistently stay above 50°F for several days.
After being cooped up all winter, many homeowners feel that irresistible urge to get outside and tackle yard work as soon as the first warm day arrives. But timing and proper technique matter for an effective spring cleanup.
Spring cleanup does more than just improve your property’s appearance—it prevents pest infestations, reduces disease risk, promotes healthy growth, and can even protect beneficial pollinators when done correctly.
The key to successful spring cleanup is waiting until temperatures consistently exceed 50°F for several days. This protects overwintering pollinators while ensuring the soil is workable and plants are ready for care.
“Spring is a time of growth and change. It’s also the perfect opportunity to tidy up your property after the long winter and ensure your yard is healthy and beautiful,” as landscape professionals often note.
Unlike fall cleanup which focuses on preparing for winter dormancy, spring cleanup sets the stage for the entire growing season ahead. With the right approach, you’ll not only improve your yard’s immediate appearance but also its long-term health.
Spring cleanup word guide:
– spring yard clean up checklist
– spring yard clean up safety tips
– spring yard clean up ideas
Spring Yard Cleanup 101: What It Is and Why It Matters
Spring cleanup isn’t just about making your yard look pretty—it’s a vital process that breathes new life into your landscape after winter’s harsh accept. Think of it as a wellness checkup for your outdoor space, setting the stage for a healthy growing season ahead.
When we talk about spring cleanup, we’re referring to that comprehensive process of removing winter debris, pruning damaged branches, preparing soil, and essentially giving your yard the fresh start it deserves. It’s like hitting the reset button on your landscape.
Your lawn and garden benefit in countless ways when you tackle this seasonal task properly. A thorough cleanup improves your lawn health by removing suffocating thatch and debris that prevent air, water, and nutrients from reaching grass roots. Plus, let’s be honest—a well-maintained yard dramatically boosts your home’s curb appeal, making neighbors wonder what your landscaping secret might be!
Beyond appearances, proper spring maintenance provides critical erosion control during those heavy spring rains. It also eliminates hiding spots for unwanted pests and removes potentially infected plant material that could spread disease throughout your garden. When timed correctly, your cleanup efforts can even support local pollinators who need our help more than ever.

Environmental & Health Benefits
Your spring yard efforts do more than just tidy up the place—they actually support the entire local ecosystem. When you clean up properly, you’re promoting improved soil biology by creating conditions where beneficial microorganisms can thrive.
Smart cleanup practices also encourage natural nutrient cycling. Instead of bagging and trashing all your yard waste, composting returns valuable nutrients to your soil. This creates a beautiful cycle that reduces your need for synthetic fertilizers and promotes a reduced chemical dependency in your landscape.
Perhaps most importantly, timing your cleanup with nature’s calendar protects our essential pollinator friends. According to research from the Xerces Society, many native bees, butterflies and other beneficial insects actually overwinter in leaf litter and hollow plant stems. If you clean up too early—before temperatures consistently hit 50°F—you might accidentally destroy these creatures before they wake up for spring.
As one gardening expert wisely put it: “That first warm day might tempt you to clean everything up immediately, but waiting just a little longer could make all the difference for your local pollinator population.”
Risks of Skipping Spring Cleanup
We all get busy, but neglecting your spring cleanup can lead to a cascade of problems that haunt your landscape all season long.
That cozy layer of dead vegetation might seem harmless, but it creates perfect pest harboring conditions for unwanted insects and rodents. Matted leaves and debris can literally suffocate your emerging grass, leading to suffocated turf and dead patches that are difficult to restore.
Safety becomes a concern too, with storm damage risks from broken branches and weakened trees that weren’t properly pruned. Wet, decomposing material creates the perfect breeding ground for fungal disease spread that can quickly jump to your healthy plants.
All these factors combine to create reduced plant vigor throughout your landscape. As one lawn care professional explained, “That layer of debris isn’t just unsightly—it’s like forcing your plants to grow while wearing a wet blanket.”
Spring Cleanup vs Fall Cleanup
Both seasonal cleanups deserve your attention, but they serve different purposes in your yard’s annual cycle:
Spring cleanup prepares for growth and focuses on removing winter damage, while fall cleanup prepares for dormancy and deals primarily with fallen leaves. Spring is the time for pruning before new growth emerges, while fall involves protective measures to shield plants from winter’s chill.
Your spring efforts typically involve soil preparation and seeding, while fall requires final mowing and winterizing equipment. Leaf volume is usually lighter in spring, but gutter inspection after winter’s ice and snow is crucial. Fall, meanwhile, demands thorough gutter cleaning to prevent winter clogs.
Many homeowners find that balancing cleanup efforts between seasons creates a more manageable workload. As one landscape professional noted, “Spreading the work between seasons not only makes each cleanup less overwhelming, it actually creates a healthier landscape year-round.”
By understanding the importance of proper spring cleanup, you’re taking the first step toward a vibrant, healthy landscape that brings joy all season long. It’s not just yard work—it’s an investment in your property’s health, appearance, and ecological value.
When to Start Your Spring Cleanup
Knowing exactly when to begin your spring cleanup is a bit like solving a nature puzzle. Jump in too early, and you might damage delicate plants and displace helpful insects. Wait too long, and you’ll be playing catch-up all season.
The golden rule most landscape professionals follow is simple – wait until:
- Temperatures consistently stay above 50°F for several days
- Your soil has completely thawed and isn’t squishy underfoot
- The threat of hard frost has passed in your area
- Nature gives you its own signal with early bloomers like forsythia showing their yellow flowers
“Wait until we have consistent warm temperatures both day and night—often not until mid-May in many regions—to avoid disturbing overwintering pollinators,” ecological gardening experts often advise. This patience pays dividends for your local ecosystem.
This 50°F threshold isn’t arbitrary – it’s specifically important for protecting butterflies, native bees, and other beneficial insects that help your garden thrive. And here’s a surprising fact: yard waste can make up to 20% of total household waste during cleanup season, making smart timing and disposal essential for both your garbage bill and local wildlife.

Timing Checklist for New England
For those of us in the Boston Metro-West area and throughout New England, spring cleanup typically follows this natural rhythm:
Early April is when you’ll want to start walking your property, noting winter damage and creating your cleanup game plan. By mid-April to early May, as the soil begins to dry, you can start removing debris and pruning damaged plants.
As we move into late April through mid-May, it’s time for lawn rejuvenation – dethatching, aeration, and overseeding. Early to mid-May brings the perfect window for mulching and preparing garden beds, while mid to late May is ideal for starting up irrigation systems and applying appropriate fertilizers.
Remember to adjust these timelines based on your specific yard conditions. Is your property on a north-facing slope? You’ll likely start later. South-facing garden with lots of sun? You might begin earlier.
“Forsythia bloom is a reliable natural indicator of soil temperature for grass seed germination,” experienced lawn care professionals often note. These bright yellow flowers can be more trustworthy than any calendar when planning your cleanup activities.
Our detailed Spring Yard Clean Up Checklist provides a more comprehensive breakdown specifically custom for Massachusetts properties.
Community Cleanup Events & Regulations
Throughout Massachusetts and neighboring states, many towns organize spring cleanup events that can be incredibly helpful for responsible disposal:
Look for Bulk Item Collection Days in your community – perfect for larger yard waste and debris that won’t fit in regular bins. Many towns also offer free Document Shredding Events where you can safely dispose of up to five boxes of sensitive papers alongside your yard cleanup.
Hazardous Waste Collection events provide safe disposal options for old chemicals, paints, and other materials that should never go in regular trash. Many communities also run Tire Recycling Programs with limits (typically 5 tires per household) during special collection events.
For example, DeSoto County’s Household Hazardous Waste Day typically welcomes up to 5 tires per resident along with various hazardous materials, significantly reducing environmental risks in the community.
Some towns go even bigger – Omaha, Nebraska regularly collects thousands of tons of bulky waste during their spring cleanup events, keeping large items from clogging landfills and preventing illegal dumping in natural areas.
For specialized disposal needs that might not align with community events, resources like Utah County Household Hazardous Waste offer guidance on properly handling items that require special attention.
Step-by-Step Spring Yard Cleanup Guide
A successful spring cleanup follows a logical sequence that maximizes efficiency and results. Here’s our comprehensive guide to changing your yard:

1. Clear Debris & Inspect Damage
Every great spring cleanup starts with a careful walk around your yard, coffee in hand (or maybe gloves and a rake). Take your time to look over every corner—notice any sad, droopy plants or spots where winter truly left its mark. Check your lawn, garden beds, patios, and fences. The goal here isn’t to judge, just to observe and make a mental note (or, if you’re like us, a to-do list as long as your arm).
Start by removing any large debris left behind by winter storms—fallen branches, scattered twigs, or even the odd holiday decoration that somehow survived the snow. You might also spot trash that’s blown in or forgotten toys. Be gentle around beds where new shoots might be popping up; those little green tips are future flowers!
Next, grab your rake and tackle the leftover leaf debris. Go easy—especially near emerging perennials—so you don’t accidentally uproot your spring blooms before they’ve had their morning coffee. As you rake, keep an eye out for snow mold, which shows up as matted, grayish patches in the lawn. These areas may need a little extra TLC later.
For large yards, here’s a pro tip: The tarp-drag method can save your back and your time. Just lay a tarp on the ground, rake leaves and debris onto it, then drag the whole pile to your compost or collection spot. If you have a leaf blower, use it to corral stubborn leaves onto the tarp—just make sure your neighbors aren’t downwind!
Don’t forget to check under old mulch or straw, which can harbor overwintering pests if left too long. If it looks soggy or smells funky, it’s time to replace it.
A thorough first pass sets the stage for a smooth spring cleanup. Think of it as hitting the reset button for your yard—removing what winter left behind so fresh growth has room to shine. If you spot any serious damage to your lawn or hardscaping, jot it down. You’ll want to address those issues as you move through the rest of your cleanup.
With the debris gone and damage assessed, you’re ready for the next steps—pruning, lawn revival, and everything else that will bring your yard back to life. For more detailed checklists and tips, explore our Spring Yard Clean Up Checklist.
2. Prune Trees, Shrubs & Perennials
Spring pruning breathes new life into your landscape. During your spring cleanup, proper cutting techniques will set the stage for healthy growth throughout the season.
When approaching your trees and shrubs, think of pruning as both healing and preventive medicine. Start by removing any branches that didn’t survive winter—those that are visibly broken, diseased, or completely dead. Your plants will thank you for this attention!
“Pruning isn’t just cosmetic but essential for plant health,” as our experienced landscapers often tell clients. Those clean cuts actually stimulate growth and help prevent future problems.
Timing matters tremendously with pruning. For summer-flowering shrubs like hydrangeas and butterfly bushes, early spring before buds swell is perfect. However, if you’ve got beautiful spring bloomers like forsythia, lilacs, or azaleas, hold your pruners until after they’ve finished their glorious show—otherwise, you’ll literally be cutting off this year’s flowers!
When making cuts, always use sharp, clean tools. Dull pruners crush rather than slice, leaving wounds that heal slowly and invite disease. Position your cuts just outside the branch collar (that slightly swollen area where branch meets trunk) for fastest healing.
For your perennial beds, spring offers the perfect opportunity for renewal. Cut back last year’s dead stems and foliage to make way for fresh growth. Most flowering perennials can be trimmed to about 4–5 inches above ground, while ornamental grasses should be cut lower, around 2–3 inches.
If you notice some perennials have formed dense clumps or aren’t flowering as vigorously as before, spring is ideal for division. Carefully dig up the plant, split the root ball into sections with a sharp spade or knife, and replant the divisions to enjoy more plants and renewed vigor.
Proper pruning preserves the natural form of your plants. Avoid the temptation to create perfect spheres or unnatural shapes unless you’re maintaining formal hedges. The most beautiful landscapes improve rather than fight against a plant’s natural growth habit.
Crowded branches competing for light and air create perfect conditions for disease. During your spring cleanup, thin out areas where branches cross or rub against each other to improve circulation and sunlight penetration.
For more detailed guidance on pruning specific plants in your Massachusetts landscape, our Spring Yard Clean Up Tips resource provides region-specific advice.
With thoughtful pruning during your spring cleanup, you’re not just tidying up—you’re setting the stage for a healthier, more beautiful landscape all season long.
3. Lawn Revival: Rake, Dethatch, Aerate, Reseed
Bringing your lawn back to life is perhaps the most satisfying part of spring cleanup. After a long winter, your grass needs special attention to thrive in the new growing season.
Start with a soil test to understand what your lawn truly needs. This simple step reveals your soil’s pH and nutrient profile, helping you make informed decisions rather than guessing. Many local extension offices offer affordable testing services that provide customized recommendations.
“A soil test is like a health checkup for your lawn,” says one turf expert. “Without it, you’re just throwing solutions at unknown problems.”
Once you know what your soil needs, begin with gentle raking to remove loose thatch and stimulate new growth. This wakes up your lawn and allows it to breathe again after winter. For lawns with serious thatch issues (anything over ½ inch thick), more aggressive dethatching with a specialized rake or power dethatcher might be necessary.
Core aeration follows as your next critical step, especially for compacted soil. This process creates small holes in your lawn that allow water, air, and nutrients to penetrate deep into the root zone. You’ll see dramatic improvements in lawn health when roots can finally access what they need.
“Many homeowners skip aeration, but it’s like opening windows in a stuffy room—your lawn can finally breathe,” notes a lawn care professional.
With soil properly prepared, overseeding thin or bare patches becomes much more effective. Wait until soil temperatures consistently reach 50-65°F for optimal germination. For best results, ensure good seed-to-soil contact by lightly raking after spreading seed, and keep the area consistently moist until young grass emerges.
When it’s time for the first mowing, set your blade height to about 2 inches to remove winter damage without stressing the grass. After this initial cut, raise your mower height to 3-3.5 inches to promote deeper root development and natural weed suppression.
Finish your lawn revival with a light compost top-dressing—just ¼ inch spread evenly across the surface. This natural approach feeds your soil biology while improving soil structure, creating the foundation for a lush, resilient lawn throughout the growing season.
Timing matters tremendously. As our Spring Yard Clean Up Checklist explains, rushing lawn care before soil has properly dried can cause compaction issues that set your lawn back rather than move it forward.
4. Refresh Beds & Borders
After tackling your lawn, it’s time to give your garden beds some much-needed attention during your spring cleanup. Garden beds are the showpieces of your landscape, and a little springtime TLC goes a long way toward vibrant, healthy plants all season.
Start by getting down on your knees for a thorough weeding session. Those early spring weeds might look small now, but they’ll quickly take over if left unchecked. The soil is typically moist in spring, making it the perfect time to pull weeds completely—roots and all.
“Weeding is so much easier when the soil is still damp from spring rains,” explains many gardening experts. “You’ll save yourself hours of backbreaking work later if you tackle them now.”
Next, create clean, defined edges between your lawn and garden beds. This not only creates that crisp, professional look that improves your property’s curb appeal, but also serves a practical purpose by creating a natural barrier that slows grass from creeping into your garden areas.
Soil amendment is crucial during your spring cleanup routine. Working in compost improves both soil structure and fertility, giving your plants the best possible growing environment. For established beds, gently work an inch or two of quality compost into the top layer of soil, being careful not to disturb plant roots.
When it comes to fertilizing, a balanced approach works best. For spring-flowering bulbs and perennials, apply a 5-10-10 fertilizer according to package directions. This balanced formula provides the nutrients plants need without excessive nitrogen that can promote leafy growth at the expense of flowers.
Mulching is perhaps the most satisfying part of bed refreshment—instantly changing tired garden areas into neat, tidy spaces. Apply a fresh 3-inch layer of mulch throughout your beds, being careful to keep it pulled back a few inches from plant stems and tree trunks.
“Apply mulch 3 inches deep initially, then add just 1 inch each subsequent year,” advise landscape professionals. “This prevents excessive buildup while still providing weed suppression and moisture retention benefits.”
Spring is also the ideal time for dividing and transplanting. Many perennials benefit from division every few years to maintain vigor and prevent overcrowding. Look for plants that have formed large clumps or those that flowered less vigorously last year—these are prime candidates for division during your spring cleanup.
Proper bed maintenance isn’t just about appearances—it’s about creating healthy growing environments that require less intervention throughout the season. Well-defined, properly mulched beds with rich soil will need less watering, weeding, and fertilizing as the growing season progresses.
For more detailed guidance on creating stunning garden beds that are both beautiful and low-maintenance, check out our Spring Yard Clean Up Ideas resource.
5. Hardscape, Fences & Furniture Touch-Ups
Your spring cleanup isn’t complete until you’ve addressed the non-living elements of your landscape. Winter can be particularly harsh on hardscaping and outdoor structures, leaving them damaged or looking tired and worn.
Start by taking a slow walk around your property to inspect all your hardscape elements. Look for any pavers that winter frost may have pushed upward—these heaved pavers not only look unsightly but can create tripping hazards. Gently lift these displaced pieces, add or remove base material as needed to level, and reset them firmly in place.
“Many homeowners overlook their hardscaping during spring cleanup, but addressing these issues early prevents more costly repairs later,” landscape professionals often note.
Those green or black stains on your patio or walkway? That’s algae and mold that thrived during winter’s damp conditions. A good pressure washing will bring back the original beauty of stone, concrete, and deck surfaces. If you don’t own a pressure washer, they’re readily available as rentals from local hardware stores for a reasonable daily fee.
Winter snow, ice, and wind can be particularly tough on fencing. Take time to walk your property line, looking for loose posts, broken pickets, or sections that may have shifted. Tightening hardware and replacing damaged pieces now will extend your fence’s lifespan significantly.
Wooden elements like pergolas, arbors, and fences might need a fresh coat of stain or sealant after winter’s assault. Look for areas where the finish appears dull or water no longer beads on the surface—these are clear signs it’s time for refinishing. A light sanding followed by an appropriate outdoor wood stain will provide protection through the coming seasons.
Don’t forget your outdoor furniture! After months in storage (or braving the elements), your chairs, tables and benches likely need attention. A thorough cleaning with appropriate cleaners will remove dirt, mold, and stains. For many outdoor furniture pieces, a solution of mild detergent and water works well, though specialized cleaners are available for teak, wrought iron, and other specific materials.
“Outdoor furniture often gets overlooked during spring cleanup, but giving it proper attention now means you’ll be ready for that first perfect day to enjoy your outdoor space,” according to patio design experts.
Before the summer entertaining season begins, check furniture for loose screws, wobbly legs, or tears in cushions. Making these minor repairs during your spring cleanup ensures everything is ready when you want to use it.
Taking care of these hardscape elements not only improves your yard’s appearance but also protects your investment in these features. With proper maintenance during your spring cleanup, your outdoor living spaces will be ready to enjoy all season long.
6. Irrigation & Drainage Check
After winter’s frozen grip loosens, your irrigation system needs careful attention during spring cleanup. Water is the lifeblood of your landscape, and proper management prevents both waste and damage.
Start by inspecting all visible sprinkler heads throughout your property. Winter frost can crack heads, shift their positioning, or fill them with debris. Give each head a gentle cleaning and check for any obvious damage that needs repair.
“The biggest mistake homeowners make is rushing to activate their irrigation systems before nighttime temperatures consistently stay above freezing,” explains many irrigation professionals. “It’s better to hand water on days above 40°F until you’re confident frost season has passed.”
Once temperatures allow, conduct a thorough system test:
Run each zone separately for a few minutes, watching for proper coverage, pressure issues, or misaligned heads that might spray sidewalks or buildings instead of plants. This zone-by-zone approach helps identify problems that might be missed in a full-system test.
Check all visible pipes, valves, and connections for leaks or damage. Even tiny drips can waste hundreds of gallons over a season and potentially damage your landscape or home foundation.
Don’t forget your filters! Remove and clean any system filters that may have accumulated sediment or debris over the winter months. Clean filters improve water flow and reduce strain on your system’s pump.
Pay special attention to drainage patterns throughout your yard. Spring rains can reveal problem areas where water pools or creates erosion. Address these issues early by adjusting grades, adding drainage solutions, or incorporating water-loving plants in naturally wet areas.
For homes with irrigation systems, consider scheduling a backflow prevention test. This safety check ensures your irrigation water doesn’t contaminate your household drinking supply—a service many municipalities require annually.
Smart water management isn’t just good for your landscape—it’s good for your wallet. A properly maintained irrigation system uses up to 30% less water than a neglected one, saving both natural resources and your monthly water bill.
“A water audit during spring cleanup can identify inefficiencies before the hot summer months arrive,” note landscape professionals. “Simple adjustments to run times and spray patterns often provide dramatic water savings.”
Proper drainage and irrigation work together as a system. The goal is getting water to your plants efficiently while preventing destructive pooling or runoff that can damage your landscape and home.
7. Tool Cleaning & Storage
Let’s face it – your garden tools work hard during spring cleanup. Taking care of them isn’t just about extending their life; it’s about making your yard work easier and more effective all season long.
After a long winter of sitting idle, your tools deserve some TLC before jumping back into action. Start by giving them a good once-over, removing any rust with a wire brush or steel wool. A light coat of vegetable oil afterward works wonders for prevention.
“Every gardener with a green thumb knows that having the proper tools in the best condition will contribute to a beautiful garden,” as seasoned gardening experts often say.
Tool sanitation is just as important as sharpness. Dipping your tools in a simple solution of 2 cups bleach to 1 gallon water for about 10 minutes helps eliminate any lingering plant diseases that could spread to your healthy garden. Just be sure to rinse and dry them thoroughly afterward.
Those dull edges on your pruners and shovels? They’re making your work harder than it needs to be. Take a file to those cutting edges, maintaining the original angle for best results. Your back will thank you when you’re not fighting against dull tools all season.
Wooden handles need attention too. Sand away any rough spots that might give you splinters, then apply a coat of linseed oil to prevent splitting and cracking. This simple step makes tools more comfortable to use and significantly extends their lifespan.
Finally, rethink how you’re storing your garden arsenal. Hanging larger tools prevents warping and keeps them accessible, while smaller hand tools can benefit from being stored in a bucket of oiled sand – a clever trick that keeps them clean, rust-free, and ready whenever you need them.
For those wanting to dive deeper into proper tool maintenance, the University of Vermont offers excellent guidance on clean garden tools that covers everything from disinfection to winterizing.
The quality of your spring cleanup is directly related to the condition of your tools. As one landscaping professional puts it, “Your tools are an extension of your hands – keep them sharp, clean, and ready, and your garden work becomes less of a chore and more of a pleasure.”
Eco-Friendly Practices & Smart Waste Disposal
Changing your spring cleanup into an eco-friendly process isn’t just good for the planet—it’s better for your yard too! The choices you make during cleanup can create a healthier landscape while supporting local wildlife.
Mother Nature has her own timeline, and respecting it makes a big difference. Wait until temperatures consistently stay above 50°F before doing your full cleanup—those leaf piles and hollow stems are home to butterflies, native bees, and other beneficial insects still waking up from winter.
“I’ve learned to be patient with my spring cleanup,” shares one Massachusetts gardener. “The pollinators thank me with abundant garden visits all summer long!”
Consider designating a “wild corner” in your yard where cleanup is minimal. These undisturbed areas become wildlife havens, supporting everything from birds to beneficial insects. Even a small 3×3 foot section can make a difference!
Switching to battery-powered tools reduces both noise and emissions—a win for you and your neighbors. And those reusable collection bags? They’ll save you money while keeping plastic out of landfills.
Did you know yard waste can make up to 20% of total household waste during spring cleanup season? That’s a lot of valuable organic material that could be nurturing your landscape instead of filling landfills.
Composting & Grasscycling
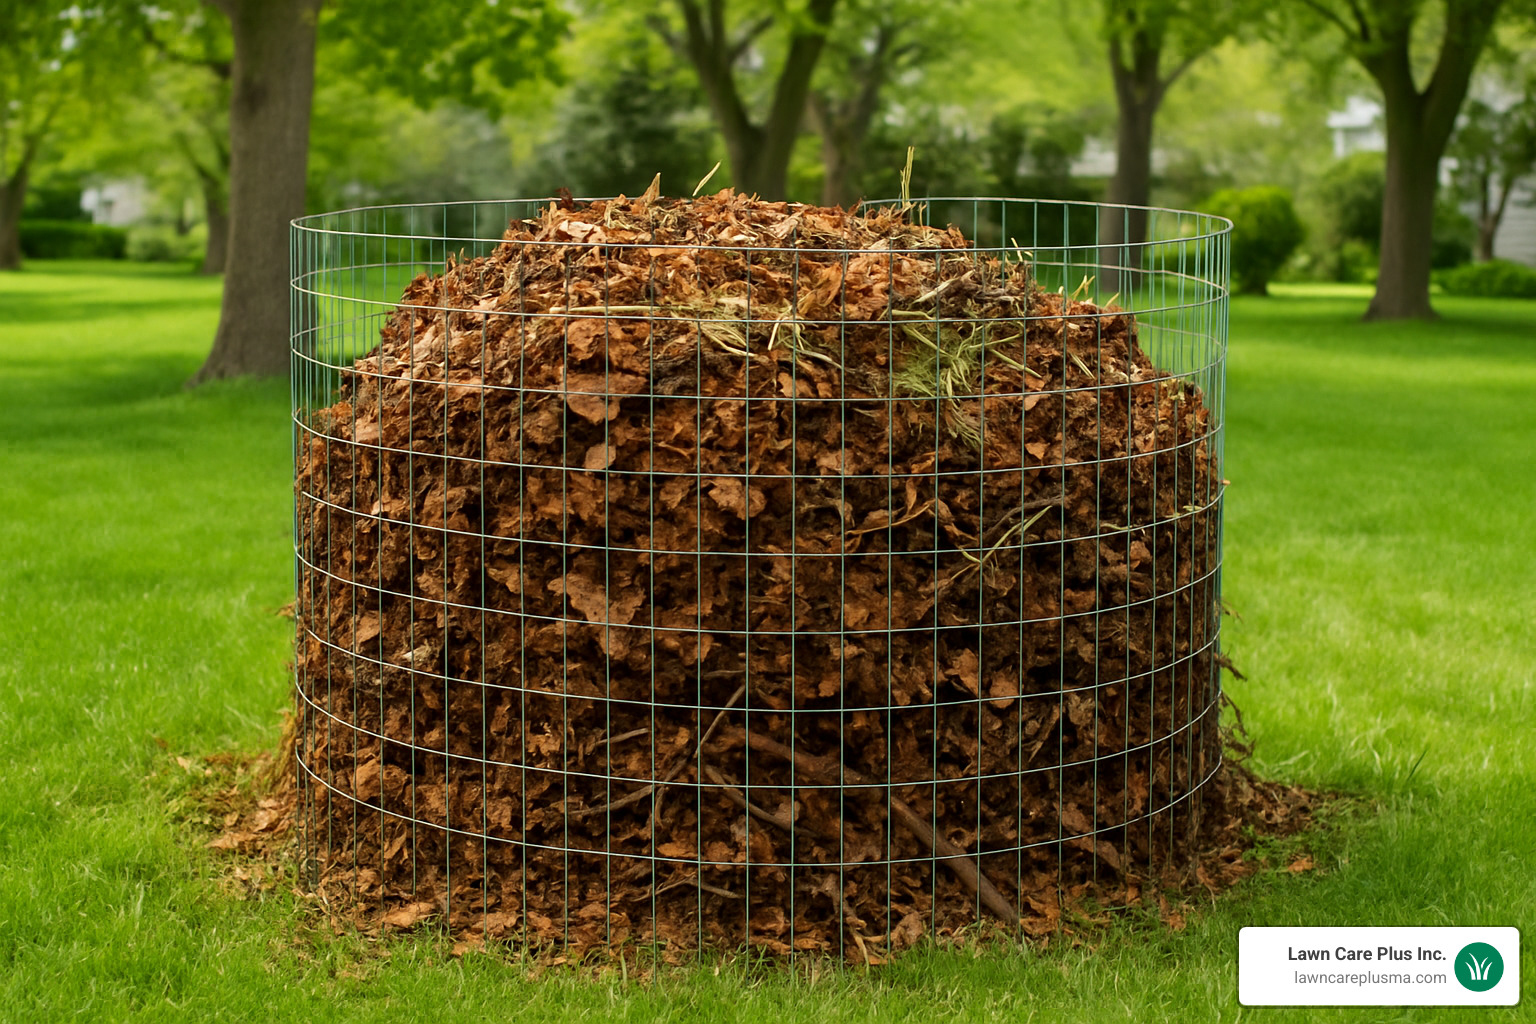
Turn your yard waste into garden gold! A simple 3×3×3 foot compost pile creates the perfect environment for nature’s recycling process. Wire fencing bent into a circle makes an easy DIY compost bin that allows for good airflow.
The secret to successful composting is balance. Mix “browns” (fallen leaves, small twigs, shredded paper) with “greens” (grass clippings, vegetable scraps, coffee grounds) in roughly equal amounts. Keep it as moist as a wrung-out sponge and turn it every couple of weeks with a garden fork.
“Composting closed the loop in my garden,” says a local homeowner. “What used to be waste is now my best soil amendment.”
Grasscycling—leaving short grass clippings on your lawn—is perhaps the easiest eco-friendly practice to adopt. Those clippings quickly break down, returning nitrogen to your soil and reducing the need for fertilizer by up to 25%. Your lawn will be healthier, and you’ll save time not bagging clippings!
For more creative eco-friendly approaches to your yard, check out our Spring Yard Clean Up Ideas.
Where to Take What: Yard Waste, Electronics, Hazardous Materials
Even with the best composting setup, you’ll likely have some materials that need special handling during spring cleanup. Knowing where to take what makes the process much smoother.
For yard waste, most Massachusetts communities offer curbside collection or drop-off at municipal compost facilities. Check your town’s schedule—these programs often run weekly during spring and fall. Some community gardens also welcome donations of clean, disease-free organic material.
Electronics require special handling to prevent toxic materials from entering landfills. County transfer stations typically accept e-waste for a small fee, and many electronics retailers offer free recycling programs. Watch for community e-waste collection events, which are often free or lower-cost options.
Hazardous materials need the most careful disposal. Never mix chemicals with regular yard waste or trash! Most counties operate Household Hazardous Waste (HHW) facilities or host collection events several times a year. These accept items like paint, pesticides, fertilizers, and automotive fluids at no charge.
“Many people don’t realize their town offers free disposal for hazardous household items,” notes a waste management professional. “Taking advantage of these programs protects both your family and the environment.”
Proper disposal isn’t just about following rules—it’s about being a good steward of our shared environment. A little extra effort during your spring cleanup creates a healthier yard and community for everyone.
Tools, Costs & Common Mistakes
Getting your spring cleanup right means having the proper tools and know-how. Like any home project, the right equipment makes all the difference between a backbreaking chore and a satisfying weekend task.
Essential Tools:
Your spring cleanup toolkit doesn’t need to be fancy, but a few key items will make the job much easier. Most homeowners can get by with a sturdy rake, quality pruning shears, and a reliable lawn mower with freshly sharpened blades. Add an edger (even a manual one works well), a wheelbarrow for hauling debris, and a large tarp for collecting leaves and clippings, and you’re well-equipped for basic yard work.
Don’t forget about protecting yourself, too! Good gloves are non-negotiable – they’ll save your hands from blisters and scratches. Safety glasses protect your eyes during pruning, and proper footwear with good traction prevents slips on wet spring soil.
“I always tell my clients that investing in quality tools pays off in the long run,” says one landscaping veteran. “That $15 pruner might seem like a bargain until it breaks halfway through your rose bushes.”
Manual vs. Battery Tools:
The green revolution has finally reached our garden sheds! Modern battery-powered equipment has come a long way, with many models now matching gas-powered tools in performance while offering some compelling advantages.
Battery tools run cleaner and quieter than their gas counterparts. There’s no fuel to mix, no cords to trip over, and significantly less maintenance. Many homeowners find the reduced noise particularly appealing – you can do your yard work early without waking the neighbors!
“Battery-powered outdoor equipment now matches the power of gasoline tools,” according to equipment experts. For typical residential properties, these eco-friendlier options handle most tasks beautifully, though very large properties might still benefit from gas tools’ extended runtime.

DIY vs Hiring Pros
The eternal question: tackle spring cleanup yourself or call in the professionals? Both approaches have their merits.
DIY cleanup gives you complete control over timing and methods, not to mention the satisfaction of changing your own space. Many homeowners also enjoy the connection with their landscape that comes from hands-on work. And yes, the cost savings on labor can be substantial.
On the flip side, professional services bring expertise and efficiency that’s hard to match. A team with commercial-grade equipment can accomplish in hours what might take a homeowner an entire weekend. Professionals also handle proper disposal of all materials and carry insurance for any unexpected issues. For busy families or those with physical limitations, the time savings alone can justify the expense.
Professional spring cleanup services typically range from $150 for small properties to $900 or more for larger estates with extensive landscaping. These figures represent average internet ranges and not actual Lawn Care Plus rates.
“Most of our clients initially tried doing their own cleanup but eventually realized their time was worth more than the money saved,” notes a landscape professional. “Especially when it comes to specialized tasks like irrigation system checks or proper tree pruning.”
For help determining if professional assistance is right for your situation, visit our Need Yard Clean Up? resource.
Common Spring Cleanup Mistakes to Avoid
Even experienced gardeners can stumble into these spring cleanup pitfalls:
Rushing the season might be the most common mistake. When that first warm day arrives, it’s tempting to tear into your yard, but cleaning up too early can harm overwintering pollinators and expose tender plants to late frosts.
Skipping soil tests leads many homeowners to apply amendments blindly, potentially wasting money and creating imbalances. A simple soil test tells you exactly what your lawn needs—and doesn’t need.
Improper pruning causes lasting damage. Cutting spring-flowering shrubs too early removes the very buds that would become your beautiful blooms. And those “mulch volcanoes” piled high against tree trunks? They’re actually tree killers, promoting disease and rot.
Lawn scalping happens when enthusiasm for that first mow leads to cutting grass too short. This stresses your lawn just as it’s waking up and creates perfect conditions for weeds to outcompete your grass.
“I see so many people work hard but work wrong,” shares one garden center owner. “They’ll spend all weekend on their yards but skip critical steps like aeration or proper tool cleaning. Then they wonder why their results don’t match their effort.”
For more comprehensive guidance on getting your yard in top shape, check out our Spring Yard Clean Ups resources.
Proper spring cleanup isn’t just about immediate results—it’s setting the stage for a beautiful, thriving landscape all season long.
Frequently Asked Questions about Spring Cleanup
When should I aerate my lawn in spring?
Timing is everything when it comes to aeration. For those of us in Massachusetts with cool-season grasses, the sweet spot is early spring—typically April to early May—when your soil is damp but not waterlogged. If you’re tending to warm-season grasses, you’ll want to wait until later in spring when they’re actively growing.
Aeration isn’t always necessary every year, but it’s particularly beneficial when:
- Your lawn sees heavy foot traffic that’s compacted the soil
- You’ve noticed thatch buildup exceeding half an inch
- You’re planning to overseed and want to improve seed-to-soil contact
“For cool-season grasses, aerate once or twice a year in early spring or fall; for warm-season grasses, aerate in late spring or early summer,” as lawn care professionals often recommend. Think of aeration as giving your lawn a chance to breathe after a long winter nap.
How do I dispose of household hazardous waste safely?
Those leftover cans of paint, old bottles of pesticides, and used motor oil shouldn’t go in your regular trash or—heaven forbid—down the drain. Spring cleanup often uncovers these forgotten hazards, and they require special handling:
First, keep everything in its original container whenever possible—this helps disposal staff identify what they’re dealing with. Never mix different products together (this can create dangerous chemical reactions). Store these items safely until you can properly dispose of them, keeping them away from children and pets.
When transport day arrives, place items in your vehicle’s trunk or truck bed, not the passenger compartment where fumes could accumulate. Follow all instructions provided by collection site staff—they’ve seen it all and know how to handle these materials safely.
Most communities host seasonal collection events, and many counties maintain permanent drop-off facilities. Items like paint, oil, pesticides, and batteries are typically accepted free of charge at designated HHW facilities—a small effort that makes a big difference for our environment.
What’s the difference between dethatching and raking?
Though they might seem similar at first glance, regular raking and dethatching serve different purposes in your spring cleanup routine.
Regular raking is like giving your lawn a gentle brush. Using a standard leaf or fan rake, you’re simply removing surface debris—fallen leaves, twigs, and light thatch that’s accumulated over winter. This routine maintenance has minimal impact on your grass plants while clearing away the winter mess.
Dethatching, on the other hand, is more like giving your lawn an exfoliating treatment. This more aggressive process uses specialized equipment—either a dethatching rake with sharp tines or a power dethatcher—to dig deeper and remove that layer of dead grass stems and roots that’s built up between your soil and green grass. This should only be done when thatch exceeds half an inch in thickness, as too-frequent dethatching can stress your lawn.
“Raking loosens matted grass which promotes new lawn growth,” as lawn experts often point out, while “dethatching improves the soil’s ability to absorb water, oxygen, and nutrients.” Both have their place in a comprehensive spring cleanup, but knowing when to use each approach makes all the difference in your lawn’s health.
A light raking is usually sufficient for most spring lawns. Save the more intensive dethatching for when you can actually see or feel that spongy layer building up between your soil and the green grass. Your lawn will thank you for knowing the difference!
Conclusion
As the last frost melts away, a thorough spring cleanup lays the groundwork for a vibrant, thriving landscape that will reward you throughout the growing season. The steps we’ve explored aren’t just about creating curb appeal—they’re about nurturing your outdoor space’s long-term health and resilience.
Patience pays off when it comes to timing your cleanup. Those extra days of waiting until temperatures consistently stay above 50°F might feel like procrastination, but they’re actually an act of environmental stewardship, protecting the pollinators that help your garden flourish while ensuring your soil is ready for care.
The investment you make now—whether raking winter debris, properly pruning damaged growth, or refreshing garden beds—creates a cascade of benefits that extend far beyond aesthetics. A well-executed spring cleanup reduces maintenance headaches later, prevents pest and disease problems, and improves your enjoyment of outdoor living spaces.
For many busy homeowners in the Boston Metro-West area, finding time for comprehensive yard care can be challenging. That’s where professional assistance can make all the difference. Lawn Care Plus Inc. specializes in thoughtful, thorough spring & fall yard clean-ups custom to each property’s unique needs. Our experienced team brings not just equipment but expertise that ensures your landscape receives exactly what it needs to thrive.
Spring cleanup isn’t just a seasonal chore—it’s an opportunity to reconnect with your outdoor space after winter’s isolation. Whether you tackle it yourself over a few weekends or partner with professionals to transform your yard efficiently, the results are the same: a landscape that supports local ecosystems while providing beauty and enjoyment for you and your family.
As you look out at your refreshed yard in the coming months, you’ll appreciate how those early spring efforts set the stage for season-long success. Your lawn will grow more vigorously, your garden beds will burst with healthy plants, and your outdoor spaces will become natural extensions of your home.
For more information about professional spring cleanup services, visit our Spring and Fall Clean-Ups page.
