How to prepare ground for sod is crucial if you want a beautiful, thriving lawn. Proper preparation ensures the sod roots deeply and grows lush and green. Here’s a quick summary to get you started:
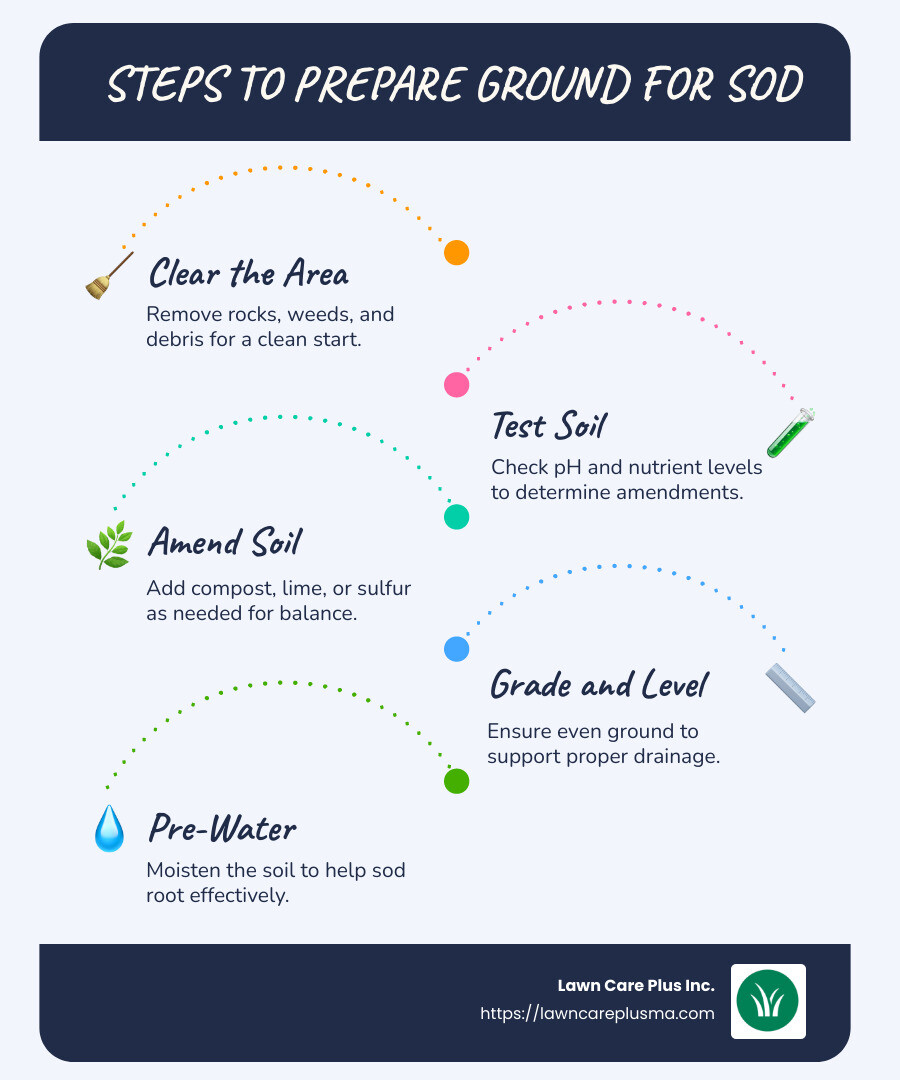
- Clear the Area: Remove rocks, weeds, and debris.
- Test Soil: Check pH and nutrient levels.
- Amend Soil: Add compost, lime, or sulfur as needed.
- Grade and Level: Ensure even ground for proper drainage.
- Pre-Water: Moist soil helps sod root effectively.
Preparing the ground is not just a step—it’s the foundation of successful sod installation. Failing to prepare can lead to poor growth and wasted effort. Think of your soil as a canvas. A properly prepped canvas is vital for a masterpiece lawn. Following these steps, your sod lawn will be healthier from day one, reducing future maintenance needs.
We’ll guide you through the details, ensuring that your lawn becomes the envy of the neighborhood.
Must-know how to prepare ground for sod terms:
– how to care for new sod
– how to install a new lawn
– how to lay sod
Essential Tools and Materials for Ground Preparation
Getting ready to lay sod involves some groundwork—literally. The right tools and materials make all the difference. Let’s break it down into what you need to prepare ground for sod effectively.
Key Tools You’ll Need
- Sod Cutter:
- This tool is a game-changer. It slices through old grass and weeds, making it easy to remove them from your yard. A clean slate is crucial for new sod to thrive.
- Rototiller:
- A rototiller mixes and aerates the soil, which helps roots penetrate deeply. It breaks up compacted soil, improving air and water flow. Rototilling to a depth of 4-6 inches is often recommended for best results.
- Garden Rake:
- After tilling, use a rake to remove leftover debris and level the soil. A smooth surface ensures the sod lays flat and roots evenly.
- Lawn Roller:
- A lawn roller helps firm up the soil after tilling and before laying sod. It removes air pockets, ensuring good soil contact.
- Soil Test Kit:
- Testing your soil gives you insights into pH and nutrient levels. This helps in deciding what amendments are needed.
Materials to Gather
- Compost:
- Adding compost improves soil structure, whether your soil is clay-heavy or sandy. It improves nutrient content and water retention.
- Lime or Sulfur:
- These amendments adjust soil pH. Lime raises pH, making acidic soils more neutral. Sulfur lowers pH, helping alkaline soils.
- Starter Fertilizer:
- A fertilizer with a higher phosphorus content (like 18-23-12) encourages root growth. Mix it into the topsoil before laying sod.
- Topsoil:
- If your soil is thin or poor, adding quality topsoil can boost the overall health of your new lawn.
Why These Tools and Materials Matter
Proper tools and materials set the stage for a lush lawn. A sod cutter and rototiller ensure the ground is ready, while compost and amendments create an ideal growing environment.
“Excellent sod + excellent site preparation = excellent results!”
Preparing your ground with these essentials helps achieve a lawn that’s healthier, more resilient, and less thirsty. Next, we’ll dive into the specifics of clearing and testing your site to ensure everything is just right before laying your sod.
How to Prepare Ground for Sod
Preparing your ground for sod is more than just laying the pieces down. It involves several key steps to ensure your sod thrives. Let’s explore the essentials of site clearing, soil testing, and grading for optimal drainage.
Clearing the Site
The first step in preparing for sod is clearing the site. Remove all debris such as rocks, branches, and any leftover building materials. Debris larger than 2-3 inches can interfere with the sod’s ability to root properly.
Existing vegetation, like old grass or weeds, must also be removed. You can use a sod cutter or a glyphosate-based herbicide to clear these. This creates a clean slate, allowing your new sod to establish without competition for nutrients.
Testing and Amending the Soil
Before laying sod, it’s crucial to test your soil. A soil test will reveal the pH level and nutrient content, guiding you on necessary amendments. Turfgrass typically prefers slightly acidic soil with a pH around 6.5.
- Lime is used to raise the pH of acidic soils.
- Sulfur can lower the pH of alkaline soils.
- Compost adds organic matter, improving soil structure and nutrient content.
Amend the soil based on test results and work these into the top 3-4 inches of soil. Proper soil amendments create an ideal environment for your sod to root and grow.
Grading for Optimal Drainage
Grading your site is essential for preventing water pooling and ensuring proper drainage. Here’s how to do it:
- Create a Slope: Always grade the soil away from buildings to avoid water damage. A gentle slope helps direct water flow.
- Address Low Spots: Fill in any low-lying areas to prevent puddles from forming.
- Level High Spots: Cut down high spots to ensure an even surface for the sod.
Use a grading rake for small areas or a tractor-mounted box blade for larger spaces. The final grade should be about ¾ inch below driveways and sidewalks.

By following these steps, you’re setting a strong foundation for your sod. With a clear site, amended soil, and a well-graded surface, your new lawn will have the best chance to thrive. Next, we’ll explore best practices for laying the sod itself.
Best Practices for Laying Sod
Laying sod is like putting together a puzzle on your lawn. But instead of a picture, you’re creating a lush, green carpet. Let’s walk through some best practices to make sure your sod installation is smooth and successful.
Laying the First Row
Start by laying the first row of sod along a straight edge like a driveway or a fence line. This helps keep everything aligned as you move across the yard. Unroll each piece of sod carefully and ensure it sits flat against the soil.
Tip: Use a taut string line as a guide if your yard doesn’t have a natural straight edge. This ensures your first row is perfectly aligned, setting the stage for the rest of your sod.
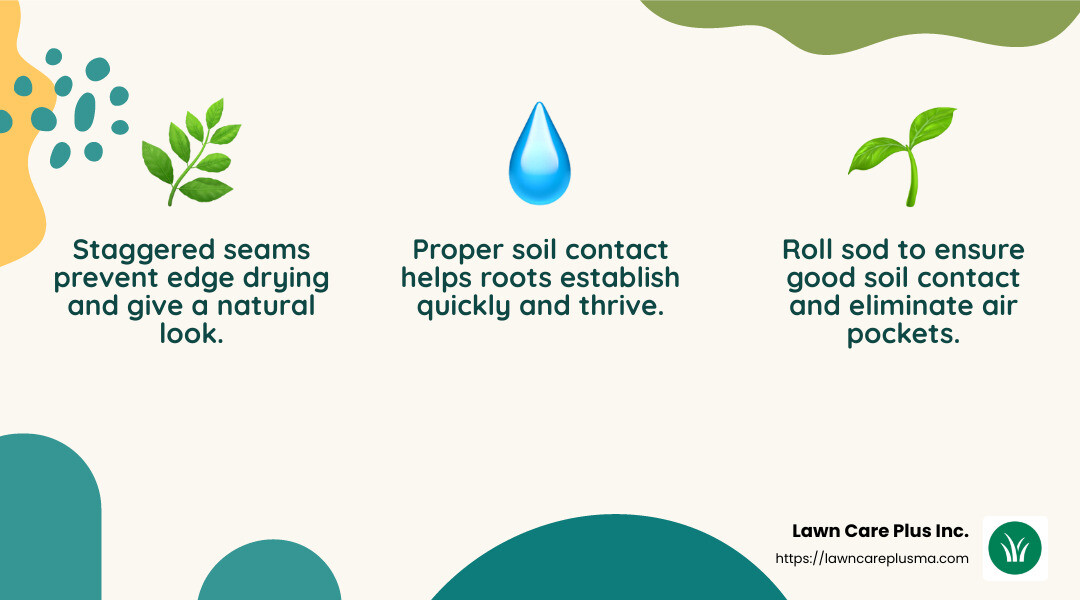
Staggering the Seams
For the second row, cut the first piece of sod in half to create a brick-laying pattern. This staggered approach prevents seams from lining up, much like how bricks are laid in a wall.
- Snug Fit: As you lay each piece, make sure they fit snugly against each other without overlapping. This close fit helps the sod seams knit together, reducing the risk of edges drying out and dying back.
Staggering seams not only strengthens the sod’s hold on the soil but also gives your lawn a more natural, seamless look.
Ensuring Good Soil Contact
Once your sod is laid, it’s crucial to ensure it has good contact with the soil beneath. This step prevents air pockets that can hinder root growth.
- Sod Roller: Use a sod roller to press the sod into the soil. This tool helps eliminate air pockets and ensures the sod roots have direct access to the soil’s nutrients and moisture.
If you don’t have a sod roller, a large piece of plywood can work in a pinch. Carefully walk over the wood to embed the sod evenly.
By following these best practices, your sod will have a solid foundation to take root and thrive. Next, we’ll address some common questions about sod installation and care.
How to Prepare Ground for Sod: Addressing Common Questions
When it comes to laying sod, there are a few questions many homeowners ask. Let’s tackle these to ensure your sod installation goes off without a hitch.
Can I Lay Sod Over Existing Grass?
Short answer: No, it’s not a good idea.
Laying sod over existing grass can lead to several problems. The old grass competes with the new sod for water and nutrients, making it harder for the sod to establish strong roots. Plus, any bumps or uneven spots in the old grass will transfer to the new sod, creating a lumpy lawn.
To avoid these issues, always start with a clean slate. Remove existing grass and weeds using a sod cutter for a smooth, even surface.
How Long Should I Wait Before Walking on New Sod?
Patience is key!
New sod needs time to establish its roots in the soil. Walking on it too soon can disrupt this process and damage the sod. It’s best to keep foot traffic off the new sod for at least a week. This gives the roots time to anchor themselves firmly in the ground.
If you must walk on the sod, try to limit it to small sections and step lightly.
Do I Need to Rototill Before Laying Sod?
Rototilling is highly recommended.
Rototilling the soil before laying sod offers several benefits. It helps break up compacted soil, making it easier for the sod roots to penetrate and establish. Tilling also mixes in any soil amendments, like compost or fertilizer, ensuring they are evenly distributed and accessible to the new sod.
While it’s not mandatory to rototill, doing so can significantly improve the health and longevity of your sod. If the soil is particularly compacted or hasn’t been worked on in a long time, rototilling can make a big difference in sod success.
By addressing these common questions, you’re now better prepared to lay your sod with confidence and care. Next, we’ll explore how to maintain your newly installed sod for long-lasting beauty.
Maintaining Your Newly Installed Sod
Once you’ve laid your sod, proper maintenance is key to ensuring it thrives. Let’s explore the essential steps: watering, mowing, and fertilizing.
Initial Watering and Settling
Watering Schedule:
For the first week, water your new sod daily, preferably in the morning. This helps the sod stay hydrated and start settling into its new home. In the second week, reduce watering to every other day. By the third week, you can water twice a week.
Watering Depth:
Aim to moisten the soil to a depth of 3-4 inches. You can check this with a soil probe. The soil should be damp, but not soggy, to encourage strong root growth.
When to Mow New Sod
Mowing Height:
Wait until your sod reaches about 3 inches tall before mowing for the first time. Cut it down to 2 inches. This helps the roots establish and reduces stress on the grass.
Clipping Bagging:
Be sure to use a sharp mower blade for clean cuts. Bag the clippings to prevent them from smothering the new sod. Regular mowing will keep your lawn healthy and looking neat.
Fertilizing New Sod
Starter Fertilizer:
About three to four weeks after installation, apply a starter fertilizer. This replenishes nutrients lost during the initial watering phase.
Nutrient Replenishment:
Choose a balanced fertilizer, like a 10-10-10 or 13-13-13, based on your soil test results. Follow the package instructions for the correct application rate to avoid over-fertilizing, which can harm your lawn.
By following these steps, your sod will develop strong roots and maintain its lush, green appearance. Next, we’ll discuss long-term care to ensure your lawn stays healthy and vibrant.
Conclusion
Ensuring the long-term health of your sod requires ongoing care and attention. At Lawn Care Plus Inc., we believe that maintaining a lush, green lawn is not just about initial installation—it’s about consistent, quality care.
Long-Term Care:
Once your sod is established, regular maintenance is key. This includes following a consistent watering schedule, adjusting as needed for seasonal changes. Proper mowing practices, such as keeping your grass at the right height and using sharp blades, will help maintain a healthy lawn. Fertilizing should be done according to the specific needs of your soil, as identified in your initial soil test.
Consider seasonal yard cleanups and periodic soil testing to keep your lawn in optimal condition. Our lawn care services are designed to support you in every step of this journey. We offer professional advice and services custom to your lawn’s unique needs, ensuring it remains the envy of your neighborhood.
At Lawn Care Plus Inc., we understand that a beautiful lawn is more than just grass—it’s a space for memories, relaxation, and enjoyment. Our team is here to support you in achieving and maintaining the lawn of your dreams. Contact us today to learn more about our services and how we can help you lay the foundation for a thriving lawn.
By partnering with us, you can rest easy knowing your lawn is in expert hands. Let us help you achieve a lawn that not only meets your expectations but exceeds them.
