Concrete walkway installation is crucial for creating durable, functional, and visually appealing paths in your outdoor spaces. Whether you’re enhancing your home’s curb appeal or ensuring safe and convenient access to your property, installing a concrete walkway can significantly impact your landscape’s aesthetics and usability.
- Why Concrete?
- It’s versatile, cost-effective, and requires low maintenance.
- With a lifespan of up to 50 years, it’s a long-term investment.
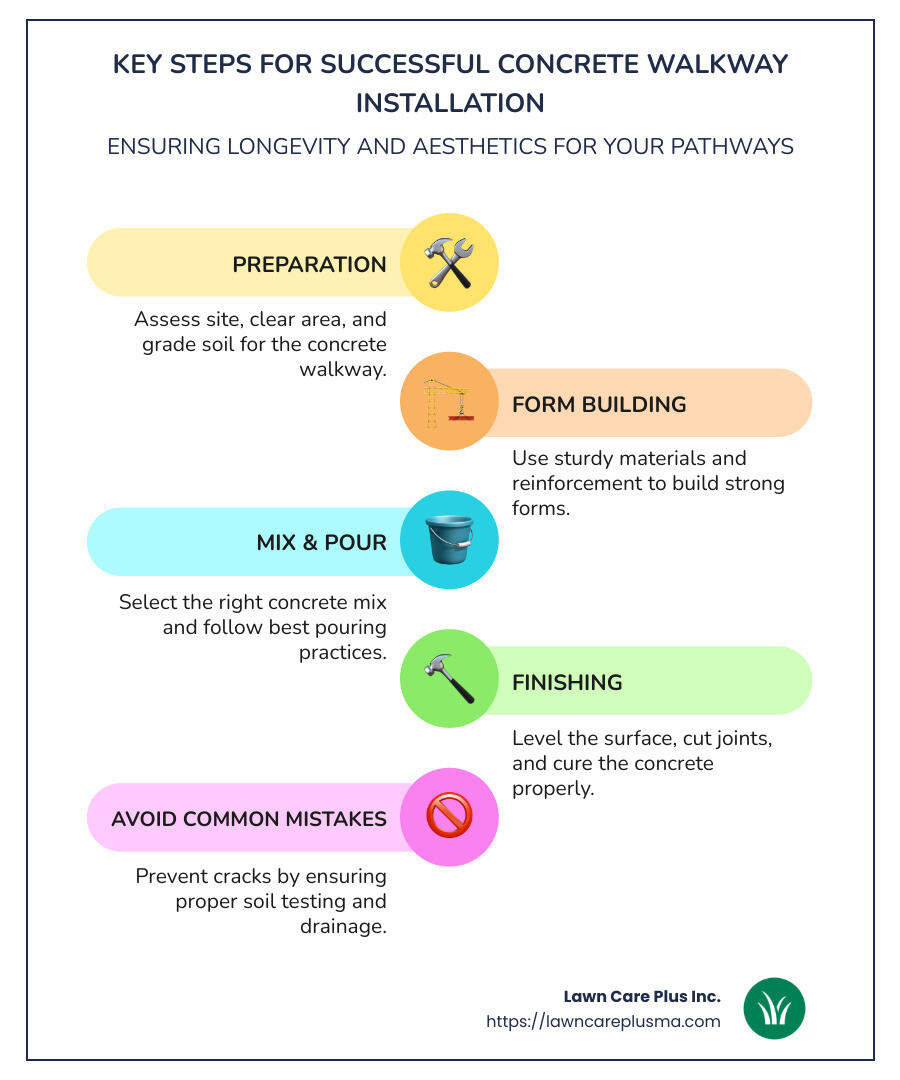
- Key Steps to Success:
- Preparation: Assess site, clear area, and grade soil.
- Form Building: Use sturdy materials and reinforcement.
- Mix & Pour: Choose the right concrete and follow best practices.
- Finishing: Level, joint, and cure properly for longevity.
- Common Mistakes:
- Skipping proper soil testing and drainage considerations.
- Using incorrect concrete mixes or poor pouring techniques.
Proper installation is essential to avoid cracks and premature deterioration. By focusing on each step and choosing quality materials, you ensure the walkway withstands the test of time and elements.
Concrete walkway installation terms to learn:
– bluestone walkway installation
– cost to install paver walkway
– installing a paver walkway
Preparing the Ground for Concrete Walkway Installation
Before you begin the concrete walkway installation, prepare the ground properly. This ensures a stable and durable foundation for your walkway. Let’s explore the key steps involved in getting the site ready.
Site Evaluation
Start with a thorough evaluation of the site where the walkway will be installed. Look for any potential obstacles like trees, roots, or existing structures that might interfere with the installation. Consider the natural slope of the land and how it might affect water drainage.
Soil Testing
Soil testing is a crucial step that should not be overlooked. Different soil types have varying load-bearing capacities. Conduct a soil test to determine the soil’s composition and stability. This will help you decide if any soil amendments or additional support are necessary.
Clearing the Area
Once you understand the site’s conditions, clear the area of any debris, vegetation, or old materials. Removing these elements will provide a clean slate for the walkway. Ensure that the ground is free from large rocks or roots that could disrupt the concrete surface.
Grading
Grading the site involves leveling the ground to ensure a smooth and even surface. This step is vital for proper water drainage and to prevent pooling on the walkway. Use a rake and a level to achieve the desired grade, sloping slightly away from any structures to direct water runoff.
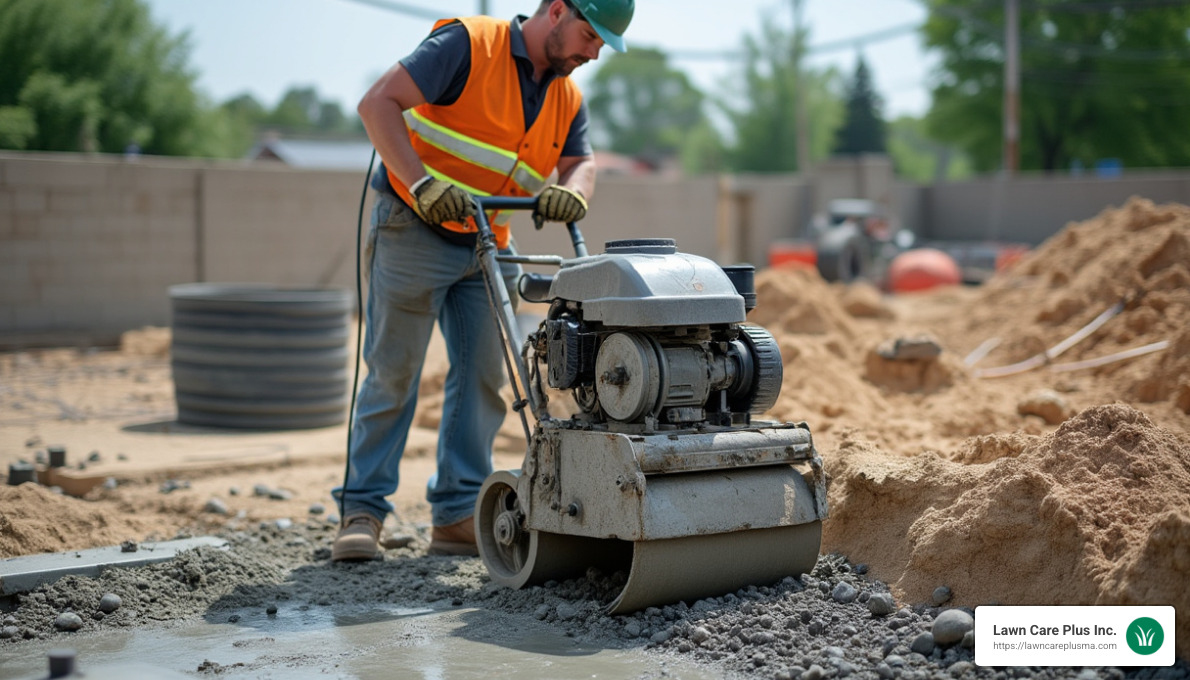
Compaction
Compaction is the final step in preparing the ground. Compacting the soil increases its density, providing a solid base for the concrete. Use a plate compactor or a hand tamper to compact the soil thoroughly. This step helps prevent future settling and cracking of the concrete.
By taking the time to evaluate the site, test the soil, clear the area, grade, and compact the ground, you’re setting the stage for a successful concrete walkway installation. These preparatory steps are crucial for ensuring the longevity and durability of your walkway, preventing common issues like cracking and uneven surfaces.
Building Strong and Effective Forms for Concrete Walkways
Once you’ve prepped the ground, it’s time to build forms for your concrete walkway. These forms are crucial for shaping the concrete and ensuring it cures properly. Let’s explore the key elements of building strong and effective forms.
Form Materials
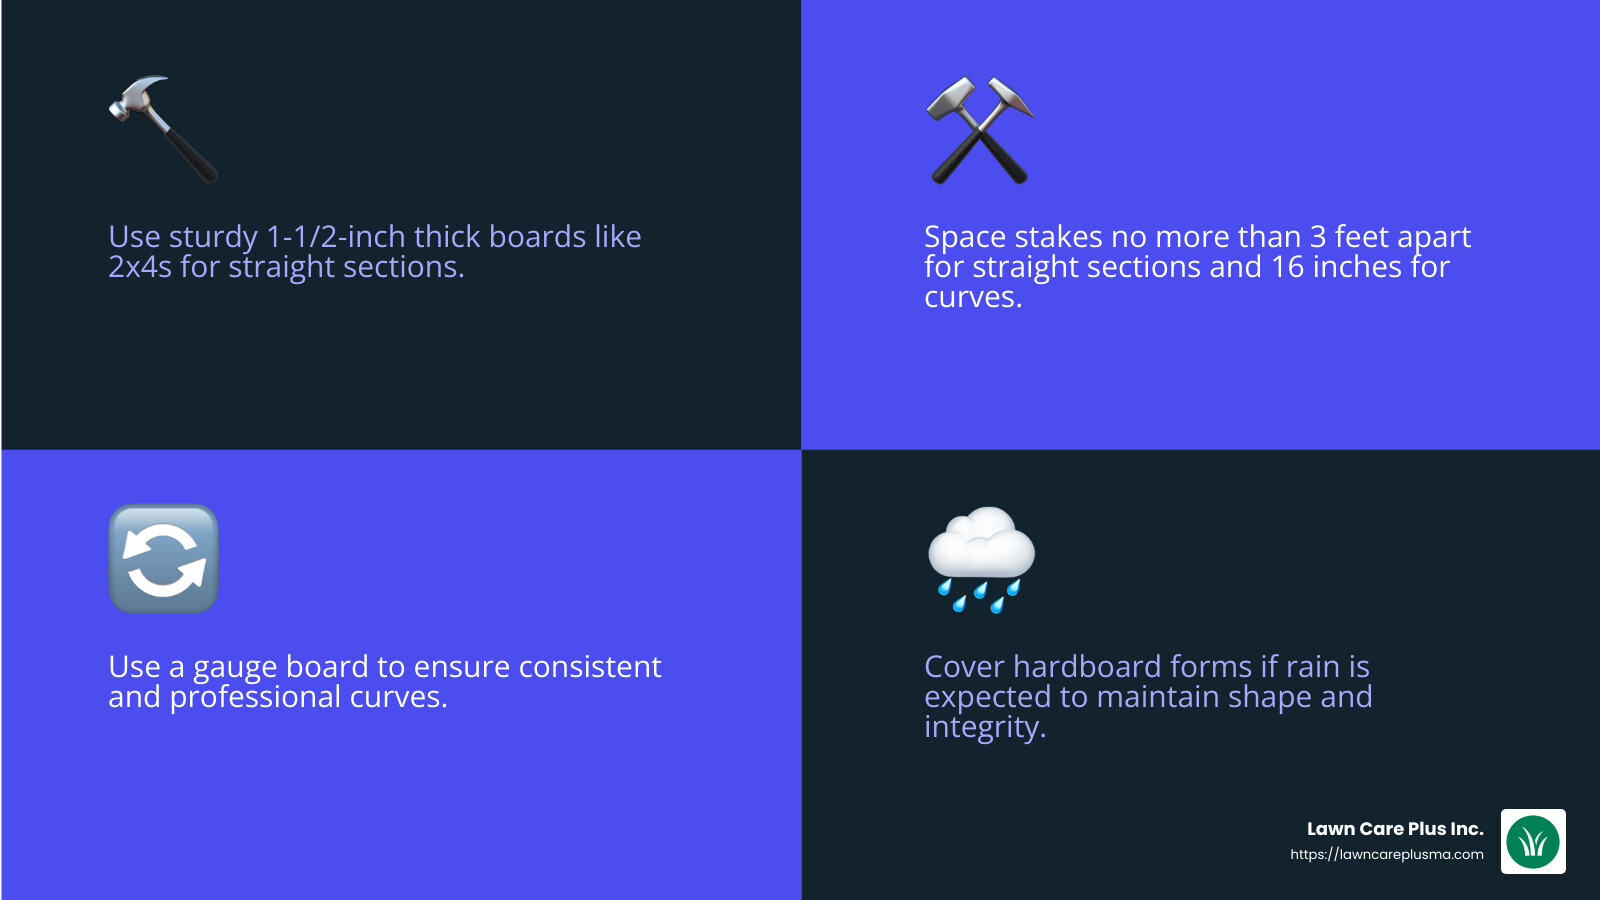
The choice of materials for your forms can make or break your project. Use sturdy 1-1/2-inch thick boards, such as 2x4s or 2x6s, for straight sections. These boards provide the necessary strength to withstand the pressure of wet concrete. For curves, opt for flexible materials like fiber cement board siding, also known as hardboard. Hardboard is affordable and can be cut to any width, making it ideal for forming curves.
Staking
Proper staking is essential to keep your forms in place. Place stakes no more than 3 feet apart for straight sections. For curves, space them closer—about 16 inches apart—to provide extra support. Ensure that stakes are driven below the top edge of the forms to avoid obstacles during screeding.
Curves Handling
Creating smooth curves in your walkway requires some finesse. Start by building one side of the curve first. Then, use a gauge board—a simple 1×4 with blocks attached—to position the opposite side parallel and at the correct distance. This method ensures consistent curves and a professional finish.
Reinforcement
Concrete forms need reinforcement to prevent bulging under pressure. For aboveground forms, brace the stakes with diagonal kickers for added stability. If forms extend below ground, pack soil against them to provide additional support.
Hardboard Use
Hardboard is excellent for forming curves but needs reinforcement to prevent swelling and warping, especially in wet conditions. Be prepared to cover your hardboard forms if rain is expected to maintain their shape and integrity.
By selecting the right materials and properly staking and reinforcing your forms, you’ll ensure a smooth and successful concrete walkway installation. Once the forms are set, you’re ready to move on to choosing the right concrete mix and pouring techniques.
The Right Concrete Mix and Pouring Techniques
Choosing the right concrete mix is crucial for a successful concrete walkway installation. The mix determines the strength, durability, and finish of your walkway. Here’s how to get it right:
Mix Selection
For a standard residential walkway, a 3,000-pound mix is typically recommended. This mix provides the right balance of strength and workability. In colder climates, consider a mix with 5 percent air entrainment. This helps the concrete expand and contract without cracking during freeze-thaw cycles.
Ordering Concrete
Order your concrete from the nearest supplier to ensure it arrives fresh. Concrete is typically ordered in cubic yards. To calculate the amount you need, multiply the length, width, and depth of your walkway, then divide by 27 to convert to cubic yards. Always order a bit extra to account for spills or uneven ground—about 5 percent more should suffice.
Pouring Method
Pouring concrete is a team effort. Have at least three people ready: one to pour, one to level, and one to haul concrete. Use a steel rake to pull the concrete into place, rather than shoveling it, which can create air pockets. Pour in sections, slightly overfilling the forms, and level with a screed board.
Weather Considerations
Weather plays a significant role in concrete pouring. Aim for dry, cool weather—between 60 to 80 degrees Fahrenheit is ideal. Avoid pouring on very hot days or when freezing temperatures are expected at night. Rain is a deal-breaker; if rain is forecasted, postpone your pour to avoid damage to the fresh concrete.
Timing
Timing is everything. Once the concrete is poured, you have a limited window to finish the surface. Start by screeding immediately after pouring to level the surface. Then, use a bull float to smooth it out. As the concrete begins to set, cut control joints to prevent cracking. Finally, apply a broom finish for texture and slip resistance.
By selecting the right mix and using proper pouring techniques, you can ensure a strong and durable concrete walkway. Next, we’ll cover the essential steps for installation to make sure your walkway is built to last.
Essential Steps for Concrete Walkway Installation
Once the concrete is poured, the next steps are critical to ensure a smooth and durable finish. Let’s dive into the key processes: leveling, screeding, floating, joint cutting, brooming, and curing.
Leveling
Leveling is your first task after pouring the concrete. Use a screed board, usually a straight 2×4, to level the concrete. Move the screed in a sawing motion back and forth across the top of the forms. This removes excess concrete and fills in low spots, ensuring an even surface.
Screeding
Screeding helps to compact the concrete and bring the cream (a mix of cement and water) to the surface. This step is essential for creating a smooth and uniform base. Ensure the screed board is clean and free of debris to avoid imperfections.
Floating
Once screeding is complete, it’s time to float the concrete. Use a bull float to smooth the surface and embed any large aggregate. This tool helps to remove ridges and fills voids left by the screed. Floating should be done immediately after screeding, while the concrete is still workable.
Joint Cutting
Cutting control joints is vital to prevent random cracking. Use a jointing trowel to create grooves in the surface. These should be placed at intervals equal to the width of the walkway and should be about a quarter of the concrete’s depth. Joints allow the concrete to expand and contract with temperature changes, directing cracks to the grooves instead of the surface.
Brooming
For a non-slip surface, apply a broom finish after floating. Use a stiff-bristled broom to gently drag across the concrete surface. This creates small ridges that improve traction, especially important in wet conditions. Brooming should be done after the surface water has evaporated but before the concrete sets.
Curing Methods
Proper curing is crucial for concrete strength and durability. Cover the walkway with a plastic sheet or curing blanket to retain moisture. This helps prevent the surface from drying too quickly, which can cause cracks. Keep the concrete covered for at least a week, and avoid foot traffic during this time to ensure optimal curing.
By following these essential steps, you ensure a durable, long-lasting concrete walkway. These techniques not only improve the walkway’s appearance but also its functionality, making it safe and reliable for years to come.
Next, we’ll discuss the finishing touches and maintenance tips to keep your concrete walkway in top shape.
Finishing Touches and Maintenance for Your Concrete Walkway
Once your concrete walkway is installed, it’s important to focus on finishing touches and maintenance to ensure it remains in top condition for years to come. Here’s how:
Sealing
Sealing your concrete walkway is crucial for protecting it from stains, weather, and wear. A good concrete sealer will act as a barrier against moisture and chemicals, extending the life of your walkway. Apply the sealer once the concrete has fully cured, typically around 28 days after pouring. Make sure to follow the manufacturer’s instructions for the best results.
Texturing
Texturing adds both aesthetic appeal and safety to your walkway. While brooming during installation provides a non-slip surface, additional texturing can be achieved by stamping or staining. These techniques can mimic the look of natural stone or brick, enhancing the overall appearance of your outdoor space.
Cleaning
Regular cleaning is essential to maintain the look and longevity of your concrete walkway. Use a mild detergent and water to remove dirt and debris. For stubborn stains, a pressure washer can be effective, but be careful not to damage the surface. Avoid harsh chemicals that could degrade the concrete.
Long-term Care
To keep your walkway looking its best, inspect it regularly for any signs of damage. Fill small cracks promptly with a concrete patching compound to prevent them from spreading. Additionally, avoid using de-icing salts in winter, as these can lead to surface damage over time.
Repair Tips
Despite best efforts, cracks and chips can occur. For minor cracks, use a concrete filler or patching mix to repair the damage. For more significant issues, such as crumbling edges, it may be necessary to resurface the affected area. Always consult a professional if you’re unsure about the extent of the repair needed.
By focusing on these finishing touches and maintenance tips, you can ensure that your concrete walkway remains a durable and attractive part of your property. Next, we’ll address some frequently asked questions to help you further understand the intricacies of concrete walkway installation.
Frequently Asked Questions about Concrete Walkway Installation
How thick should the concrete be for a walkway?
For a concrete walkway, the recommended thickness is typically 4 inches. This provides a strong and stable surface that can handle regular foot traffic. If the walkway will see heavier use, such as occasional vehicle crossings, consider increasing the thickness to 5 or 6 inches for added durability.
Can you pour concrete directly on dirt for a walkway?
Pouring concrete directly on dirt is not advisable. The ground should be properly prepared to ensure a long-lasting walkway. This involves removing grass and topsoil, compacting the soil, and laying down a 4-inch layer of gravel. This gravel base helps with drainage and prevents the concrete from cracking or shifting over time.
How do you ensure proper drainage in a concrete walkway?
Proper drainage is key to preventing water pooling and potential damage. To ensure effective drainage:
- Slope the Walkway: The walkway should have a slight slope, typically 1/4 inch per foot, away from structures like your home. This directs water away and prevents pooling.
- Use Expansion Joints: These joints allow for movement and prevent cracking. They also help guide water flow.
- Install Drainage Solutions: Consider adding French drains or perforated pipes alongside the walkway if the area is prone to heavy water accumulation.
By addressing these common questions, you can ensure a successful and long-lasting concrete walkway installation.
Conclusion
A concrete walkway is more than just a path; it’s a durable and aesthetic addition to any property. When properly installed, it can last anywhere from 25 to 50 years or more, offering a reliable surface that withstands the test of time and weather. The key to longevity lies in careful planning and execution, from preparing the ground to the final finishing touches. By following the detailed steps outlined and considering professional services, you can ensure your walkway is built to last.
Aesthetically, concrete offers versatility. It can be tinted, stamped, or stained to match your home’s exterior, mimicking materials like natural stone or brick. This adaptability allows homeowners to customize their walkways to blend seamlessly with their landscape, enhancing curb appeal.
At Lawn Care Plus Inc., we pride ourselves on delivering expert landscaping and hardscaping services. Our experienced team specializes in concrete walkway installation, ensuring each project is completed with precision and care. We understand the unique challenges of the Boston Metro-West area’s climate and terrain, and our comprehensive services are designed to meet the needs of both residential and commercial clients.
By choosing Lawn Care Plus Inc., you benefit from our expertise and commitment to quality. Our services ensure that your concrete walkway is not only aesthetically pleasing but also durable and long-lasting. For more information on our walkway installation services, visit our service page.
In summary, investing in a professionally installed concrete walkway is a smart choice for any homeowner seeking both beauty and durability. With proper care and maintenance, your walkway will serve you well for decades to come.
