How to install patio pavers quickly transforms your yard into a stunning outdoor sanctuary. Whether you want a cozy nook for relaxation or an neat space for entertaining, installing patio pavers is your go-to project. To kickstart your venture into patio perfection, here’s a simple rundown of the steps:
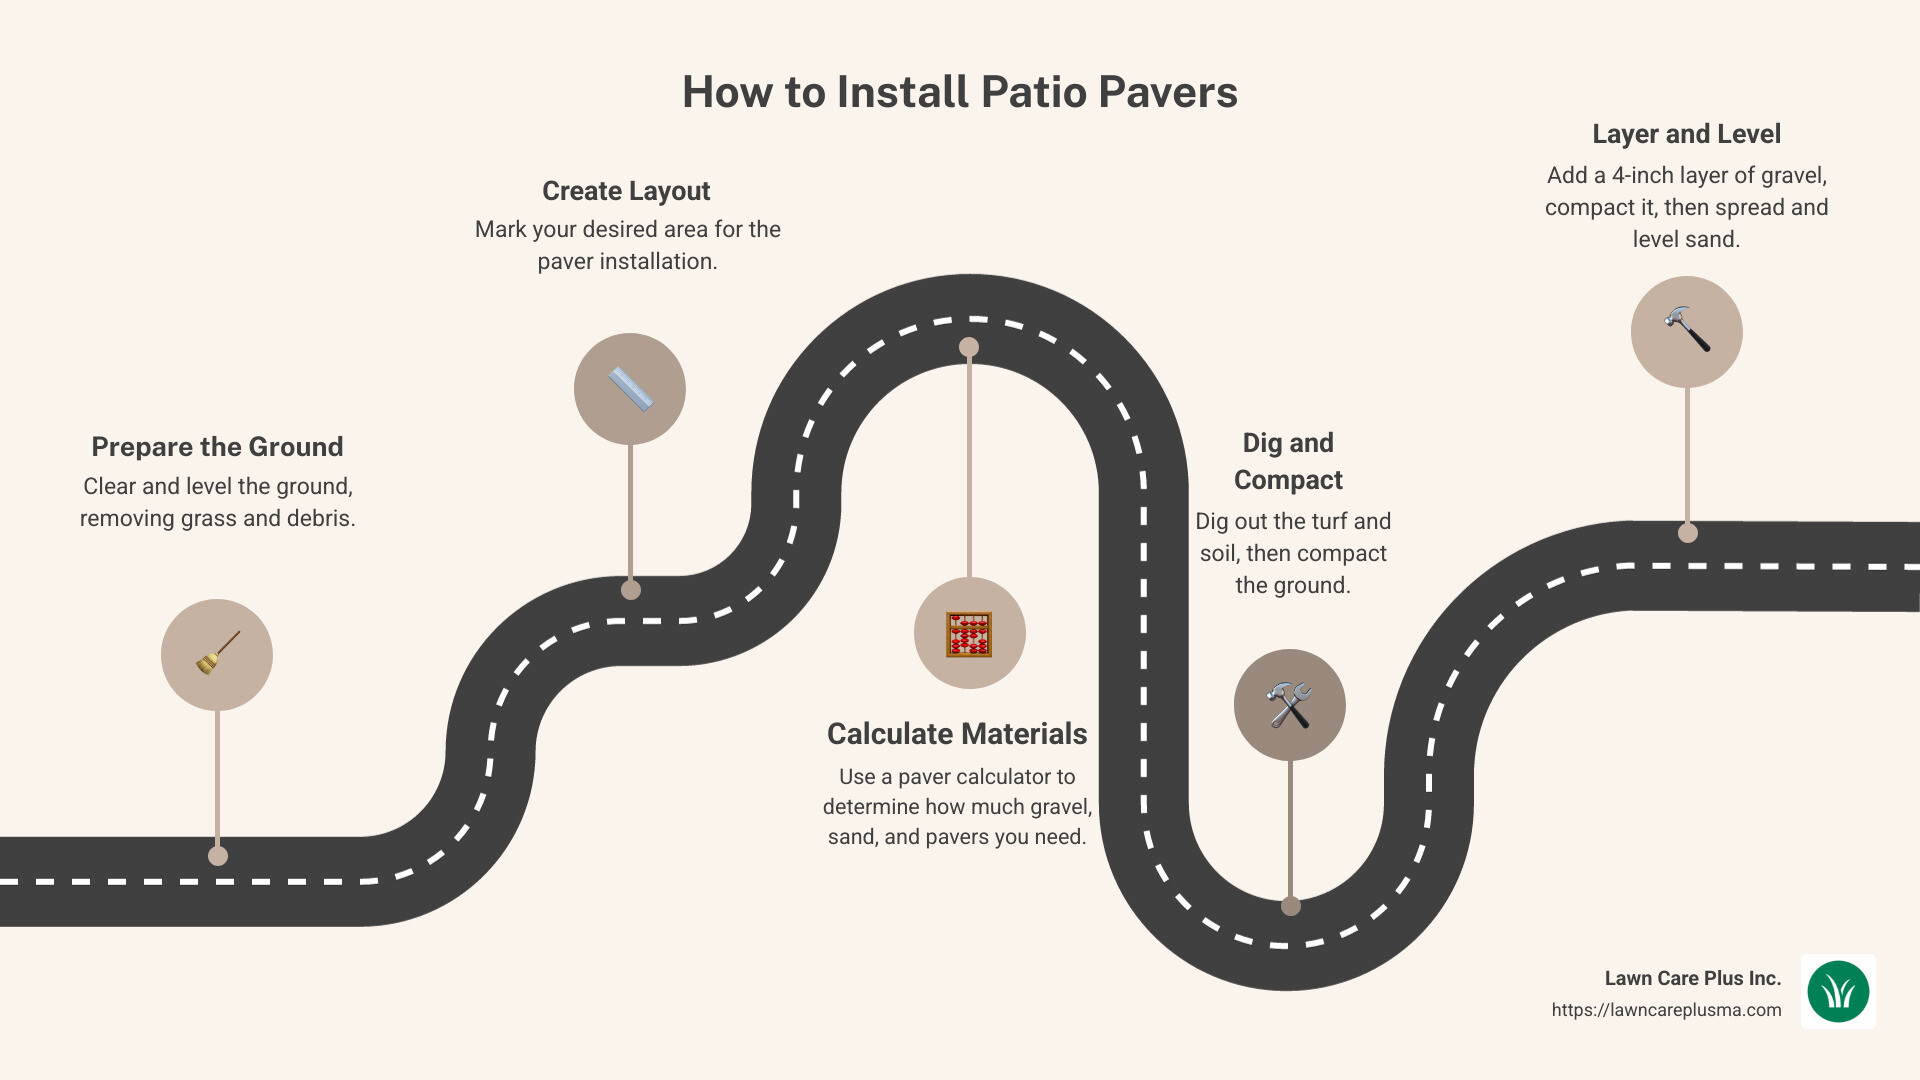
- Prepare the Ground: Clear and level the ground, removing grass and debris.
- Create Layout: Mark your desired area for the paver installation.
- Calculate Materials: Use a paver calculator to determine how much gravel, sand, and pavers you need.
- Dig and Compact: Dig out the turf and soil, then compact the ground.
- Layer and Level: Add a 4-inch layer of gravel, compact it, then spread and level sand.
- Place Pavers: Lay paver stones snugly, starting from a corner.
- Finish: Sweep sand into the paver joints and compact again.
Installing a patio with pavers doesn’t just lift your home’s aesthetic; it also adds lasting durability and minimal maintenance to your outdoor area. That’s why we at Lawn Care Plus Inc. are excited to provide insightful guidance to support busy homeowners and property managers throughout the Boston Metro-West area.
Creating a patio with pavers might sound like a hefty task, but it’s a rewarding undertaking that transforms your space into a vibrant, functional area. Throughout this article, you’ll find how easily you can improve your landscape with the right steps and materials. Each phase of the process, from preparation to finalization, contributes to crafting a patio that endures the test of time and seasons.
Let’s dive into the details and help you revitalize your home’s exterior the professional way.
How to install patio pavers word roundup:
– paver patio contractors
– patio construction
– patio builders
Preparing the Ground for Pavers
Before diving into the main event of laying your patio pavers, it’s crucial to prepare the ground properly. This foundational step ensures your patio will be stable and long-lasting.
Clear the Area
Start by clearing the designated area of any grass, plants, or debris. Use a spade or shovel to remove the top layer of grass and soil. It’s important to work methodically to ensure no roots or rubble are left behind, as these can cause uneven surfaces later on.
Remove Grass and Soil
Once the area is clear, dig down to the required depth. Typically, this means removing enough soil to accommodate your gravel base, sand layer, and pavers. A general rule of thumb is to dig about 6-7 inches deep, accounting for 4 inches of gravel, 1 inch of sand, and the thickness of the pavers.
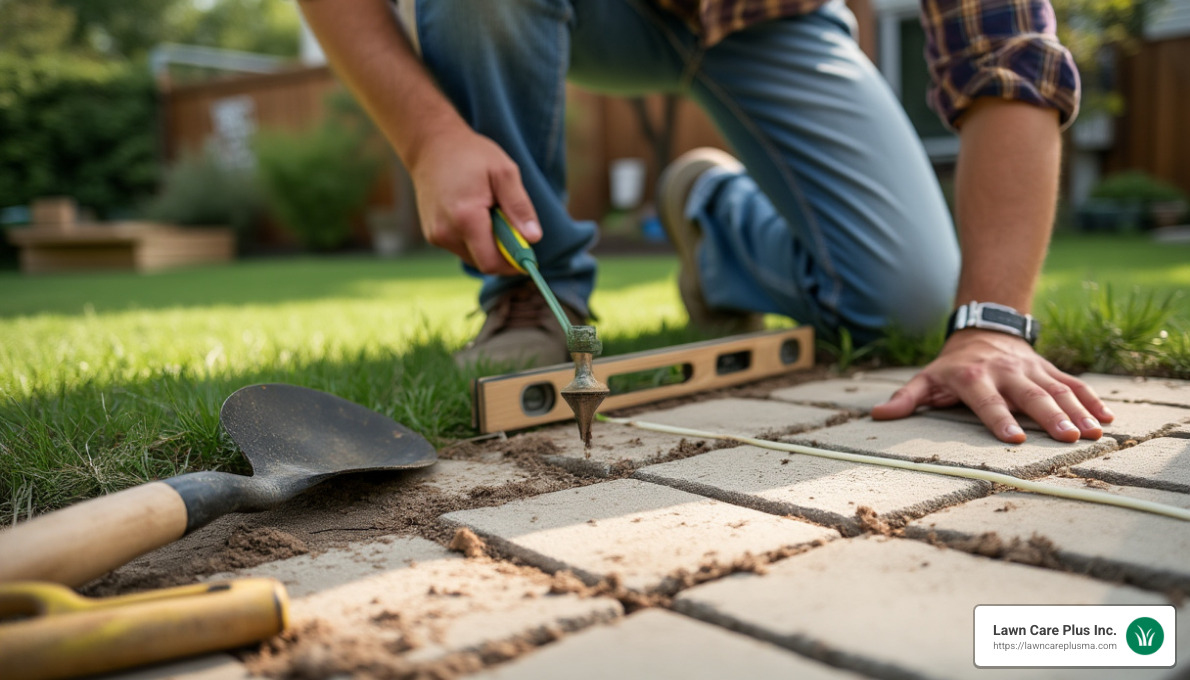
Level the Ground
After removing the soil, it’s time to level the ground. Use a mason’s line or a garden hose to mark the perimeter and ensure your ground is even. This step is crucial for a smooth finish. A line level can help you check for any high or low spots.
Compact the Ground
Compacting the ground is essential to prevent future settling. Use a mechanical compactor or a hand tamper to press down the soil firmly. This creates a stable base for your pavers. If you’re working on a larger area, consider renting a plate compactor to save time and ensure thorough compaction.
Ensure a Root-Free and Rubble-Free Base
Before moving on, double-check that the area is free of roots and rubble. These can compromise the integrity of your patio by causing shifting or cracking over time.
Add a Compatible Sand Sub-Base
The final step in ground preparation is adding a layer of sand. This acts as a cushion for the pavers and helps with leveling. Spread the sand evenly across the compacted ground and use a straight board or a 2×4 to screed the surface, ensuring a level base.
By carefully preparing the ground, you set a solid foundation for your patio paver project. This groundwork is key to crafting a durable and beautiful outdoor space.
How to Install Patio Pavers
Changing your outdoor space with patio pavers is a rewarding project. Let’s explore the step-by-step process to ensure your patio looks professional and stands the test of time.
Step 1: Create Layout
Start by marking the perimeter of your patio area. Use a garden hose or mason’s line to outline the space. Secure the lines with stakes to keep everything in place. This layout will guide you through the rest of the installation process.
Step 2: Calculate Materials
Measure the area of your planned patio. Enter these measurements into a paver calculator to determine how much gravel, sand, and how many pavers you’ll need. This ensures you have the right amount of materials without overbuying.
Step 3: Dig Out Turf and Soil
Use a spade and shovel to dig out the turf and soil to the necessary depth. Typically, you’ll need to dig about 6-7 inches deep. Maintain a slight slope away from any structures using a mason’s line to ensure proper drainage.
Step 4: Add Paver Base
Spread a 4-inch layer of gravel across the area using a landscape rake. Compact the gravel using a plate compactor or hand tamper to create a firm base. Lightly wet the base with a garden hose to help with compaction.
Step 5: Add and Level Paver Sand
Lay down lengths of electrical conduit to guide the sand leveling. Spread paver sand over the gravel, then use a 2×4 board to level it out. Remove the conduits and fill any gaps with more sand, ensuring a smooth surface.
Step 6: Place the Paver Stones
Begin laying the paver stones from a corner, ensuring a snug fit. Avoid dragging or stomping the pavers into place, as this can disturb the sand layer. Instead, place them gently and adjust as needed.
Step 7: Cut Pavers
For areas where pavers don’t fit perfectly, use a masonry saw to cut them to size. Always wear safety gear like gloves and eyewear when cutting to protect yourself from debris.
Step 8: Add Edging Stones or Paver Edging
Secure the edges of your patio with edging stones or plastic edging. Use concrete or mortar to hold them in place, or stake plastic edging into the ground to maintain the shape of your patio.
Step 9: Finish the Patio
Spread a layer of paver sand over the entire surface. Use a push broom to sweep the sand into the gaps between the pavers. Run a plate compactor over the patio to settle the sand and pavers into place. Repeat the sand application and compaction process to fill any remaining gaps and ensure a stable surface.
By following these steps, you’ll have a beautiful and durable patio that improves your outdoor space. Now, let’s look at some tips for beginners to make the process even smoother…
Tips for Beginners
Starting on a DIY patio paver project can feel overwhelming, but with a few simple tips, you’ll be on your way to creating a stunning outdoor space. Here’s how to make the process smoother:
Rent Tools
Don’t rush out to buy every tool you need. Many specialized tools, like a plate compactor or masonry saw, can be rented. This not only saves money but also ensures you have access to professional-grade equipment. Check local rental shops for availability.
Take Your Time
Patience is key. Rushing through the installation can lead to mistakes that are costly to fix. Allocate enough time to complete each step thoroughly. A well-laid patio will last for years, so it’s worth doing it right the first time.
Check Drainage
Ensuring proper drainage is crucial to prevent water pooling on your patio. As you set the slope during the digging phase, keep in mind the general rule: a drop of 1 inch for every 8 feet. This simple step can save you from future water damage.
Avoid Shortcuts
It might be tempting to skip steps or use fewer materials to save time or money, but shortcuts often lead to issues like uneven surfaces or shifting pavers. Follow each step of the process, especially with preparing the base and leveling the sand.
Seek Help If Needed
If you find yourself in over your head, don’t hesitate to ask for help. Whether it’s enlisting a friend for heavy lifting or consulting with a professional for advice, having support can make a big difference.
By following these tips, you’ll set yourself up for success and enjoy the process of changing your outdoor space. Next, let’s explore common mistakes to avoid during your installation…
Common Mistakes to Avoid
When learning how to install patio pavers, being aware of common pitfalls can save you time and frustration. Here are some mistakes to steer clear of:
Improper Base Preparation
One of the biggest errors is neglecting the base. A strong foundation is crucial. Start by removing all grass and roots, then compact the soil. Add a layer of gravel or crushed stone, and compact again. Skipping these steps can cause your patio to shift or sink over time.
Incorrect Leveling
Achieving a perfectly level surface is key. Use a mason’s line and a level to ensure accuracy. An uneven base will lead to crooked pavers and water pooling. Take your time to smooth and level the sand before laying pavers.
Insufficient Compaction
Failing to compact the base material properly can result in a weak foundation. Use a plate compactor on the gravel and again on the sand. This ensures that the ground beneath your pavers is solid and stable, preventing future movement.
Poor Drainage
Ignoring drainage can lead to water problems. Your patio should have a slight slope to direct water away. Without this, you risk water pooling, which can damage the pavers and create a slippery surface.
Skipping Edging
Edging is not just decorative; it holds your pavers in place. Without it, your pavers might shift and spread over time. Use concrete, mortar, or plastic edging to secure the perimeter of your patio.
By avoiding these common mistakes, you’ll create a patio that’s not only beautiful but also durable. Next, let’s dive into frequently asked questions about installing patio pavers…
Frequently Asked Questions about Installing Patio Pavers
Can you lay pavers directly on dirt?
No, laying pavers directly on dirt is not recommended. While it might seem like a shortcut, it leads to problems like shifting and uneven surfaces.
Why? Dirt is not a stable foundation. It can shift, sink, and erode, especially with rain or heavy foot traffic. This can cause your pavers to become uneven, creating tripping hazards and damaging your beautiful patio.
To ensure stability, level the area, excavate to the proper depth, and compact the soil. This preparation is key to a long-lasting patio.
Do I need gravel under pavers?
Yes, using gravel under pavers is essential. Gravel acts as a stable foundation that prevents shifting and sinking, which are common issues with patios.
Why is gravel important? It provides a solid base that helps distribute weight evenly. This prevents pavers from moving around and ensures your patio stays level over time.
A 4-inch layer of gravel, compacted firmly, creates the perfect base. This layer supports the pavers and helps with drainage, reducing the risk of water damage.
How do you prepare a patio for pavers?
Preparing your patio for pavers involves several crucial steps:
- Layout: First, mark the perimeter using a garden hose, stakes, and mason’s line. This helps you visualize the final design and ensures accuracy.
- Calculate Materials: Measure the area to determine how much gravel, sand, and pavers you’ll need. A paver calculator can simplify this process.
- Dig and Smooth: Use a spade and shovel to dig out turf and soil. Ensure the depth is correct, considering the layers you’ll add.
- Tamp the Base: Compact the soil to create a firm base. Follow this with a 4-inch layer of gravel, compacted again for stability.
- Add Base Material: After the gravel, add a layer of coarse sand. This helps level the surface and provides a cushion for the pavers.
- Edging: Install edging to keep the pavers in place. This can be done with concrete, mortar, or plastic edging.
- Cut Pavers: Use a masonry saw to cut pavers as needed, ensuring a snug fit and clean lines.
By following these steps, you’ll set the stage for a successful patio installation. Proper preparation makes all the difference in durability and appearance.
Conclusion
Installing patio pavers is a rewarding project that can transform your outdoor space into a functional and beautiful area. By following the steps outlined in this guide, you can achieve a professional-looking patio that improves your home’s value and appeal.
Benefits of Installing Patio Pavers:
- Durability: Pavers are designed to withstand heavy foot traffic and various weather conditions, ensuring your patio remains in great shape for years.
- Low Maintenance: Once installed, patio pavers require minimal upkeep. Occasional sweeping and the application of joint sand keep them looking their best.
- Versatility: With a wide range of styles, colors, and patterns, pavers offer endless design possibilities to match your personal taste.
Why Choose Lawn Care Plus Inc.?
At Lawn Care Plus Inc., we pride ourselves on our expertise in landscaping and hardscaping services. Serving the Boston Metro-West area, our team is dedicated to delivering high-quality installations that meet your specific needs. Whether you’re planning a DIY project or seeking professional help, we have the skills and resources to bring your vision to life.
If you’re ready to improve your outdoor space with a stunning patio, contact us today for expert assistance. Our team is here to guide you every step of the way, ensuring a seamless and satisfying experience.
Professional Help
While a DIY patio installation can be a fulfilling endeavor, sometimes professional assistance is the best choice. Our experienced team can handle everything from planning and design to installation and finishing touches. We ensure every detail is perfect, saving you time and effort.
For more information or to schedule a consultation, reach out to us at Lawn Care Plus Inc. Let us help you create the outdoor space of your dreams!
