Protecting Your Home With Proper Water Management
There’s something truly magical about the gentle patter of rain on your roof – until that water has nowhere to go. Without proper drainage, that soothing rainfall transforms from peaceful ambiance into a serious threat to your home’s foundation, basement, and landscape.
Installing a french drain for gutters creates a comprehensive water management system that protects your biggest investment – your home. If you’re looking for the essentials, here’s what you need to know:
Quick Answer: French Drain for Gutters Installation Basics
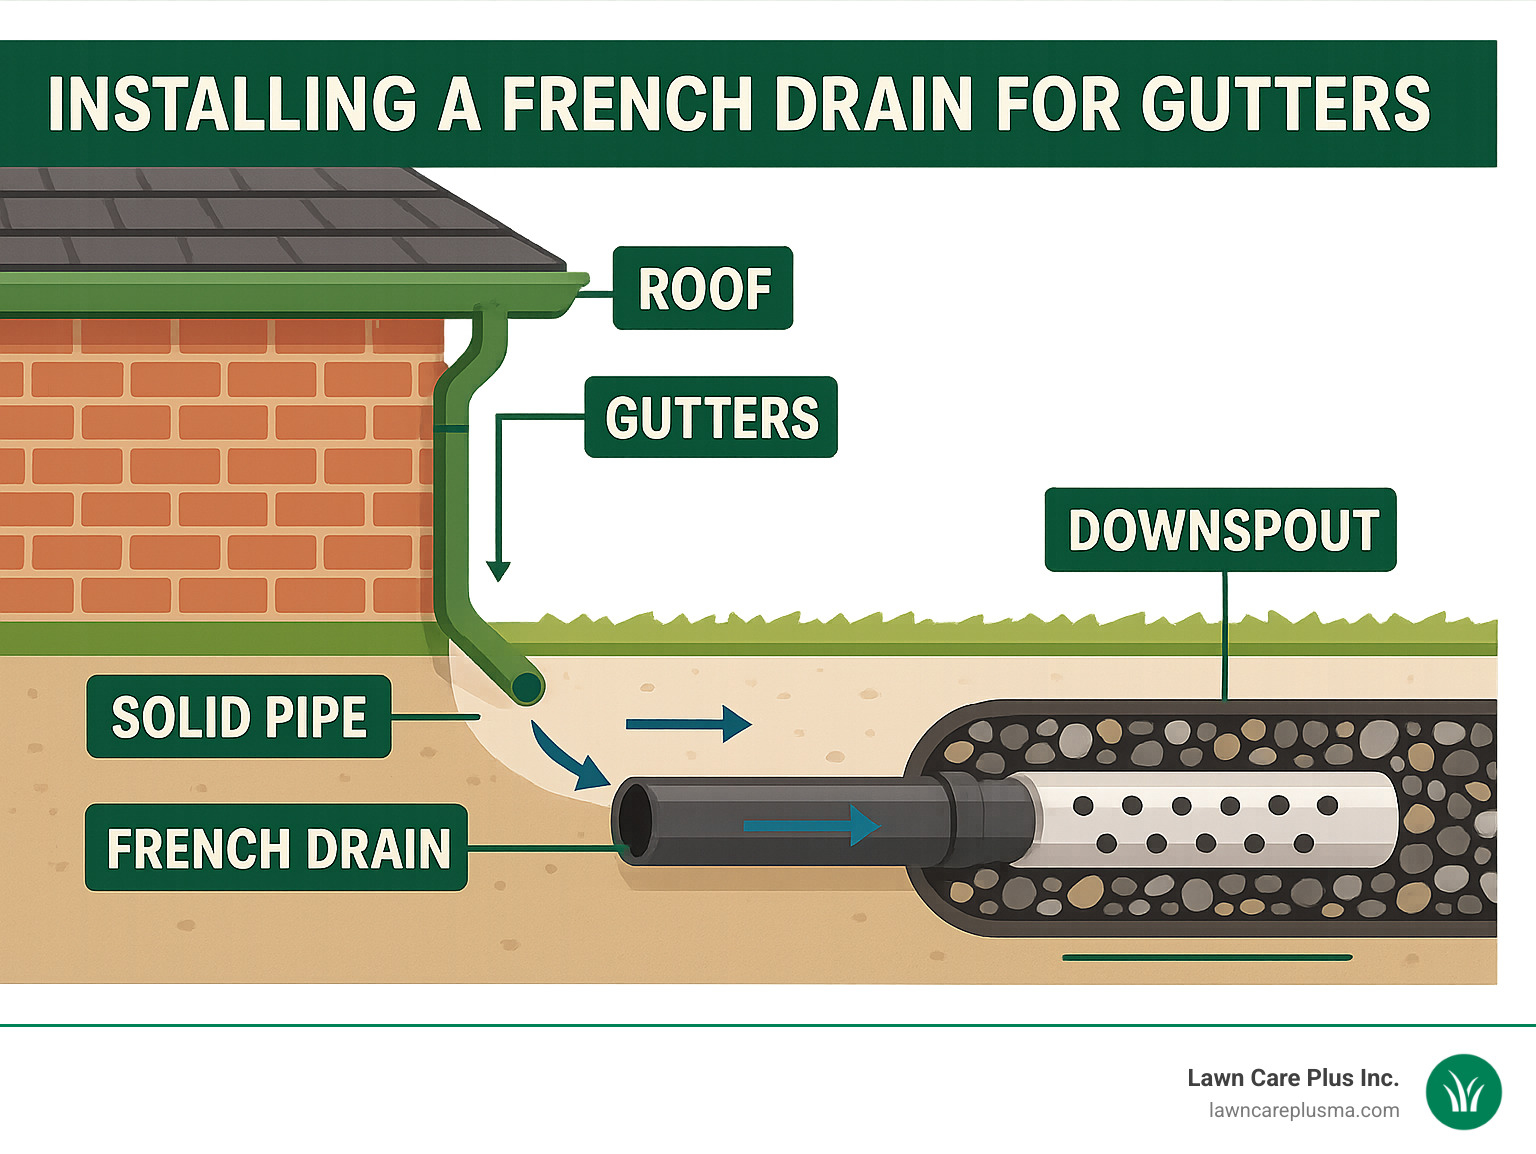
1. Use separate pipes: Run a solid PVC pipe from downspouts, NOT directly into the French drain
2. Proper spacing: Keep the downspout pipe at least 6″ away from the French drain
3. Recommended materials: 4″ Schedule 40 PVC for downspouts, 4″ perforated pipe for French drain
4. Slope requirement: Maintain 1″ drop per 10 feet of pipe
5. Trench dimensions: Dig 9″ wide by 18-24″ deep
A properly designed drainage system directs water away from your home, preventing the triple threat of water pooling, soil erosion, and foundation damage. By thoughtfully combining your gutter system with a French drain, you create a complete water management solution that handles both roof runoff and groundwater issues.
Why this matters: The numbers don’t lie – a properly installed French drain can reduce basement flooding and standing yard water by up to 80%. That’s the difference between a dry basement and thousands in water damage repairs.
While gutters and French drains work as partners in your drainage system, they serve distinct but complementary purposes:
- Gutters capture all that roof runoff that would otherwise cascade directly around your foundation
- Downspouts channel water from gutters safely down to ground level
- French drains collect and redirect groundwater through underground perforated pipes surrounded by gravel
The secret to success is knowing how to connect these systems properly. As drainage expert Thomas wisely notes, “It is definitely NOT a good idea to tie gutter downspouts directly into a French drain.” This might seem counterintuitive, but it prevents overwhelming your French drain during heavy downpours.
Here at Lawn Care Plus Inc., we’ve seen far too many Massachusetts homes with preventable water damage. Basements with mold issues, cracked foundations, and eroded landscapes – all because rainfall wasn’t properly managed. The good news? With thoughtful planning and proper installation, you can keep your home dry and protected for years to come.
What Is a French Drain and How Does It Work?
Ever wondered how water seems to magically disappear from soggy yards? That’s where French drains come in! Despite the fancy name, a French drain is simply an underground drainage superhighway for groundwater.
Think of it as creating the path of least resistance for water. When rain falls, it soaks into your yard and naturally wants to flow somewhere. A French drain gives that water an easy route away from your home’s foundation.
The magic happens through a combination of gravity and capillary action. When water seeps into the ground, it encounters your French drain’s gravel-filled trench. Those little spaces between the rocks create a much easier path for water to flow through than the surrounding soil. At the bottom sits a perforated pipe that collects this water and channels it safely away from your property.
“A French drain consists of a network of pipes laid in trenches beneath the ground to carry water runoff,” explains a drainage specialist. “The key is creating a consistent downward slope that allows gravity to do the work.”
Here in the Boston Metro-West area, we see all kinds of soil conditions that affect drainage. Clay soils hold water like a sponge and often need more extensive systems, while sandy soils let water move through more freely. Your soil type will influence how we design your specific drainage solution.
For more comprehensive information on managing water on your property, check out our detailed guide on Land Drainage Systems.
Key Components Inside the Trench
A properly built French drain is like a well-constructed sandwich, with several important layers working together:
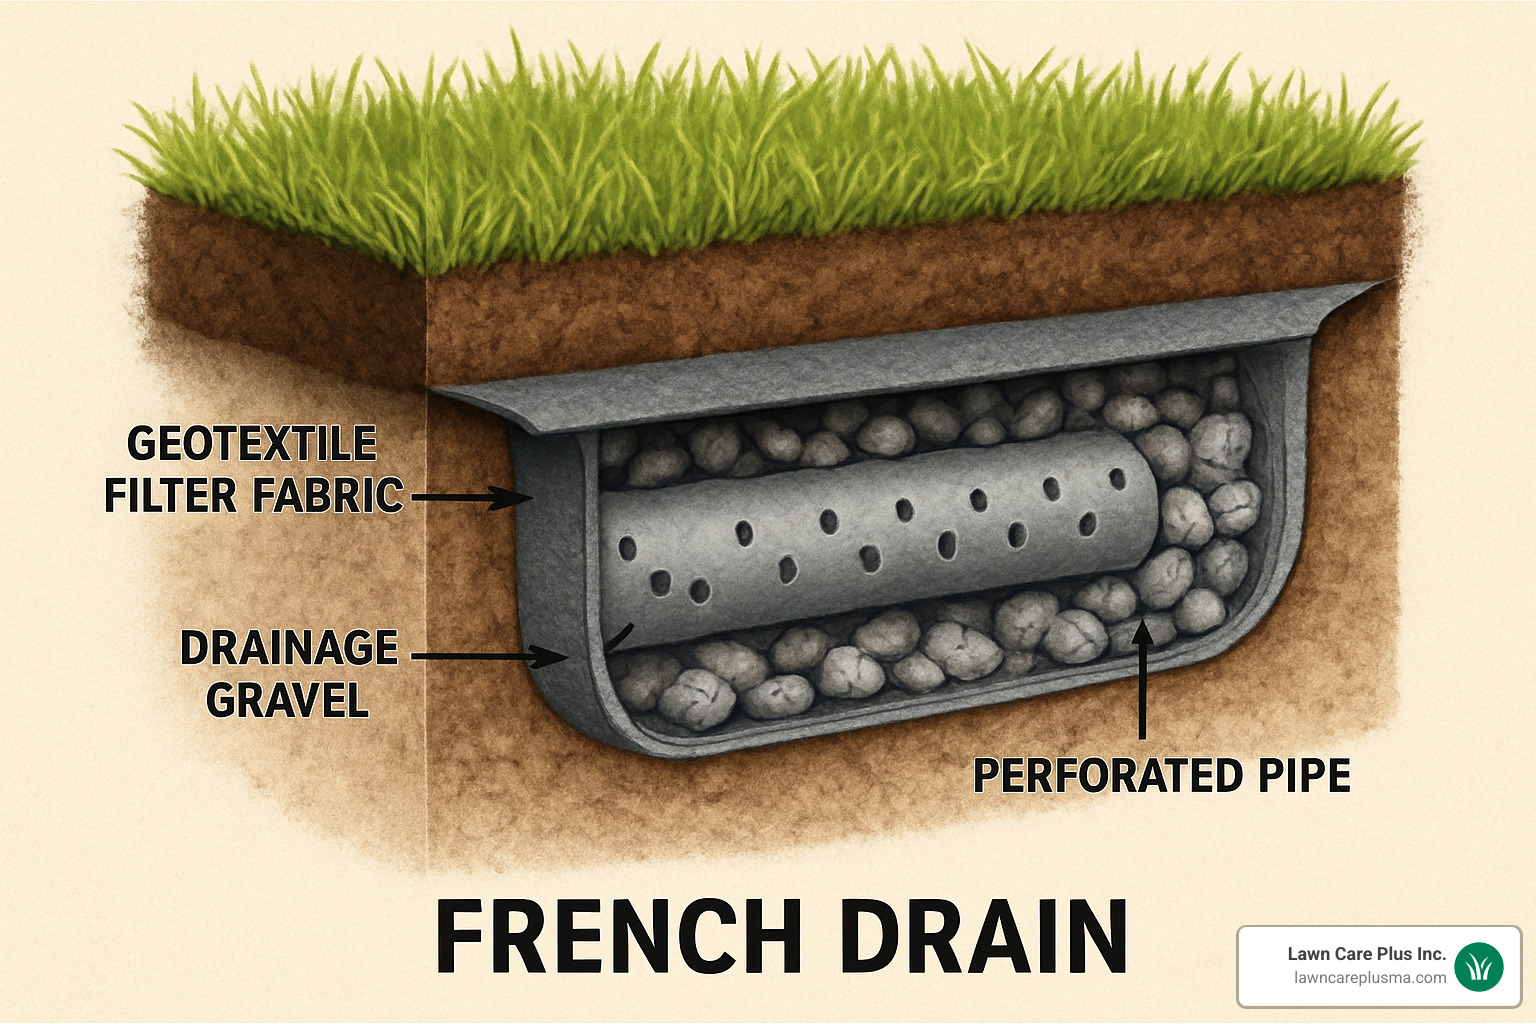
Geotextile filter fabric wraps the entire system like a burrito. This special fabric is critical because it keeps soil particles out while letting water flow in. Without it, your drain would clog up within months.
Perforated pipe (typically 4 inches in diameter) sits at the bottom of the trench. Here’s a surprising tip from our years of experience: install the pipe with holes facing downward. It seems counterintuitive, but this actually prevents clogging and improves water collection.
Drainage gravel surrounds the pipe and fills the trench. We typically use 3/4-inch washed stone or pea gravel, which provides plenty of space for water movement while supporting the pipe structure.
Proper slope is absolutely essential. The entire system needs a downward pitch of at least 1 inch per 10 feet of pipe. This gentle slope ensures water keeps moving away from your home rather than pooling up.
Outlet or termination point gives the collected water somewhere to go. This might be a storm drain, a dry well, or simply “daylighting” (bringing the pipe to the surface) at a low point in your yard away from structures.
When designing French drains for our clients in Massachusetts, we carefully consider each of these elements. The right combination creates a system that will protect your home and keep your yard dry for years to come. And when installing a French drain for gutters, these components become even more critical to ensure both systems work together effectively.
Installing a French Drain for Gutters: Benefits & Limitations
Installing a french drain for gutters is one of the smartest investments you can make to protect your home from water damage. When these systems work together properly, they create a powerful defense against moisture problems that could otherwise lead to costly repairs.
According to industry data, homeowners who install proper drainage systems can reduce basement flooding and eliminate standing water by up to 80%. That’s significant peace of mind when you consider that water damage consistently ranks among the most expensive home insurance claims.
But before you grab a shovel and start digging, it’s important to understand both what these systems can and can’t do for your property.
On the positive side, a well-designed gutter and French drain combination effectively manages both roof runoff and groundwater, preventing soil erosion around your foundation. This reduces hydrostatic pressure against basement walls (the force that can eventually crack concrete) and protects your landscaping from water damage. Best of all, these systems work entirely with gravity – no electricity required!
However, there are limitations to consider. Installation requires significant excavation, which might necessitate professional help to ensure proper slope and connections. These systems can clog if not properly protected with filter fabric, and they need regular maintenance to function optimally. Additionally, not all soil types or property layouts are suitable for standard French drain installations.
Why You SHOULD Keep Downspouts Separate
One of the biggest mistakes homeowners make when installing a french drain for gutters is trying to connect these systems directly. As drainage expert Lee Sam warns, “You are trying to combine two systems: 1) collection of ground water, and 2) collection of roof drainage. This is a bad idea…don’t do it.”
The reasoning is straightforward. French drains are designed to collect groundwater gradually, while your gutter system needs to handle large volumes of concentrated water during heavy downpours. Connecting them directly creates several problems:
First, you risk overwhelming your French drain during heavy rain when the volume of roof water exceeds what the system can handle. Second, this excess water creates hydrostatic pressure that can push back through the perforations in the pipe, saturating the soil around your foundation – exactly what you’re trying to prevent! Finally, debris from your roof and gutters can enter the perforated pipe and create clogs from within.
The better approach is using solid Schedule 40 PVC pipe for your downspout drainage, keeping it completely separate from your French drain. As a rule of thumb, maintain at least a 6-inch offset between these systems. This allows each to function as intended without compromising the other.
When Combining Systems Makes Sense
While keeping pipes separate is generally best practice, sometimes running both systems in the same trench makes practical sense. If you’re working with a tight lot where multiple trenches aren’t feasible, a shared trench can be a good solution. It’s also cost-effective since excavation is one of the most expensive parts of drainage installation.
Properties with consistent, favorable slopes and highly permeable sandy soils are also good candidates for combined trenches. In these situations, water drains quickly enough that the systems won’t interfere with each other.
If you do use a shared trench, follow this advice from home improvement expert Thomas: “If using the same trench, place the downspout pipe at least 6″ above or 6″ away from the French drain.” This approach gives you efficient use of space while maintaining the integrity of each system.
For more detailed information on proper installation techniques, you can review the comprehensive guide on how to install French drains from HGTV’s outdoor remodeling experts.
At Lawn Care Plus Inc., we’ve helped countless homeowners throughout the Boston Metro-West area design drainage solutions that work with their specific property conditions. The right approach depends on your soil type, property slope, and existing water issues – but getting it right makes all the difference in protecting your home.
Planning Your Drainage Layout, Codes & Materials
Ready to start digging? Not so fast! A little planning now will save you major headaches later. Before you grab that shovel, let’s make sure your drainage project starts on the right foot.
Safety First: Call Before You Dig
I can’t stress this enough – always call 811 at least a few days before breaking ground. This free service marks all underground utilities on your property. Trust me, accidentally hitting a gas line or electrical cable isn’t something you want to experience. It’s not just dangerous – it could be deadly and will definitely be expensive to repair.
Check Local Codes and Permits
Here in Massachusetts, water management isn’t something you can just handle however you please. Many towns around Boston have specific rules about where drainage water can go. Your town might require permits, especially if you’re planning to connect to municipal storm drains.
At Lawn Care Plus Inc., we’ve worked in communities throughout the Metro-West area for years. We know the local regulations in Newton, Brookline, Watertown, and beyond, so you don’t have to learn them the hard way.
Designing Your Drainage Path
Planning your drainage route isn’t just about getting water from point A to point B. You need to consider the physics of water flow, your property’s unique features, and long-term maintenance.
The golden rule is maintaining proper slope – at minimum, your pipes need a 1-inch drop for every 10 feet (a 1% slope). More slope is always better when your yard allows it. Water needs somewhere to go, whether that’s a storm drain, dry well, or a daylight point that won’t create problems for you or your neighbors.
For materials, stick with quality components. Use solid Schedule 40 PVC pipe for downspouts and 4-inch perforated pipe (preferably with a filter sock) for the French drain portion. Don’t forget to plan for accessories like catch basins, clean-outs, and pop-up emitters that make maintenance easier down the road.
Material Comparison: Solid vs. Perforated Pipe
| Pipe Type | Best Use | Advantages | Disadvantages |
|---|---|---|---|
| Solid PVC (Schedule 40) | Downspout drainage | No water leakage, smooth interior reduces clogging | More expensive, less flexible |
| Corrugated Solid | Downspout drainage | Flexible, easy to work with | More prone to clogging, shorter lifespan |
| Perforated PVC | French drain | Smooth interior, durable | Less flexible, higher cost |
| Perforated Corrugated | French drain | Flexible, cost-effective | More prone to clogging, shorter lifespan |
Finding the Best Route for installing a french drain for gutters
The perfect path for installing a french drain for gutters follows your yard’s natural contours while maintaining that crucial slope. Look for the “grade break” in your yard – that’s the point where your land naturally starts sloping away from your foundation.
As drainage expert French Drain Man says, “Run underground downspouts until you reach a break in the grade so water naturally drains away from the foundation.” With 35+ years of experience, he knows what he’s talking about!
When mapping your route, keep these practical considerations in mind:
Stay at least 10 feet away from large trees when possible. Those thirsty roots will find your nice moist drain pipe and eventually cause problems.
Think ahead about future landscape plans. That perfect drain route might not be so perfect if you’re planning to add a patio or garden bed next year.
Watch out for obstacles like buried utilities, large rocks, or existing hardscapes that might force you to adjust your route.
Decide where your water will ultimately go – will your pipe daylight somewhere on your property, feed into a dry well, or connect to a municipal system?
If your property has challenging slopes, don’t worry. Our team at Lawn Care Plus Inc. specializes in drainage solutions for sloping land and can design a system custom to your unique landscape.
Selecting Pipe Size and Type
For most homes, 4-inch diameter pipe hits the sweet spot between cost and capacity. However, if you’re dealing with serious water volume or a high water table, stepping up to 6-inch pipe might be necessary.
As drainage expert Thomas notes, “Schedule 40 PVC 4″ for the downspout drain pipe and perforated 4″ for the French drain is standard.” This combination provides reliable performance for most residential applications.
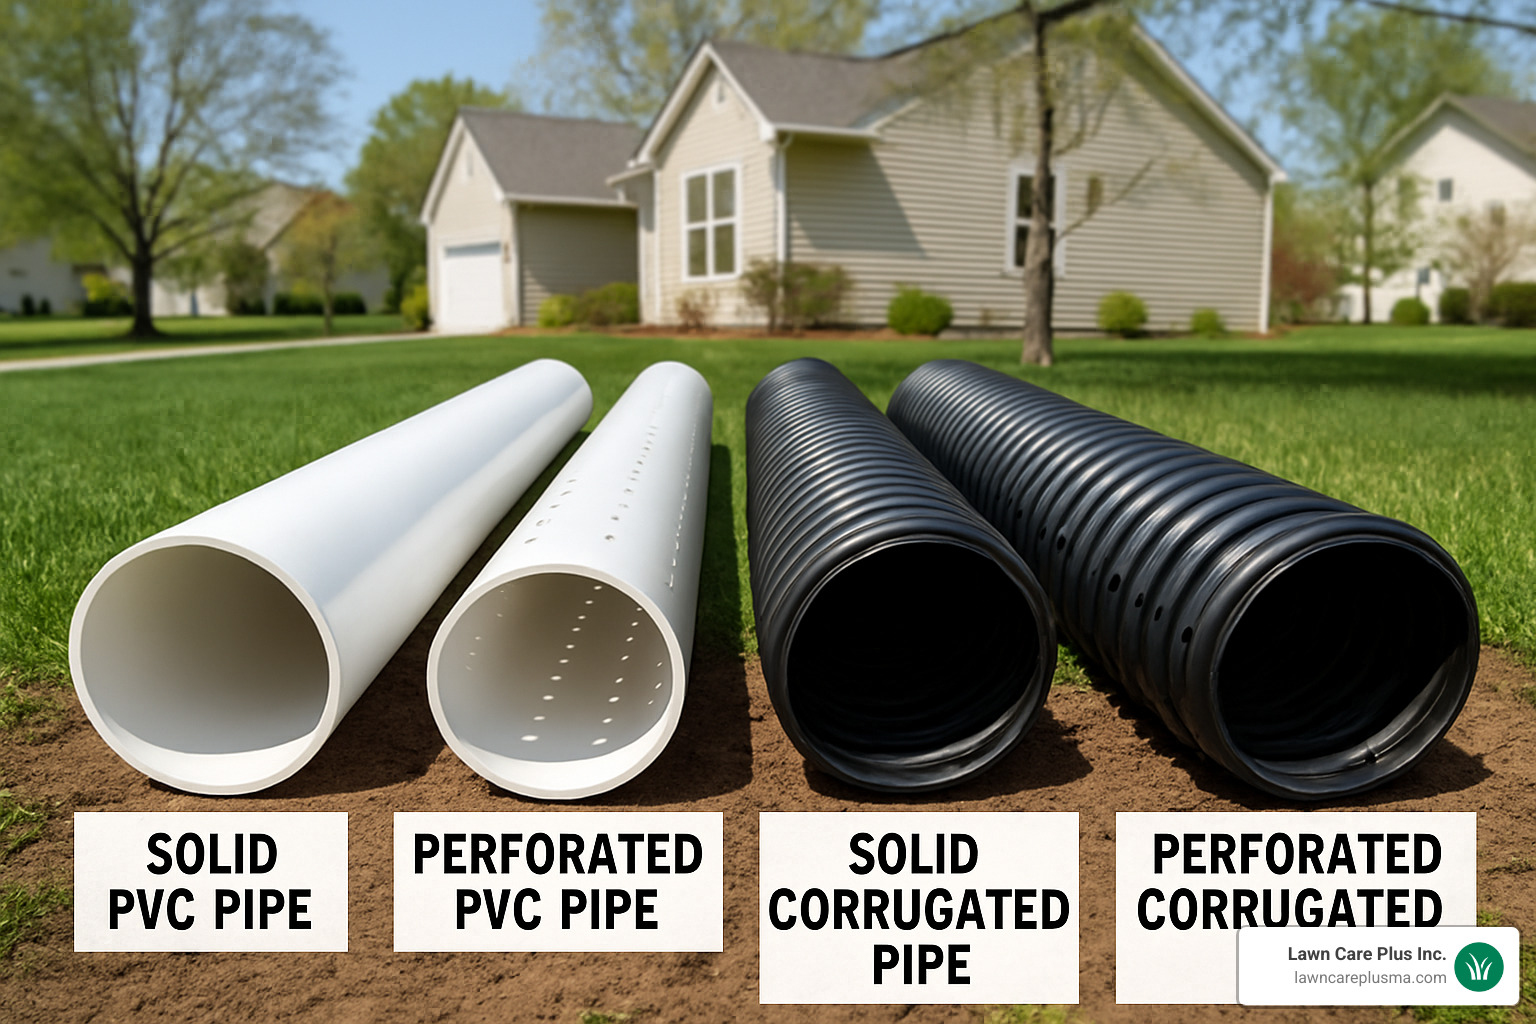
When choosing between smooth-wall PVC and corrugated pipe, consider the tradeoffs. Smooth PVC offers superior flow and clog resistance, but it’s rigid and sometimes pricier. Corrugated pipe flexes around obstacles easily and costs less, but those interior ridges can trap debris and slow water flow.
Here in New England, frost heave is a real concern. Ideally, pipes should be installed below the frost line (typically 48-52 inches deep in Massachusetts) or properly insulated. When that’s not possible, you’ll need special considerations for winter operation to prevent freeze damage.
The right materials make all the difference between a drainage system that lasts decades and one that fails after a few seasons. When in doubt, it’s always better to invest in quality components upfront than to deal with the hassle and expense of digging everything up again later.
Step-by-Step Guide: Installing French Drains for Gutters
Ready to get your hands dirty? Let’s walk through the actual installation process for installing a french drain for gutters. With the right approach, you can create a drainage system that will protect your home for years to come.
Tools and Materials You’ll Need
Before you start digging, gather everything you’ll need. For tools, you’ll want a good shovel or trenching spade (your back will thank you for getting the right tool), a wheelbarrow, level, string line, tape measure, and a hacksaw or PVC cutter. Don’t forget safety gear like gloves and eye protection!
For larger projects, consider renting a trencher—it can save you hours of backbreaking work. As one of our clients joked, “My chiropractor was disappointed when I rented a trencher instead of digging by hand!”
For materials, you’ll need 4-inch perforated pipe with a filter sock for the French drain portion, 4-inch Schedule 40 PVC pipe for the downspouts, plenty of geotextile filter fabric, 3/4-inch washed gravel, various PVC fittings, PVC primer and cement, catch basins, pop-up emitters, and clean-out fittings.
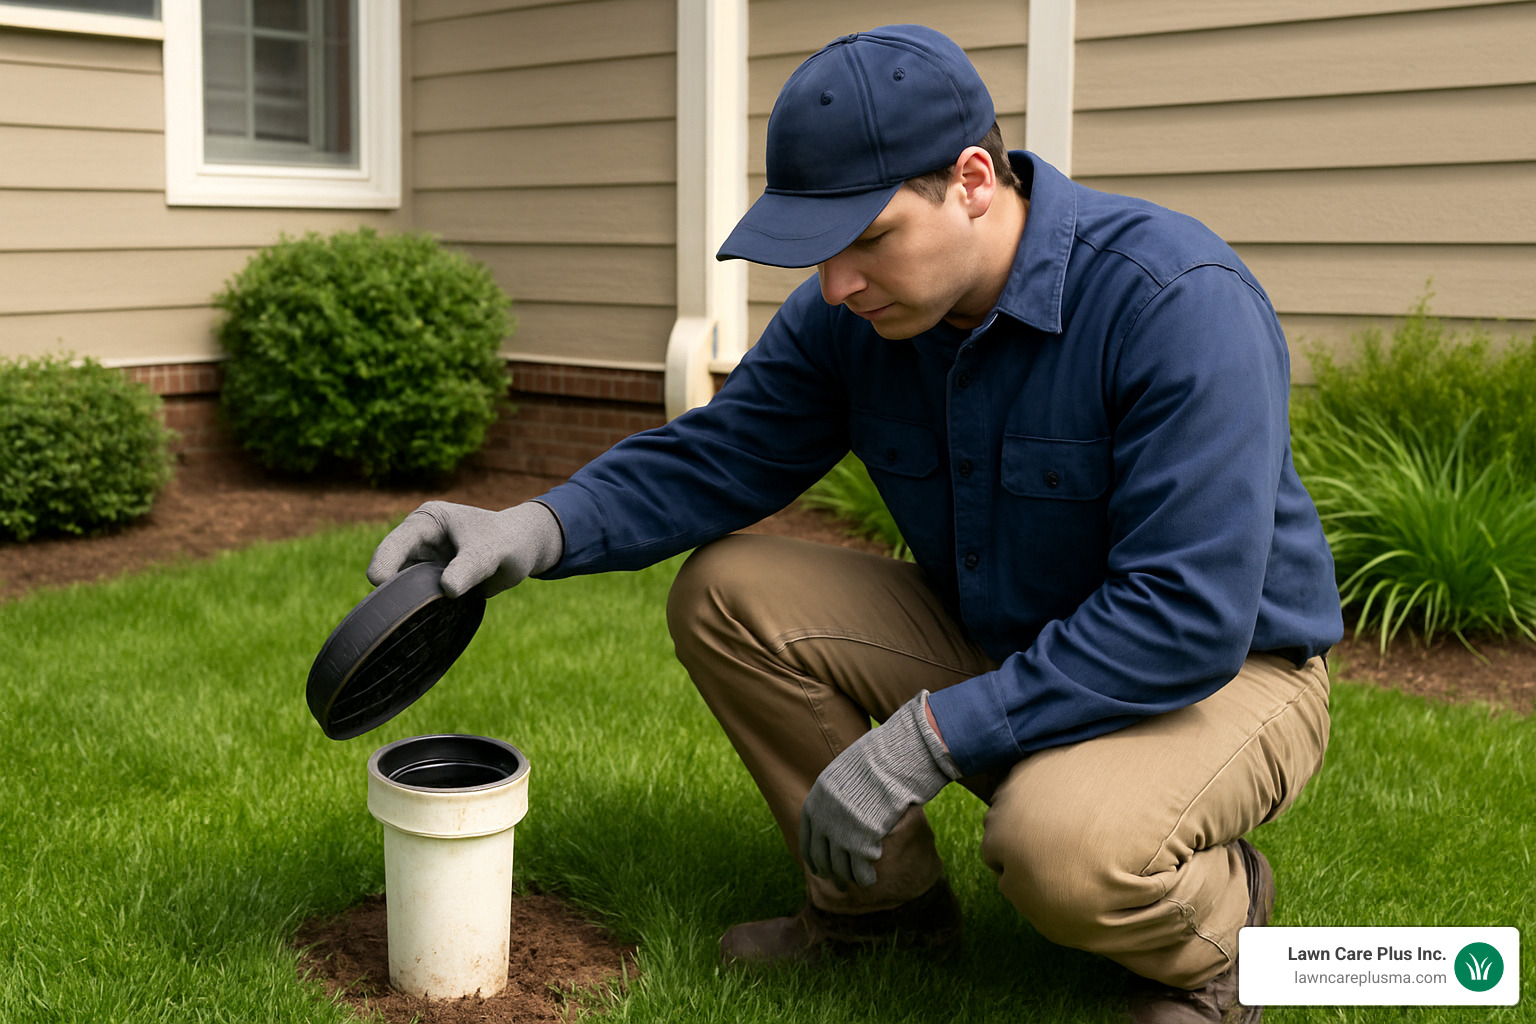
Step 1: Dig the Trench
Start by marking your planned route with spray paint or stakes and string. This is your roadmap! Now for the hard part—digging a trench about 9 inches wide and 18-24 inches deep.
While some guides suggest trenches as shallow as 8-12 inches, here in the Boston Metro-West area, we recommend going deeper (18-24 inches) to account for our significant frost cycles. Remember to maintain that critical slope of at least 1 inch per 10 feet—this is non-negotiable for proper drainage.
Once dug, remove any sharp rocks or debris from the trench bottom. Think of this as preparing a smooth highway for water to travel along.
Step 2: Line the Trench with Filter Fabric
Next, roll out your geotextile filter fabric along the trench. Cut pieces long enough to allow for at least 10 inches of excess on each side. This fabric is like the bouncer at a club—it lets water in but keeps soil particles out.
Lay the fabric in the trench, pressing it against the sides and bottom. Temporarily secure the excess fabric over the edges of the trench—you’ll fold this over later to create a complete wrap.
Step 3: Add Gravel Base and Position Pipe
Pour a 3-inch layer of washed gravel on the bottom of the trench, then level and compact it. This creates a stable base for your pipe to rest on.
Now place your perforated pipe on top of this gravel bed with the holes facing downward. Yes, downward! This seems counterintuitive to many homeowners, but it’s actually the correct way. When the holes face down, water enters from below while gravity helps prevent soil from falling directly into the holes.
Use your level to verify the pipe maintains the proper slope throughout its run.
Step 4: Add More Gravel and Wrap Fabric
Add more gravel around and over the pipe until you have about 3-5 inches of space left below ground level. This gravel “jacket” around your pipe creates the path of least resistance that water will naturally follow.
Now, fold the excess filter fabric over the top of the gravel layer, creating a complete envelope. If you have any seams in the fabric, make sure they overlap by at least 12 inches to prevent soil infiltration.
Step 5: Backfill and Finish
Finally, backfill the remaining trench with topsoil, compacting gently but firmly as you go. Finish with sod, seed, or other appropriate ground cover to restore your yard’s appearance.
Connecting Downspouts Without Flooding the French Drain
The trickiest part of installing a french drain for gutters is connecting your downspouts properly. Do it wrong, and you’ll overwhelm your French drain during heavy rain. Do it right, and you’ll have a harmonious system that handles both roof runoff and groundwater.
Start by installing downspout adapters at the bottom of each downspout. These fittings create a smooth transition from your gutter system to the underground drainage pipe. Always use solid Schedule 40 PVC pipe for this section—never perforated pipe—to carry water directly away without leaking into the soil near your foundation.
Maintain a slightly steeper slope for downspout pipes—at least 1/4 inch per foot—to ensure rapid water movement during heavy rain. When combining multiple downspouts, use WYE fittings rather than T-fittings. As French Drain Man explains, “Always use WYE fittings instead of T fittings to follow the flow of water.” This simple change dramatically reduces backups and clogs.
Make sure your downspout pipe terminates at least 10 feet away from your home’s foundation. This distance helps ensure that discharged water doesn’t find its way back to your basement.
For properties with walkways or patios that complicate drainage routes, check out our sidewalk drainage solutions for specialized approaches.
Running Both Pipes in One Trench—Safely
If space constraints or budget concerns have led you to run both systems in one trench, don’t worry—it can work well if done correctly. The key is maintaining proper separation.
Keep the solid downspout pipe at least 6 inches away from the perforated French drain pipe. You can position them side-by-side or at different elevations, with the solid pipe typically placed higher in the trench.
Using distinct pipe types (different colors or materials) makes future maintenance much easier. “When I need to dig up a section years later, I’m always thankful when past-me made it obvious which pipe is which,” jokes one of our experienced installers.
Be sure to label all access points clearly. When you install clean-outs and inspection ports, mark which system they connect to. Your future self (or the next homeowner) will appreciate this thoughtfulness when maintenance is needed.
By maintaining proper separation between systems, you ensure that each can perform its intended function without interference. The solid pipe carries roof runoff directly to the discharge point, while the perforated pipe collects groundwater along its entire length—working together as a complete water management solution for your property.
At Lawn Care Plus Inc., we’ve installed countless drainage systems throughout the Boston Metro-West area. While many homeowners tackle this as a DIY project, our team is always available to help with design, installation, or troubleshooting if you need professional assistance.
Maintenance, Clog Prevention & Common Mistakes
Your French drain system is a lot like a car—it’ll run smoothly for years with proper care, but neglect it and you’ll end up with costly problems. After installing a french drain for gutters, maintaining it properly becomes your next important job.
Think of maintenance as your drainage insurance policy. A little effort now prevents major headaches later. Here’s what you need to know to keep everything flowing freely.
Regular gutter cleaning is your first line of defense. Those autumn leaves might look pretty falling from trees, but once they pack your gutters, they become the enemy of good drainage. Plan to clean your gutters at least twice yearly—typically in late spring and late fall. This simple task prevents debris from washing down into your drainage pipes.
After heavy rainstorms, take a quick walk around your property to check catch basins. These collection points can become clogged with leaves, twigs, and sediment. A quick cleaning prevents water from backing up into your yard or toward your foundation.
Once a year, grab your garden hose and flush water through your system’s clean-out ports. This helps push out any small debris that might be accumulating inside. If water backs up during this test, you may have a developing clog that needs attention.
“I always tell my clients to mark their calendar for an annual drainage flush,” says our team leader at Lawn Care Plus. “It’s ten minutes that can save thousands in potential water damage.”
Watch for depressions or soft spots developing along your pipe route. These might indicate settling or damage to the underground system. Also, maintain proper grading around your foundation—soil should slope away from your house at all times.
Preventing Root Intrusion
Tree roots are surprisingly determined when seeking water. They can crush, penetrate, or wrap around drainage pipes, causing serious damage. Your beautiful maple tree doesn’t mean to destroy your drainage system—it’s just doing what nature programmed it to do.
Physical root barriers installed alongside your pipes can redirect root growth away from your drainage system. Some homeowners have success with copper sulfate treatments along the trench before backfilling. The copper creates a zone that roots tend to avoid.
When planning your system, try routing pipes away from large trees and shrubs whenever possible. In areas where you must pass near trees, consider using solid pipe instead of perforated to reduce the risk of root penetration.
For properties with established trees, root management becomes especially important. Learn more about dealing with this common issue in our guide on roots in French drain systems.
Common Installation Mistakes to Avoid
After helping hundreds of homeowners with drainage issues, we’ve seen the same mistakes repeatedly. The most serious—and unfortunately common—is connecting downspouts directly to the French drain. This overwhelms the system during heavy rain and defeats the purpose of having separate systems.
Insufficient slope is another drainage killer. Without proper slope (at least 1 inch per 10 feet), water simply sits in the pipe rather than flowing away. Water doesn’t flow uphill without a pump!
Many DIYers install perforated pipe with the holes facing up, thinking this will collect more water. In reality, this orientation allows soil to fall directly into the pipe, causing clogs. Always position holes downward.
Skipping the filter fabric is a mistake that might save you $50 now but cost you $1,500 later. This crucial geotextile wrapper prevents soil from infiltrating your gravel bed and clogging the system. Consider it cheap insurance.
Inadequate gravel surrounding your pipe creates weak spots where the system can fail. Your pipe should have at least 3 inches of clean gravel on all sides to create proper void spaces for water flow.
In our Massachusetts climate, pipe depth becomes crucial. Install pipes too shallow, and winter freezing can crack them. We typically recommend at least 18-24 inches of depth to protect against frost heave.
Finally, poor outlet planning leaves water with nowhere to go. Every drainage system needs a proper termination point, whether that’s daylighting on a slope, connecting to a municipal system, or emptying into a dry well.
“The most successful drainage systems are the ones you forget are there because they just work,” notes our drainage specialist. “That only happens with proper installation and regular maintenance.”
At Lawn Care Plus, we’ve seen how these small details make the difference between a system that lasts for decades and one that fails within years. When installing a french drain for gutters, taking the time to do it right pays dividends in long-term protection for your home.
Frequently Asked Questions About Installing a French Drain for Gutters
Should gutter downspouts attach directly to a French drain?
This is perhaps the most common question we hear at Lawn Care Plus Inc., and the answer is a resounding no. Connecting downspouts directly to your French drain is like trying to pour a gallon of water into a coffee cup—it simply can’t handle the volume during heavy rainfall.
As drainage expert Thomas emphatically puts it, “It is definitely NOT a good idea to tie gutter downspouts into a French drain.” We’ve seen many homeowners make this mistake, only to find basement flooding after the first major storm.
Instead, use a separate solid PVC pipe to carry roof water away from your home. This pipe can peacefully coexist in the same trench as your French drain (with proper spacing), but keeping them as separate systems ensures each can do its job properly. Think of it like separate lanes on a highway—everyone gets where they need to go without creating traffic jams.
How deep and wide must the trench be?
Here in the Boston Metro-West area, we typically recommend digging trenches about 9 inches wide and 18-24 inches deep for installing a french drain for gutters. This isn’t arbitrary—Massachusetts winters demand we consider frost depth to prevent pipe damage during freeze-thaw cycles.
“The standard trench for a French drain is 9 inches wide and 18 to 24 inches deep, with 4-inch perforated pipe most commonly used,” notes a drainage professional we work with regularly.
Think of the trench dimensions as your drainage system’s foundation—cut corners here, and you’ll likely face problems later. For properties with particularly soggy soil or severe drainage issues, we sometimes recommend deeper trenches. During our initial assessment, we evaluate your specific situation to determine the ideal dimensions for long-lasting performance.
Can I DIY this in a freezing-snow climate?
While there’s something satisfying about completing a major project yourself, installing a french drain for gutters in our Massachusetts climate presents unique challenges that often warrant professional assistance.
Our freeze-thaw cycles and deep frost line (typically 48-52 inches) require special considerations that many DIY guides don’t address. Here’s why many of our clients ultimately choose professional installation:
Frost line expertise makes all the difference in preventing winter damage. We understand exactly how deep pipes need to be in different parts of your yard to prevent freezing and cracking.
Slope calculation must be precise—too little slope and water pools and freezes; too much and erosion becomes an issue. We use professional-grade tools to ensure consistent, optimal drainage.
Material selection varies based on your specific soil type and climate considerations. What works in Georgia often fails in Massachusetts.
Equipment requirements often exceed what’s available at rental centers, especially when digging below the frost line.
If you’re determined to tackle this yourself, we recommend doing so during the warmer months when soil is easier to work with. Many of our clients find that the peace of mind from professional installation is worth the investment, especially considering the potential cost of water damage to their foundation.
At Lawn Care Plus Inc., we’re always happy to assess your property and provide recommendations—whether you ultimately choose our installation services or decide to go the DIY route with some professional guidance.
Conclusion
Installing a french drain for gutters isn’t just a home improvement project—it’s an investment in your property’s future. When done correctly, this comprehensive water management approach shields your home from the triple threat of foundation damage, basement flooding, and landscape erosion.
Think of it as creating a partnership between your roof and your yard. Your gutters collect rainfall from above, while your French drain manages groundwater from below. When these systems work in harmony (while maintaining their independence), even the most challenging drainage issues become manageable.
As we’ve explored throughout this guide, success depends on remembering a few fundamental principles. Always keep your downspout drainage separate from your French drain system—they’re friendly neighbors, not roommates. Maintain that critical downward slope throughout all your drainage pipes, letting gravity do the heavy lifting. Choose the right materials for each job: solid Schedule 40 PVC for downspouts and perforated pipe wrapped in filter fabric for French drains. And don’t forget to plan for the future by installing clean-outs and inspection points that make maintenance a breeze.
Water might seem harmless, but unchecked, it becomes your property’s most persistent enemy. A well-designed drainage system is your first line of defense, potentially saving you thousands in water damage repairs while increasing your property’s usability and curb appeal. The peace of mind that comes from knowing your home is protected during heavy downpours? That’s priceless.
Here at Lawn Care Plus Inc., we’ve been solving drainage problems throughout the Boston Metro-West area for years. Our team understands the unique challenges that New England weather throws at homeowners—from spring thaws to summer downpours to frozen winter ground. We’ve seen how proper drainage transforms properties from soggy messes into beautiful, usable spaces.
We offer comprehensive design and installation services custom to your specific situation. Our experienced crews understand the local soil conditions, municipal regulations, and climate considerations that impact drainage in Massachusetts. Whether you’re dealing with standing water that won’t drain, a damp basement that never quite dries out, or erosion that’s slowly washing away your landscape, we can design a solution that addresses your specific needs.
For more information about our hardscape and landscape services, we’d love to hear from you. Don’t wait until you’re bailing water from your basement or watching your foundation crack—take proactive steps today to protect your most valuable investment. Your home (and your future self) will thank you for years to come.
