The Foundation of Success: Building Strong Retaining Walls
A retaining wall foundation is the critical underground structure that supports your retaining wall and ensures its long-term stability and performance. Without a proper foundation, even the most beautiful retaining wall will eventually fail.
Essential components of a retaining wall foundation:
| Component | Purpose | Typical Specifications |
|---|---|---|
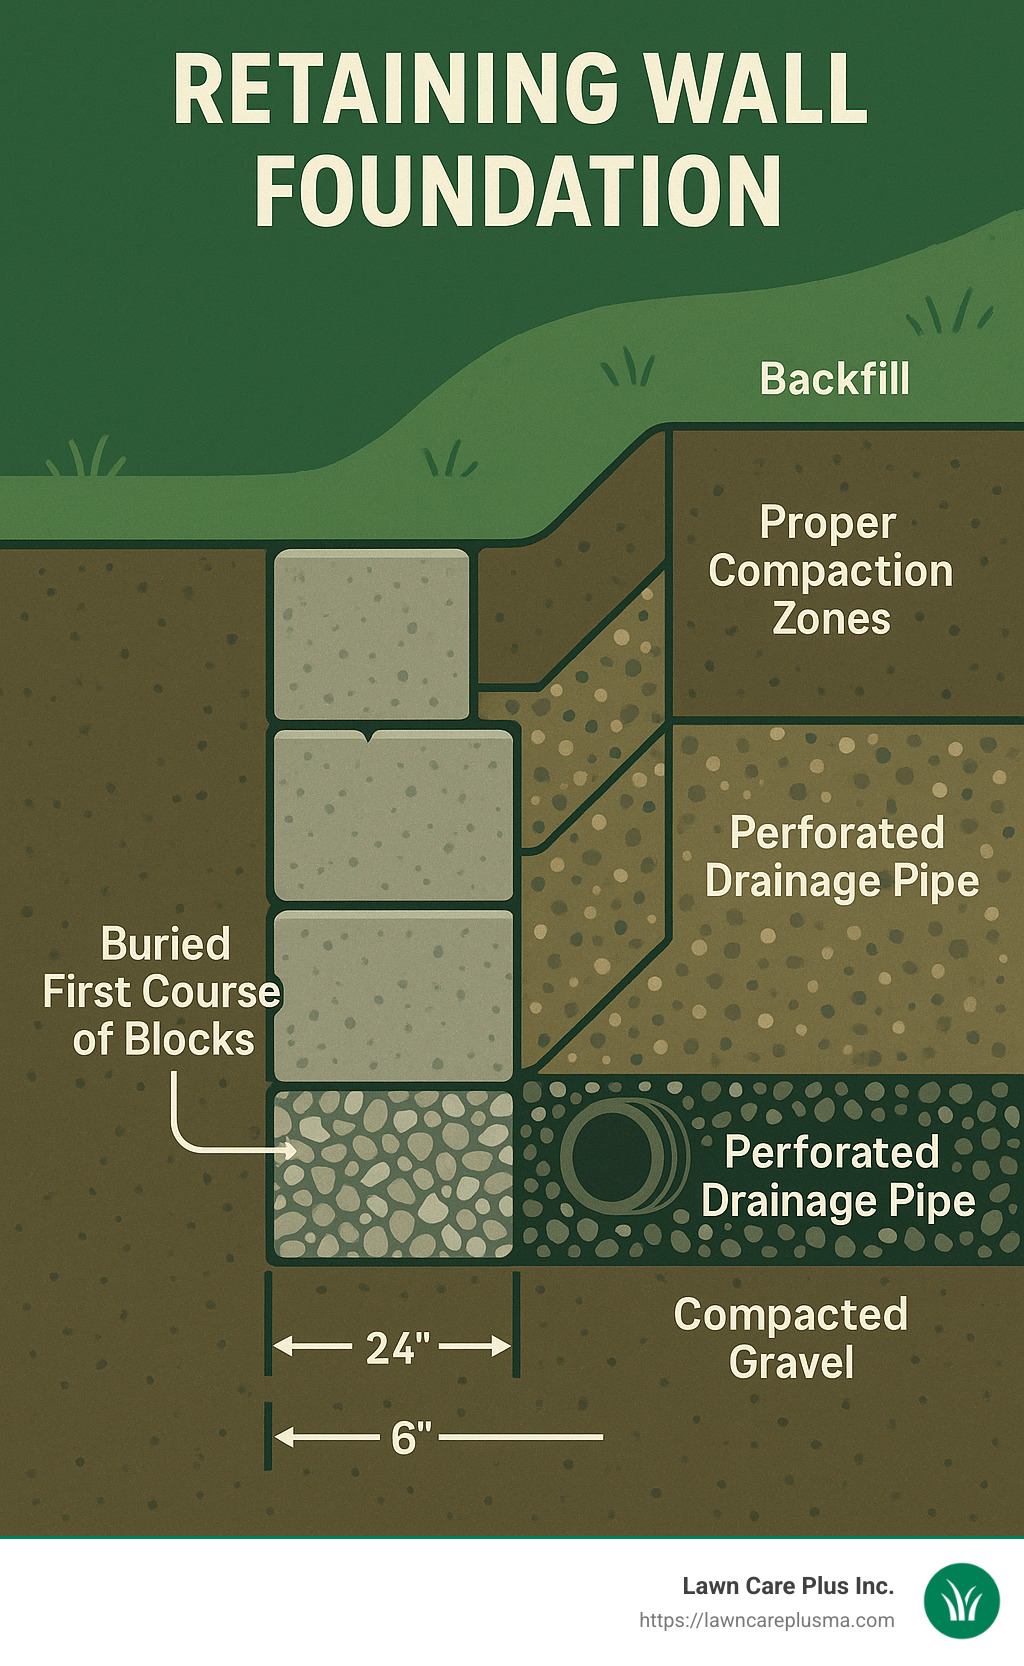
| Base Trench | Provides stable footing | 4-6 inches deep, 12-24 inches wide (or twice block width) |
| Base Material | Creates level foundation | Compacted gravel or crushed stone (3-6 inch layer) |
| Buried First Course | Anchors wall against movement | Bury 1/10th of total wall height |
| Drainage System | Prevents water pressure buildup | Perforated pipe with gravel backfill |
| Compaction | Ensures stability | Multiple passes with plate compactor |
A retaining wall is more than just a decorative landscape feature – it’s a complex structure designed to hold back tons of soil and resist tremendous lateral pressure. As the saying goes, “He is like a man building a house, who dug deep and laid the foundation on the rock. And when the flood arose, the stream beat vehemently against that house, and could not shake it, for it was founded on the rock.”
The success of your retaining wall begins below ground level. A properly constructed foundation distributes weight evenly, prevents settling and shifting, and manages water drainage to avoid pressure buildup behind the wall. A 4-foot high, 15-foot long wall could be holding back as much as 20 tons of saturated soil!
Whether you’re creating terraced gardens on a slope, preventing erosion, or simply adding visual interest to your landscape, investing time in proper foundation preparation will save you from costly repairs and rebuilds down the road.
Simple guide to retaining wall foundation:
– build retaining walls
Understanding Retaining Wall Foundations
When building a retaining wall, understanding the science behind soil mechanics is crucial. A retaining wall foundation must be designed to counteract the lateral pressure exerted by the soil it’s holding back. This pressure isn’t uniform—it increases with depth and can be significantly affected by water content.
“A retaining wall’s typical method of failure is leaning away from the soil and rotating outward,” explains our senior landscape architect at Lawn Care Plus. “This happens because the wall is essentially fighting a constant battle with gravity and the natural tendency of soil to move downslope.”
The key concept to understand is the soil’s failure plane—an imaginary line that extends upward from the base of the wall at an angle determined by the soil type. The retaining wall foundation only needs to hold back the wedge of soil defined by this failure plane, not the entire hillside. However, this wedge can still represent tons of pressure, especially when saturated with water.
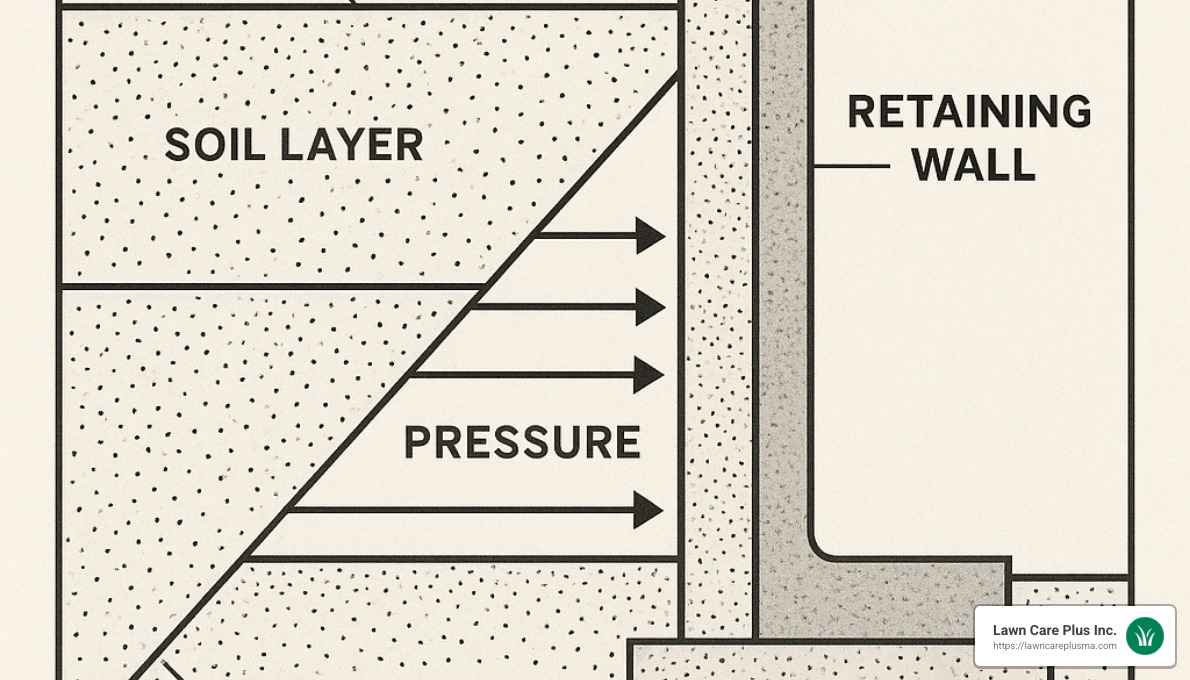
A properly designed retaining wall foundation works with gravity to resist these forces. By creating a stable base and allowing the wall to lean slightly into the hill (typically 1 inch for every 12 inches of height), the foundation helps the wall use its own weight and structural integrity to counter the pressure.
For more detailed information about managing water behind your retaining wall, check out our guide on Retaining Wall Drainage.
The Critical Role of a Proper Foundation
The foundation of a retaining wall serves several critical functions that directly impact the wall’s performance and longevity:
- Load Distribution: The foundation spreads the weight of the wall and the pressure of the retained soil across a wider area, preventing the wall from sinking into the ground.
- Frost Heave Prevention: In our Massachusetts climate, freeze-thaw cycles can cause significant ground movement. A properly designed retaining wall foundation extends below the frost line (typically 4 feet in the Boston Metro-West area) to prevent frost heave from destabilizing the wall.
- Wall Longevity: A solid foundation can extend the life of your retaining wall by decades. As one of our project managers often says, “You can’t see the foundation once the wall is built, but it’s what determines whether your wall will last 5 years or 50.”
- Soil Stabilization: The foundation creates a stable platform that prevents erosion and soil movement under the wall, which could otherwise lead to settling and structural failure.
According to research on retaining wall failure modes from structural engineering studies, approximately 40% of retaining wall failures can be traced back to inadequate foundation preparation. This makes the foundation arguably the most critical component of the entire retaining wall system.
For a deeper dive into how retaining walls can fail and how to prevent it, we recommend checking out this Research on retaining wall failure modes.
How Retaining Wall Foundations Differ from Building Foundations
Retaining wall foundations differ significantly from typical building foundations in both design and function. While both provide structural support, they face different challenges and require different approaches.
Building foundations typically have restraints at both the bottom (the footing) and the top (where they connect to the building’s floor framing). This creates a stable structure that resists lateral forces through these connections. In contrast, retaining walls usually only have a bottom restraint and must be designed to be self-supporting against lateral soil pressure.
As explained by structural engineers, “Foundation walls are designed with bottom and top restraints—supported by a footing, slab on grade, and connected to the first-floor framing—while retaining walls are freestanding structures designed solely to resist lateral soil pressure without a top tie.”
This fundamental difference means that retaining wall foundations must be proportionally more robust relative to the wall’s height. They typically require:
- Wider footings to distribute pressure
- More substantial drainage systems to prevent hydrostatic pressure
- Special reinforcement techniques like geogrid tiebacks or deadmen anchors
- Careful attention to backfill material and compaction
In some cases, a foundation wall might inadvertently need to function as a retaining wall—for example, when there’s a significant grade difference on either side of the wall. In these situations, the foundation must be designed with retaining wall principles in mind to prevent failure.
For more information about how retaining walls integrate with your overall landscape design, visit our page on Retaining Walls and Landscaping.
Planning Your Retaining Wall Foundation
Proper planning is essential before breaking ground on your retaining wall foundation. At Lawn Care Plus, we approach each project with a comprehensive site assessment that considers multiple factors affecting foundation design.
Site Assessment Checklist
Before designing your retaining wall foundation, we evaluate:
- Soil Composition: Different soil types (clay, sand, loam) require different foundation approaches.
- Slope Gradient: Steeper slopes create more lateral pressure and may require deeper foundations.
- Drainage Patterns: Understanding how water moves across and through your property is crucial.
- Existing Structures: Nearby buildings, utilities, or other landscape features can impact foundation design.
- Local Climate Conditions: Massachusetts’ freeze-thaw cycles require foundations that extend below the frost line.

Local Regulations and Permits
In Massachusetts, particularly in the Boston Metro-West area where we operate, retaining walls over 4 feet in height typically require building permits and possibly engineered plans. Each municipality has specific requirements:
- In Newton, walls over 3 feet may require permits
- Brookline has strict requirements for walls near property lines
- Boston proper often requires detailed drainage plans for retaining walls
Always check with your local building department before beginning construction. At Lawn Care Plus, we help our clients steer these requirements to ensure compliance with all local regulations.
Determining the Right Foundation Depth and Width
The dimensions of your retaining wall foundation are critical to its performance. The proper depth and width depend on several factors, including wall height, soil conditions, and local climate.
Foundation Depth Guidelines
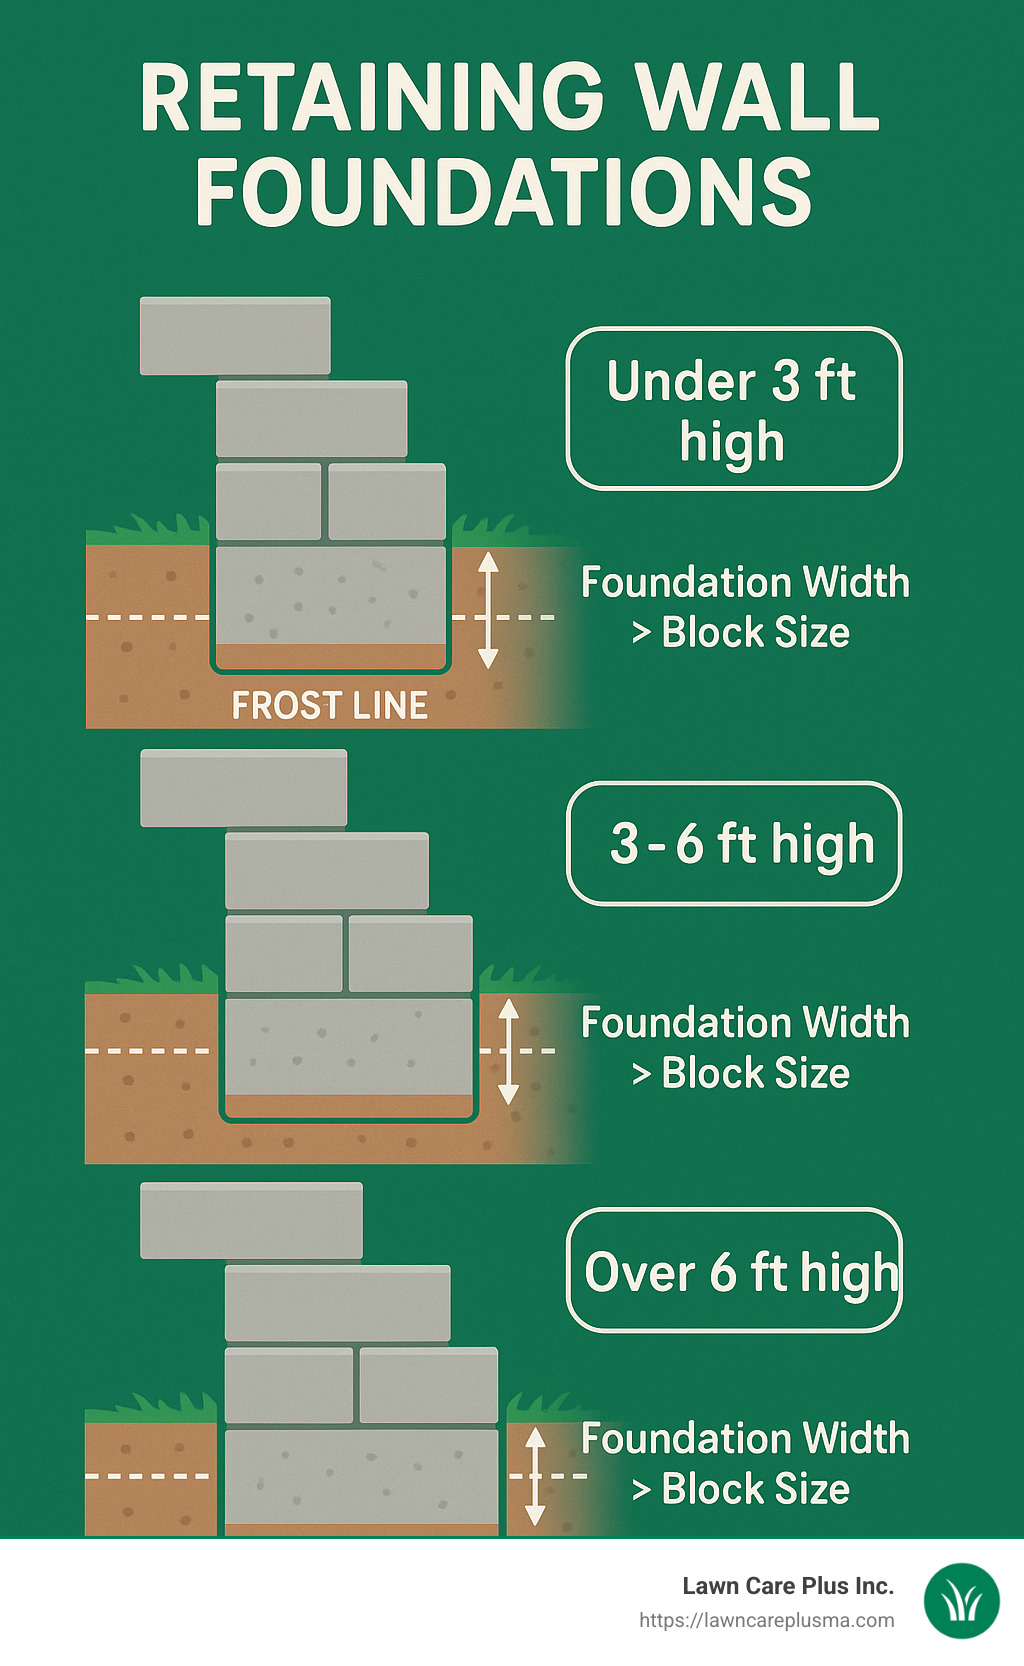
In Massachusetts, we recommend the following minimum depths for retaining wall foundations:
- For walls under 3 feet high: At least 6 inches below the frost line (typically 4 feet in our region)
- For walls 3-6 feet high: At least 8-12 inches below the frost line
- For walls over 6 feet high: Engineering calculations required, typically 12+ inches below frost line
These are minimums—soil conditions may require deeper foundations. As a general rule, the bottom of the foundation should be below undisturbed soil, never on fill material.
Foundation Width Considerations
The width of your retaining wall foundation is equally important. Industry standards suggest:
“The footing for a retaining wall should be about 4 to 6 inches deep and about 12 inches wide, or twice the width of the block used.”
However, at Lawn Care Plus, we often recommend wider foundations for added stability:
- For walls under 3 feet: Foundation width = 1.5 × block width
- For walls 3-6 feet: Foundation width = 2 × block width
- For walls over 6 feet: Engineering calculations required, typically 2-3 × block width
A wider foundation distributes the load over a greater area, reducing the pressure on the soil and minimizing the risk of settling.
Soil Considerations for Retaining Wall Foundations
The soil at your site significantly impacts retaining wall foundation design. Different soil types present different challenges:
Clay Soils
Common in parts of Massachusetts, clay soils:
– Retain water and expand when wet
– Contract when dry, potentially causing settlement
– Require excellent drainage systems behind the wall
– May need wider foundations to distribute pressure
For clay soils, we often incorporate a layer of crushed stone in the foundation to improve drainage and stability.
Sandy Soils
Sandy soils:
– Drain well but may erode easily
– Provide less stable support for foundations
– May require geotextile fabric to prevent migration
– Often need deeper foundations to reach stable bearing
In areas with sandy soil, we might recommend a concrete footing rather than a compacted gravel base for added stability.
Expansive Soils
Some soils expand dramatically when wet and contract when dry. If your site has expansive soils:
– Deeper foundations may be necessary
– Additional drainage systems are critical
– Specialized backfill materials might be required
– Professional soil testing is highly recommended
At Lawn Care Plus, we can arrange soil testing to determine the exact composition and bearing capacity of your soil, allowing us to design the optimal retaining wall foundation for your specific conditions.
Materials and Methods for Retaining Wall Foundations
When it comes to building a strong and durable retaining wall foundation, the choice of materials is as crucial as a cup of coffee on a Monday morning. At Lawn Care Plus, we handpick materials that suit the wall type, soil conditions, and the whims of Massachusetts weather.
Selecting the Right Foundation Materials
Compacted Gravel Base is our go-to for the primary support of your wall. Typically, we recommend 3/4-inch crushed stone because it offers excellent drainage and compacts nicely, like your favorite pair of sneakers fitting just right. Alternatively, paver base (a mix of crushed stone and stone dust) or bank-run gravel (a natural blend of stone, sand, and fine particles) can create a stable, easily leveled surface. For the Boston Metro-West area, a minimum 6-inch layer of these compacted materials ensures both support and drainage.
When concrete mix strength is on the table, think of it as the backbone of concrete footings. For residential walls, we use a minimum of 2,500 psi compressive strength concrete. For walls over 4 feet or in tricky soil environments, 3,000-3,500 psi is more like it. And in spots with high groundwater, sulphate-resistant cement is our secret weapon.
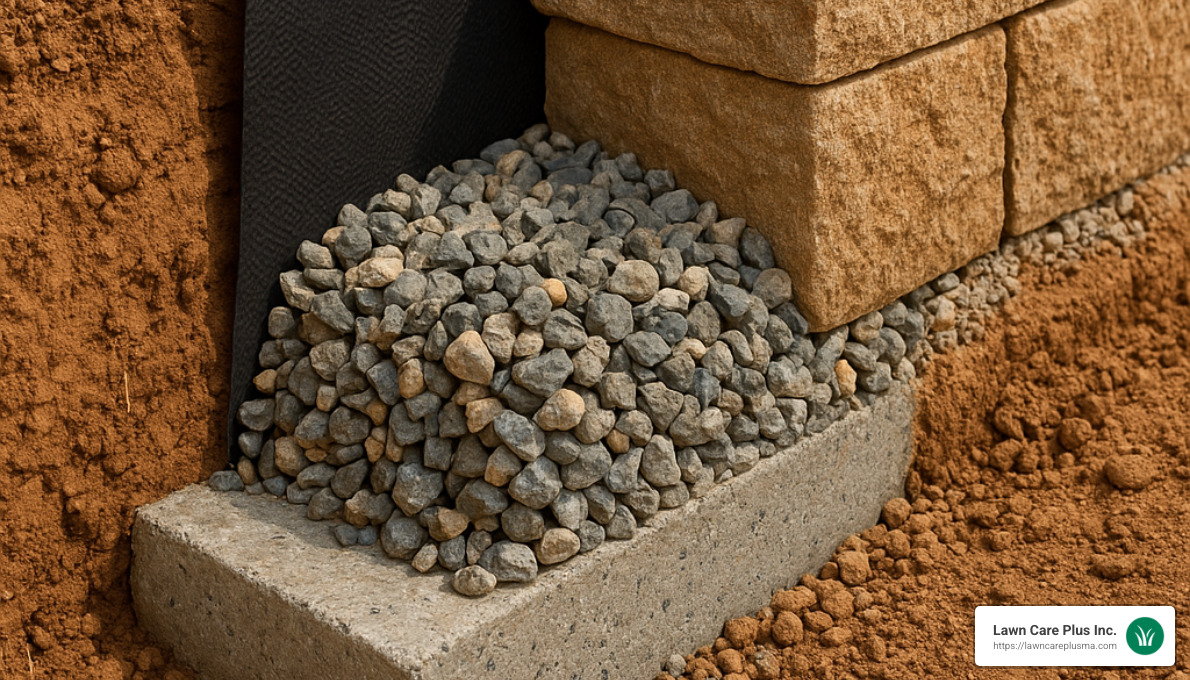
Drainage stone is critical for keeping your wall dry and happy. Clean 3/4-inch stone is ideal for allowing water to flow freely without any hiccups. We steer clear of limestone screenings or sand as these can block water flow. Behind the wall, you’ll typically find at least 12 inches of drainage stone, running from the foundation up to near the top.
The unsung hero in our toolbox is filter fabric and geotextiles. These prevent soil from sneaking into drainage stone, let water pass while blocking sediment, and provide extra reinforcement when needed. Non-woven geotextile fabric is commonly used for drainage, while woven types are for when you need that extra strength—like a reassuring hug from your favorite sweater.
Lastly, reinforcement options ensure your wall stands the test of time. These might include a rebar grid in concrete footings (think #4 or #5 rebar), geogrid tiebacks, steel deadmen anchors for timber walls, or helical tiebacks for those really challenging sites.
For more on what goes into retaining wall construction costs, check out our Retaining Wall Cost page.
Foundation Methods for Different Retaining Wall Types
Different wall types call for different foundation methods. It’s like choosing the right tool for the job; you wouldn’t use a hammer to paint a wall, would you?
Gravity wall foundations depend on sheer mass to resist soil pressure. Here, the foundation’s width is critical, often ranging from 50-70% of the wall’s height. A highly compacted base is essential to prevent any settling, and the design often includes a step-back or batter. The first course should be buried at least 6 inches to ensure solid footing.
Cantilever foundations use an L-shaped reinforced concrete design. It’s like the wall’s secret weapon, with the vertical part forming the wall face and the horizontal part extending under the backfill. Reinforcing steel ties both sections together, with precise engineering needed to get the dimensions just right. These are typically used for poured concrete walls handling significant loads.
Segmental block foundations have modern interlocking systems that are a dream for both ease of installation and performance. These require a compacted gravel base (6 inches is standard), a buried first course (at least 1 inch per foot of wall height), level installation, and proper drainage. Geogrid reinforcement is recommended for walls over 3-4 feet.
For timber wall foundations, we’re talking classic, pressure-treated timber walls. Each post needs a concrete footing (10-12 inches in diameter) and should be set at least 3 feet deep. Gravel drainage is placed behind the lowest timbers, with deadmen anchors every 4-5 feet for walls over 3 feet. While they might not be as common these days due to their shorter lifespan, timber walls remain a cost-effective choice in some scenarios.
Here’s a quick comparison to help visualize:
| Wall Type | Foundation Material | Typical Depth | Width | Drainage Requirements |
|---|---|---|---|---|
| Gravity (Block) | Compacted gravel | 6-12 inches | 2× block width | High – perforated pipe required |
| Cantilever | Reinforced concrete | 12-24+ inches | 40-70% of height | Moderate – weep holes and gravel |
| Segmental Block | Compacted gravel | 6-8 inches | 24 inches min. | High – drainage stone and pipe |
| Timber | Concrete post footings | 36+ inches | 10-12 inch diameter | Moderate – gravel backfill |
Every type of wall has its nuances and requirements. At Lawn Care Plus, we’re here to help you find the perfect fit for your landscape dreams.
Step-by-Step Guide to Preparing a Retaining Wall Foundation
At Lawn Care Plus, we’ve got a tried-and-true method for preparing retaining wall foundations that stand the test of time and hold up wonderfully in the Massachusetts weather. Let’s walk you through it:
1. Call Before You Dig
First things first—before you even think about digging, make sure you call 811 to have those underground utilities marked. It’s free, it’s the law, and it saves you from a world of trouble. Give it at least 72 hours for the utility folks to do their thing.
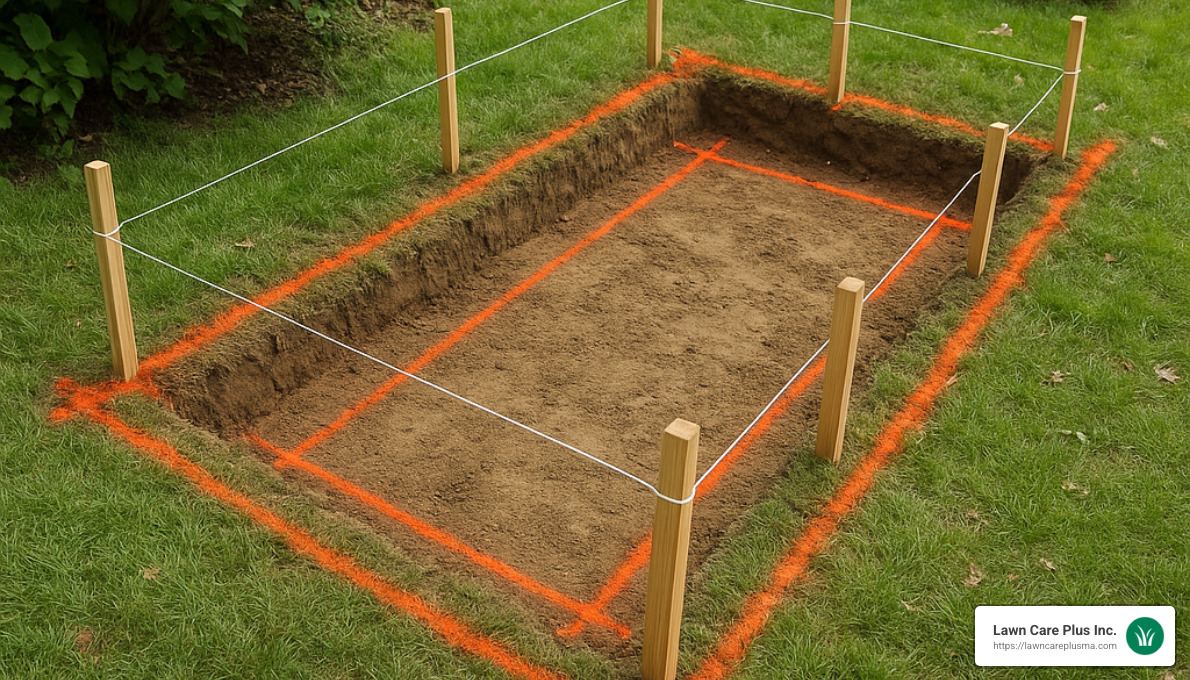
2. Mark the Wall Location
Once the utilities are sorted, it’s time to outline where your wall will go. You can use stakes, string, spray paint, or even a garden hose if you’re feeling artsy with curves. For precision, use a transit level to keep things straight and consistent. Don’t forget to mark both the front and back of the wall, and plan for any step-ups or step-downs. You want this wall to look good too!
3. Excavation and Base Preparation for Retaining Wall Foundations
Now, let’s dig into the real work—excavation. Here’s the scoop:
Trench Dimensions
Dig your trench at least 6 inches deep for the base material. Add more depth for burying the first row of blocks—usually about an inch per foot of wall height. Make sure your trench is at least twice the width of the block you’re using. Don’t forget to extend it 6 to 12 inches beyond the ends of the wall for a little extra stability.
For taller walls, especially those over 4 feet, you’ll want a 24-inch-wide trench with a minimum 6-inch depth plus extra based on the wall’s height. And don’t skip the additional space for drainage and potential reinforcement!
Removing Organic Material
Before you lay anything down, you’ve got to clear out the gunk. Strip away all that topsoil, grass, roots, and any other organic fluff. Excavate until you hit stable, undisturbed soil. Whatever you do, don’t build on fill; it’s like building on a marshmallow—squishy and unreliable.
Compaction Equipment
Let’s get serious about compaction. Proper compaction means less settling, which means a happier wall. We use vibratory plate compactors for most jobs, jumping jacks for tight spots, and hand tampers only for the smallest projects. If your wall is over 2 feet tall, mechanical compaction is a must.
Base Material Installation
With your trench ready to go, it’s time to install the base:
- Start with a 3 to 4-inch layer of your chosen base material, like crushed stone or paver base.
- Rake it out to even it up.
- Dampen the material a bit if it’s dry.
- Compact it thoroughly—two passes should do it.
- Add more material if needed and compact again.
The base should be firm and level, with a slight slope toward the drainage side—typically about 1/4 inch per foot—to keep water from pooling against the wall.
Leveling Techniques
A level base is crucial. Use a long, straight 2×4 with a torpedo level for checking, and install screed pipes for consistent height. A string line can help you keep things straight, and always check both along the wall and from front to back. Adjust as necessary and recompact. Voilà, perfection!
Installing Drainage Systems in Your Foundation
Now let’s talk about drainage because water is the real enemy here. Poor drainage is the leading cause of retaining wall failure, and we’re not about to let that happen on our watch.
Perforated Pipe Installation
For walls taller than 3 feet or in areas with poor drainage, a perforated drain pipe is your secret weapon. Place a 4-inch perforated pipe at the base of the foundation with holes facing down. Maintain a slope of 1/4 inch per foot toward the outlet, which should extend beyond the wall or connect to a drainage system. Use a filter sock if you’re dealing with fine soils.
Gravel Backfill Application
Fill behind the wall with a minimum of 12 inches of clean 3/4-inch stone. This extends from the foundation to near the top of the wall. Remember to compact every 6-inch lift before adding more.
Filter Fabric Installation
Prevent soil from pushing into your drainage setup by lining the excavation with non-woven filter fabric. Lay it up the soil face, and leave some extra at the top to fold over the drainage stone. Overlap the seams by at least 12 inches and secure it all with stakes if needed.
Water Management Strategies
To round it all out, think about a few extra water management tricks. Maybe add swales or berms above the wall to redirect surface water. Add extra drain outlets for long walls—one every 50 feet—and consider French drains in areas with high groundwater. For masonry walls, weep holes can be life savers.
For more inspiration on how to make your retaining wall both functional and stylish, check out our Retaining Wall Design Ideas for Every Style of Home.
And there you have it—a rock-solid start to your retaining wall project, courtesy of Lawn Care Plus. Happy building!
Common Mistakes and Troubleshooting
Building a retaining wall foundation can seem like a puzzle, but like any puzzle, missing pieces can lead to a wonky wall. Mistakes happen, even to the pros, but knowing what to watch out for can save you from future headaches. Let’s explore some common missteps and how to avoid them.
Inadequate Depth
One frequent mistake is not digging deep enough. If the foundation isn’t set below the frost line, particularly here in Massachusetts where it’s about 4 feet, your wall might just start dancing as the soil shifts with freeze and thaw cycles. For smaller walls, ensure you have at least 6 inches of base material along with the correct burial of the first course.
Poor Drainage
When it rains, it pours—and if your wall doesn’t have good drainage, you’re in for a soggy surprise. Water buildup can add pressure and cause instability. The solution? Install proper drainage systems with drainage stone, perforated pipes, and filter fabric. Make sure drain outlets are clear and functioning. And whatever you do, don’t trap water with plastic sheeting behind walls!
Improper Compaction
A wobbly foundation often comes from poor compaction of base material or backfill. Use mechanical compaction equipment and work in thin lifts (3-4 inches). Multiple passes with the right moisture content will ensure everything is snug and stable.
Insufficient Reinforcement
Without the right reinforcement, your wall might not stand up to the test of time—or gravity. Follow the manufacturer’s guidelines for geogrid placement. Taller walls often require some engineering magic with proper reinforcement.
Frost Heave Issues
The natural enemy of solid walls is frost heave, caused by the expansion and contraction of soil with temperature changes. Extend your foundation below the frost line, and use free-draining base materials that resist frost heave to combat this issue.
Preventing Foundation Failures
To keep your retaining wall foundation standing tall, focus on key strategies:
Water Management is crucial. Water can be a wall’s worst enemy. Implement a comprehensive drainage system behind the wall, divert surface water from above, clean drain outlets regularly, and grade the terrain to direct water away from the wall.
Proper Reinforcement based on wall height and soil conditions is a must. Incorporate geogrid reinforcement at the right intervals, ensuring it extends to the proper length, usually 60-70% of the wall height. Consider additional support like deadmen or tiebacks for timber or block walls, and helical anchors for tricky sites.
For walls over 4 feet or in challenging conditions, seek an engineering consultation. Professional engineers can provide structural calculations, soil analysis, and design specifications to ensure your wall is up to code and capable of handling the loads it bears.
Regular Inspection is vital. Once the wall is built, keep an eye out for signs of movement or bulging, check that drainage outlets remain clear, look for erosion, and monitor for any cracking or unit separation.
For more insight into why hiring a professional might save you a world of trouble, check out our guide on The Benefits of Hiring a Professional for Your Retaining Wall Installation.
When to Consult a Professional
While some DIY projects can be a fun weekend challenge, building a retaining wall isn’t always one of them, especially when it gets complex. Here’s when it’s time to call in the experts at Lawn Care Plus:
Walls Over 4 Feet
In Massachusetts, walls taller than 4 feet typically need permits and engineered plans. Our team can help by providing engineered designs, obtaining necessary permits, and ensuring compliance with local regulations.
Complex Soil Conditions
If your soil is tricky—like expansive clay that swells or loose sandy soil with poor cohesion—it’s best to seek professional advice. Our experts can assess the conditions and design the right foundation solutions for your site.
Significant Loads
Walls supporting heavy loads, like driveways, structures, or steep slopes, need specialized engineering to safely handle the pressure. Don’t take chances with these—get a professional’s opinion.
Tiered Systems
Multiple walls stacked like a cake need careful design to ensure each tier supports those below it properly. Ensure adequate spacing, drainage coordination, and overall stability with expert planning.
At Lawn Care Plus, serving the Boston Metro-West area, our team brings years of wisdom to your retaining wall foundation project. Whether you’re in Newton, Brookline, or Watertown, we’re ready to build a wall that stands the test of time—and maybe even a few jokes along the way!
Conclusion
A retaining wall foundation is truly the cornerstone of a successful landscape project. Throughout this guide, we’ve explored the critical importance of proper foundation preparation, from understanding soil mechanics to selecting appropriate materials and implementing effective drainage systems.
As we’ve seen, retaining walls are complex structures that wage a constant battle against gravity, soil pressure, and water. By investing time and resources in a properly designed and constructed foundation, you’re ensuring your wall will stand the test of time and continue to improve your property for decades to come.
Remember these key takeaways:
- Plan thoroughly: Assess your site, understand the soil conditions, and design your foundation accordingly.
- Focus on drainage: Poor drainage is the leading cause of retaining wall failure. Install proper drainage systems and manage water effectively.
- Use quality materials: From base material to drainage stone, filter fabric to reinforcement, quality materials make a significant difference in performance.
- Don’t cut corners on compaction: Proper compaction of the base and backfill is essential for stability and preventing settlement.
- Consider professional installation: For walls over 4 feet, complex sites, or significant loads, professional expertise ensures safety and longevity.
At Lawn Care Plus, we take pride in creating beautiful, functional, and durable retaining walls throughout the Boston Metro-West area. Our experienced team understands the unique challenges of Massachusetts’ climate and soil conditions, and we’re committed to building structures that stand the test of time.
Whether you’re planning a small garden wall or a major landscape change, the principles of proper retaining wall foundation preparation remain the same. By following the guidelines in this article, you’ll be well on your way to a successful project that improves your property’s beauty, functionality, and value.
For more comprehensive information about landscape retaining walls, visit our Comprehensive guide to Landscape Retaining Walls.
In retaining wall construction, what you can’t see—the foundation—ultimately determines what you do see: a beautiful, straight, and enduring landscape feature that performs its function year after year.
