
What Is Hydromulch Seeding? A Quick Answer Before We Dive In
Hydromulch seeding is a lawn establishment method where a mixture of water, fiber mulch, grass seed, fertilizer, and tackifier is sprayed onto prepared soil using a specialized tank and pump system. The mulch forms a protective mat that keeps seeds moist, reduces erosion, and speeds up germination — often producing visible sprouts within one week.
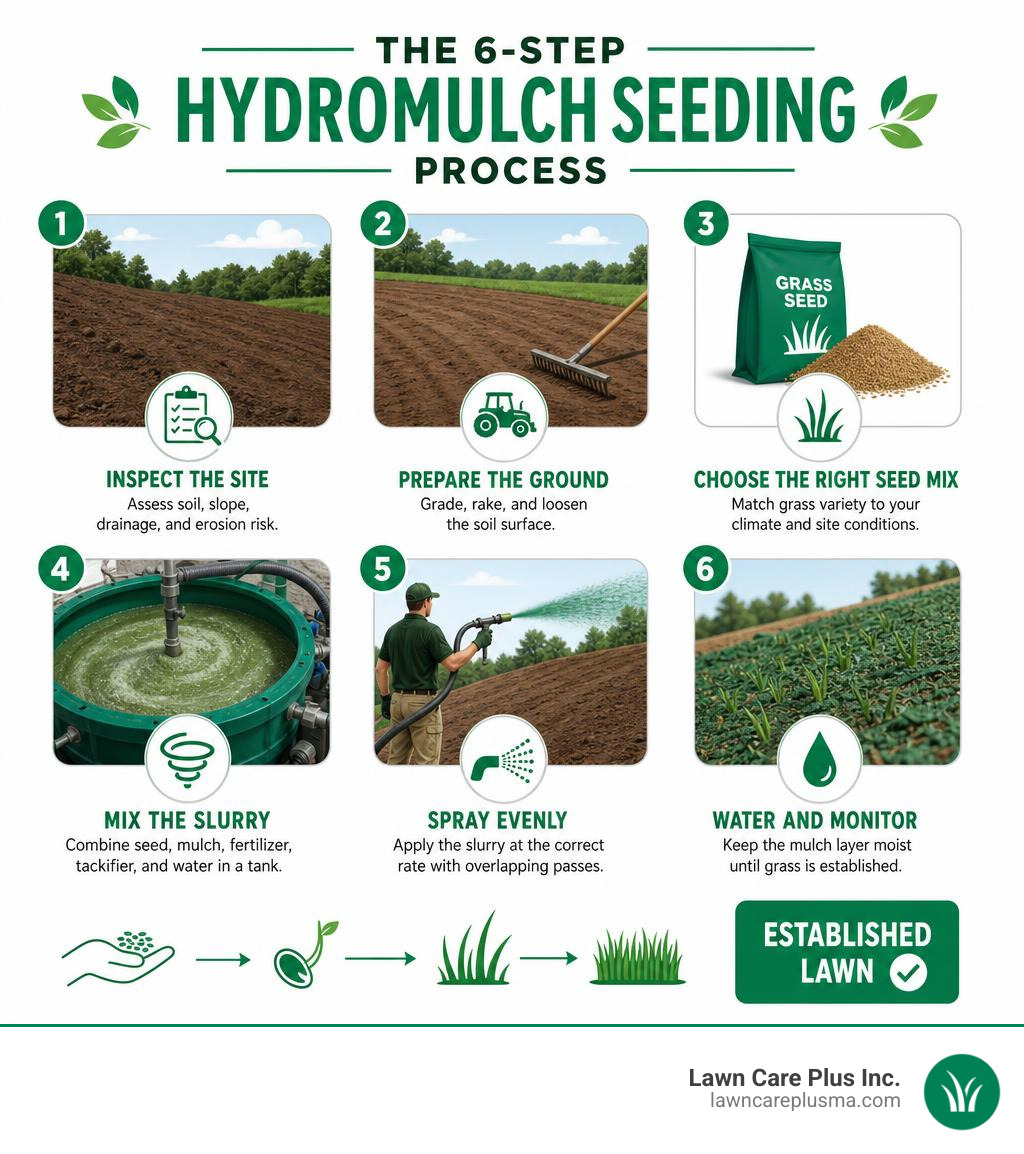
Here’s the 6-step hydromulch seeding process at a glance:
- Inspect the site — assess soil, slope, drainage, and erosion risk
- Prepare the ground — grade, rake, and loosen the soil surface
- Choose the right seed mix — match grass variety to your climate and site conditions
- Mix the slurry — combine seed, mulch, fertilizer, tackifier, and water in a tank
- Spray evenly — apply the slurry at the correct rate with overlapping passes
- Water and monitor — keep the mulch layer moist until grass is established
Most lawns seeded with hydromulch show full grass coverage in about a month and are ready for their first mow shortly after.
Getting a lush, even lawn isn’t always as simple as scattering seed and hoping for the best — especially on slopes, newly graded soil, or large properties where erosion and uneven coverage are real problems. That’s exactly where hydromulch seeding stands out. It combines the speed of hydraulic application with the protective power of a fiber mulch layer, giving seeds a far better environment to germinate than bare-soil methods offer. Whether you’re restoring a lawn after construction, tackling a steep hillside, or simply starting from scratch, this guide walks you through everything you need to know.
I’m Tim DiAngelis, owner of Lawn Care Plus, Inc., a full-service landscaping company based in Roslindale, Massachusetts — and hydromulch seeding is one of the most effective tools my team uses to help Greater Boston homeowners and commercial property managers establish healthy, lasting lawns. In the sections below, I’ll break down the full process, the materials involved, and the key decisions that separate a thriving lawn from a failed one.
What Is Hydromulch Seeding and How Does It Work?
Hydromulch seeding is a hydraulic planting method. Instead of spreading dry seed over bare soil, we spray a blended slurry made from water, seed, mulch fiber, fertilizer, and tackifier. The water carries the materials through the hose, the seed lands evenly across the soil, and the mulch forms a temporary blanket over the surface.
That blanket is the key. It helps:
- Hold seed in place
- Reduce evaporation
- Improve seed-to-soil contact
- Protect against wind and rain
- Create a moist germination zone
- Reduce erosion on exposed soil
Think of it like giving the seed a cozy green sleeping bag. The seed still has to do the growing, but the mulch gives it a much better place to wake up.
Hydromulch can be used for lawn establishment, slope stabilization, construction site restoration, commercial grounds, and large residential properties. It is especially helpful where ordinary broadcast seed might wash away before it has a chance to sprout.
Hydromulch Seeding vs Hydroseeding: What’s the Difference?
The terms are often used interchangeably, and in everyday conversation that is usually fine. Both involve spraying seed, water, mulch, and nutrients onto soil. But technically, hydromulch seeding often refers to a heavier mulch application designed for stronger soil cover and erosion control.
Here is the simple version:
- Hydroseeding usually focuses on fast, efficient lawn seeding.
- Hydromulch seeding emphasizes the mulch layer, moisture retention, slope protection, and soil stabilization.
- Hydromulch often uses more fiber mulch and tackifier than a light hydroseed mix.
- Hydromulch is often better for slopes, dry soil, newly graded land, and erosion-prone areas.
For flat lawn areas with good irrigation, standard hydroseeding can work beautifully. For tougher sites, such as slopes in Newton, commercial properties in Canton, or exposed construction areas in Needham, hydromulch gives seed a better chance of staying put.
You can learn more about our related service here: More info about hydroseeding.
How Hydromulch Helps With Erosion Control and Soil Stabilization
Bare soil is vulnerable. One heavy rain can create rills, washouts, sediment runoff, and muddy low spots. Hydromulch helps by creating a fiber network that ties the surface together.
The mulch fibers:
- Deflect raindrop impact
- Slow surface runoff
- Reduce wind movement
- Keep seed from sliding downhill
- Help stabilize loose soil
- Hold moisture close to the seed
Tackifier acts like a natural glue that helps the mulch mat bond to the soil. On slopes, this can make a big difference.
Government and conservation guidance commonly recognizes hydromulching as an erosion control tool for difficult sites. For example, the USDA Natural Resources Conservation Service discusses hydromulching as a way to protect vulnerable slopes and support revegetation after fire damage. You can review that guidance here: USDA guidance on post-fire hydromulching.
For Massachusetts lawns, the same basic principle applies: exposed soil needs cover. Whether the soil is bare because of construction, grading, utility work, or lawn replacement, hydromulch helps protect it while grass establishes.
Where Hydromulch Seeding Works Best
Hydromulch seeding is useful anywhere seed needs extra protection, but it really shines in these situations:
- Residential lawn installations
- Commercial properties
- New construction sites
- Recently graded yards
- Slopes and hillsides
- Drainage swales
- Utility corridors
- Parks and open green spaces
- Sports field edges and recovery areas
- Large lawns where hand seeding is inefficient
- Areas where erosion or runoff is a concern
In the Boston Metro-West area, we often look at hydromulch seeding when a property has a mix of sun, shade, slope, and drainage challenges. A flat backyard in Brookline may need a different approach than a steep side yard in Belmont or a commercial site in Norwood.
How to Start a Hydromulch Seeding in 6 Simple Steps
A successful hydromulch job is not just “spray and pray.” The spraying part is fast, but the planning and preparation decide whether the lawn succeeds.
Here is how we approach it.
Step 1: Inspect the Site and Test the Soil
Before any slurry goes into the tank, we inspect the site. Hydromulch is excellent, but it is not magic green paint. If the soil is compacted, poorly graded, nutrient-starved, or full of debris, the results will suffer.
We check:
- Soil pH
- Nutrient levels
- Drainage patterns
- Compaction
- Slope grade
- Sun and shade exposure
- Existing weeds
- Topsoil depth
- Irrigation access
- Erosion risk
- Foot traffic and pet use
Soil testing matters because grass grows best when pH and nutrients are in the right range. If the soil is too acidic, too compacted, or low in key nutrients, seed may germinate poorly or struggle after sprouting.
We also look at water movement. If a downspout is dumping water across the seedbed, or if a slope funnels runoff into one spot, that needs correction before seeding.
Step 2: Prepare the Ground Before Spraying
Good seedbed preparation is one of the biggest differences between a lawn that fills in evenly and one that turns patchy.
Before spraying, we typically prepare the ground by:
- Removing stones, sticks, roots, and construction debris
- Eliminating existing weeds where needed
- Adding or adjusting topsoil
- Loosening compacted soil
- Raking the surface smooth
- Repairing washouts
- Correcting rough grading
- Creating a firm but not compacted seedbed
- Marking areas to keep people and pets off the soil
The goal is a smooth, loose surface with good seed-to-soil contact. If the soil is too hard, seed roots struggle. If the surface is too fluffy, water can move seed around. We want the Goldilocks zone: not concrete, not cake batter, just right.
Step 3: Choose the Right Seed Mix
In Massachusetts, most lawns use cool-season grasses because they perform well in our climate. The right mix depends on sun, shade, traffic, irrigation, soil type, and the intended use of the lawn.
Common choices include:
- Tall fescue for drought tolerance and durability
- Fine fescue for shade tolerance and lower-input areas
- Kentucky bluegrass for dense, attractive turf and repair ability
- Perennial ryegrass for fast germination and early cover
- Native or specialty blends for erosion control, low-maintenance areas, or habitat goals
For a sunny, high-use family lawn in Walpole, we might lean toward a durable turf mix. For a shaded property in Chestnut Hill or Jamaica Plain, we would choose a mix that handles lower light. For a commercial slope in Hyde Park, erosion control and root strength may matter most.
Seed quality also matters. Technical specifications for hydro-mulch seeding often require seed to meet purity and germination standards because poor seed causes poor results. We always want seed that is clean, viable, and appropriate for the site.
For a deeper look at seed options, visit More info about hydro grass seed.
Step 4: Mix the Hydromulch Slurry Correctly
The slurry is the recipe. A basic hydromulch mix includes:
- Water
- Grass seed
- Fiber mulch
- Starter fertilizer
- Tackifier
- Dye
- Soil amendments when needed
Mulch may be made from wood fiber, paper fiber, cellulose, or a blend. Wood fiber is often preferred where erosion resistance is important because it creates a stronger interlocking fiber mat. Paper or cellulose mulch may be used in lighter applications. Blends can offer a balance of coverage, cost efficiency, and performance.
Tackifier helps the mulch adhere to the soil. Fertilizer supports early growth. Dye helps the applicator see where the slurry has already been sprayed, which improves even coverage.
The materials must be mixed with proper agitation so the slurry stays consistent. If the mix is too thin, it may not protect the seed. If it is too thick for the equipment, it can clog hoses or spray unevenly. That is why equipment, material choice, and operator experience all matter.
Step 5: Spray Evenly at the Right Rate
Even spraying is essential. The applicator uses overlapping passes to avoid gaps and thin areas. The green dye is not just for looks; it helps show coverage in real time.
During application, we watch for:
- Uniform color
- Proper overlap
- Thin spots
- Heavy buildup
- Overspray near walkways, patios, walls, and driveways
- Slope direction and runoff paths
- Hose access
- Wind conditions
- Nozzle pattern
Technical hydro-mulch specifications often emphasize proper equipment, agitation, nozzle distribution, and coverage. For public works and construction settings, acceptance may be based on coverage, establishment, and erosion repair standards. You can see an example of formal specifications here: Technical hydro-mulch seeding specifications.
For homeowners, the practical takeaway is simple: coverage should look even. If one area is dark green and another is barely tinted, the results will likely be uneven too.
Step 6: Water, Protect, and Monitor Growth
After spraying, water becomes the boss. Hydromulch holds moisture well, but it still needs consistent watering to germinate.
The mulch layer should stay damp, not flooded. Puddles and runoff can move seed. Dry mulch can stop germination. We recommend frequent light watering at first, then gradually shifting to deeper watering as roots develop.
After application:
- Keep foot traffic off the area
- Keep pets off the seedbed
- Avoid mowing too early
- Watch for washouts after storms
- Repair thin spots promptly
- Continue watering through establishment
- Follow up with proper fertilization when needed
Hydromulch creates the launchpad. Maintenance gets the rocket into orbit.
Materials, Equipment, Seeds, Mulches, and Additives Used in Hydromulch Seeding
Hydromulch seeding uses specialized equipment and materials. Each part of the mix has a job.
Common Hydromulch Equipment
Professional hydromulch application usually uses a hydroseeder or hydromulcher with:
- Tank
- Pump
- Agitation system
- Hose
- Spray nozzle
- Water source
- Engine or hydraulic drive
- Mixing controls
Agitation is important because mulch, seed, fertilizer, and tackifier need to stay suspended in the tank. Some machines use jet agitation, while others use mechanical paddle agitation. Jet-agitated units can be useful for many lawn applications. Mechanical agitation is often better for heavier slurries and thicker erosion control materials.
Large ground applications may use truck-mounted or trailer-mounted tanks. On tighter residential properties in areas like Belmont, Watertown, or Roslindale, hose access and equipment positioning become part of the planning.
Mulch Types and What They Do
Mulch is the protective layer. Common types include:
- Wood fiber mulch: Strong fiber network, good erosion control, good moisture retention
- Paper or cellulose mulch: Lighter coverage, often used for less demanding areas
- Blended mulch: Combines wood and paper characteristics
- Bonded fiber matrix: Higher-performance erosion control material
- Fiber-reinforced matrix: Designed for challenging slopes and stabilization needs
Hydromulch products are commonly used in construction erosion control because they form a web-like cover that helps hold seed and soil in place. Product types vary based on slope, soil condition, project goals, and required longevity. For examples of product categories, see Hydromulch Products for Erosion Control – Millborn Seeds.
Tackifiers, Fertilizers, and Soil Additives
Additives improve performance. Common options include:
- Guar tackifier for natural bonding
- Organic tackifiers for mulch adhesion
- Polyacrylamide tackifiers for soil stabilization in certain applications
- Starter fertilizer for early root and shoot growth
- Lime when soil pH needs correction
- Soil conditioners for poor or compacted soil
- Microbial or bio-additives where appropriate
- Dye for application visibility
Tackifier should be used carefully. Too little may allow mulch to move on slopes. Too much or the wrong product can interfere with germination or create application issues. The right material depends on the site.
Typical Application Rates to Know
Application rates vary by site conditions, slope, seed type, and performance goals. Technical guidance often uses heavier mulch rates for erosion-prone areas and lighter rates for simpler lawn seeding.
Common specification concepts include:
- Higher mulch rates for steeper slopes
- Tackifier added where runoff or slope movement is a concern
- Split applications for difficult sites, with seed applied first and heavier mulch cover after
- Minimum surface cover targets for erosion control
- Establishment standards based on grass coverage and height
Some conservation and construction specifications reference high mulch rates per acre and surface coverage goals for one growing season. For residential lawns, the rate is tailored to the property rather than copied from a highway or restoration specification.
In plain English: flat lawn, lighter recipe; steep slope, stronger recipe.
Best Timing, Costs, and Comparisons: Hydromulch vs Seed vs Sod
Timing and expectations matter. Hydromulch seeding can produce fast, even results, but it still depends on weather, water, soil, and aftercare.
Best Times and Conditions for Applying Hydromulch Seed
For cool-season lawns in Massachusetts, the best windows are usually:
- Spring, once soil has warmed and the site is workable
- Late summer into early fall, when temperatures are milder and moisture is easier to manage
Early fall is often excellent because warm soil encourages germination while cooler air reduces stress on young grass. Spring can also work well, especially with irrigation and good weed management.
Avoid hydromulch seeding when:
- Soil is frozen
- Heavy rain is forecast
- Extreme heat is expected
- The site cannot be watered
- High winds may cause overspray
- Soil is too muddy to prepare properly
The perfect forecast is mild, calm, and boring. Grass loves boring weather.
How Much Does Hydromulch Seeding Cost?
Hydromulch seeding costs vary widely. Any average pricing found online should be treated as general internet data only, not actual Lawn Care Plus pricing.
Factors that affect cost include:
- Square footage
- Site access
- Slope difficulty
- Soil preparation needs
- Seed mix quality
- Mulch type and application rate
- Tackifier use
- Fertilizer and soil amendments
- Irrigation availability
- Repair or grading work
- Residential vs commercial scope
A simple, flat, prepared lawn is very different from a steep commercial slope that needs erosion control, soil amendment, and hose access planning.
For more detail on the cost factors behind hydroseeding and related services, visit More info about hydroseeding cost.
Hydromulch Seeding Compared With Traditional Seeding and Sod
| Method | Upfront Cost | Establishment Speed | Erosion Control | Watering Needs | Labor | Best For |
|---|---|---|---|---|---|---|
| Hydromulch seeding | Moderate compared with seed, usually less than sod | Fast, often visible sprouts in about a week or more | Strong, especially with enough mulch and tackifier | Consistent moisture required | Efficient for large areas | New lawns, slopes, commercial sites, erosion-prone soil |
| Broadcast seeding | Usually lowest | Slower and more exposed | Low unless straw or erosion blanket is added | Consistent moisture required | Labor increases with prep and protection | Small flat areas and repairs |
| Sod installation | Highest upfront | Instant appearance | Immediate surface cover | Heavy watering during rooting | High labor and material handling | Immediate lawn needs and high-visibility areas |
Sod gives an instant green surface, but it is labor-intensive and more expensive in many situations. Broadcast seeding is simple, but seed is exposed to birds, wind, rain, and drying. Hydromulch sits in the middle: fast, efficient, protective, and especially useful for large or difficult sites.
When Hydromulch Is Worth the Investment
Hydromulch seeding is often worth it when you need:
- Better erosion control than broadcast seed
- Faster coverage than traditional seeding
- Less upfront investment than sod
- Uniform application across large areas
- Seed protection on slopes
- Lawn establishment after construction
- Efficient commercial property seeding
- Better moisture retention
- A custom seed mix for the site
If you are comparing options by square foot, it helps to understand what is included: soil prep, seed quality, mulch rate, tackifier, watering plan, and follow-up expectations. Learn more here: More info about hydroseeding cost per square foot.
Maintenance, Mistakes to Avoid, and Establishment Timeline
Hydromulch seeding is only the beginning. The first few weeks decide the final result.
Hydromulch Seeding Maintenance Timeline
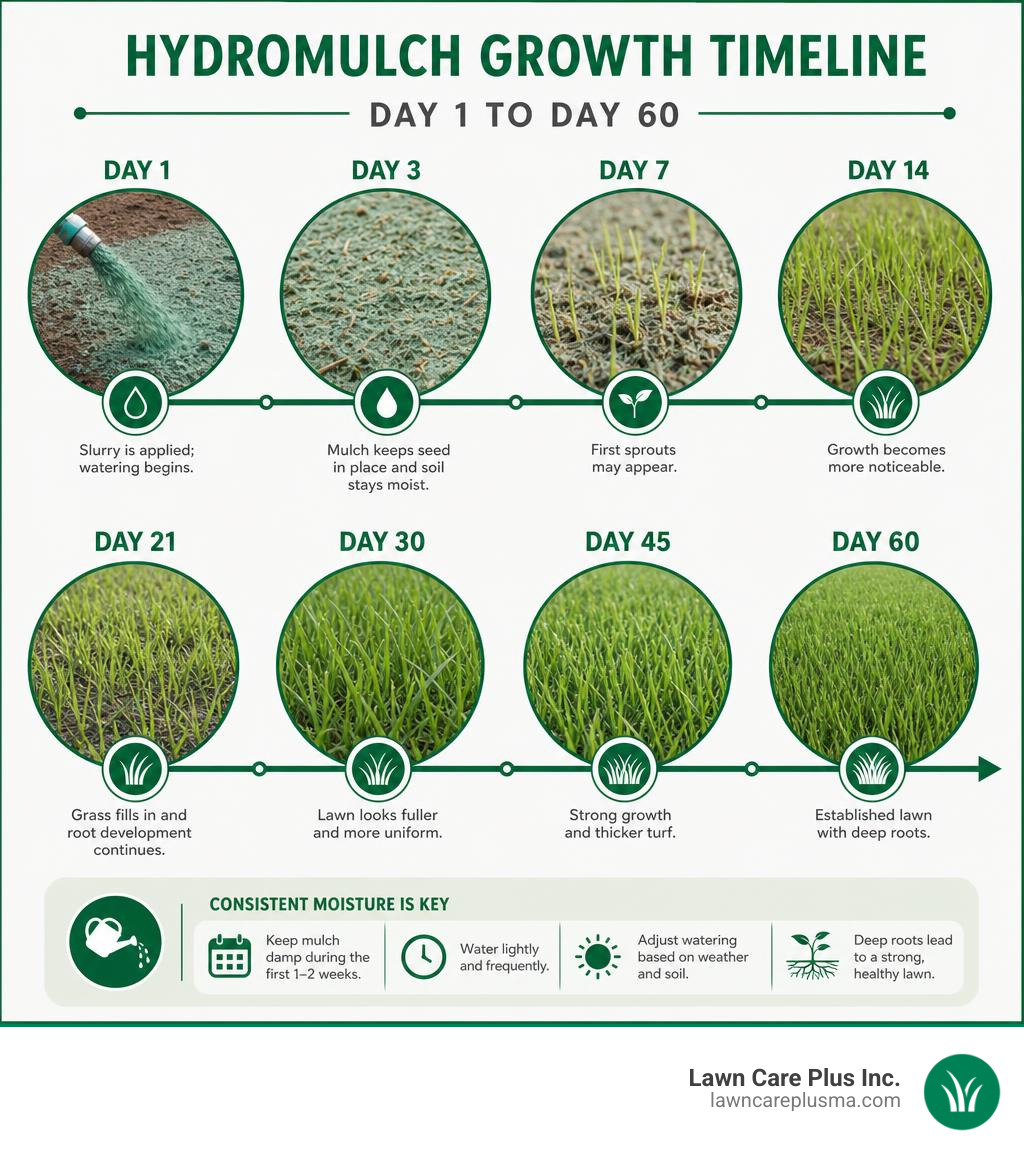
A typical timeline looks like this:
- Day 1: Slurry is applied; watering begins.
- Days 2 to 7: Mulch must stay consistently damp.
- Week 1 and beyond: Some grasses may begin sprouting, depending on seed type and conditions.
- Weeks 2 to 3: Coverage increases; thin areas become easier to spot.
- Weeks 3 to 4: Many lawns show strong coverage when weather and watering are favorable.
- About one month: Many hydromulched lawns are close to first mowing height.
- Around 60 days: Under ideal conditions, highly managed turf can become quite strong, though normal residential use should still be introduced carefully.
Different grasses germinate at different speeds. Ryegrass is quick. Fescues are moderate. Kentucky bluegrass takes longer. Weather and watering can speed things up or slow things down.
Watering After Hydromulch Seeding
Water lightly and frequently at first. The goal is to keep the mulch layer damp without creating runoff.
Best practices include:
- Water in the morning when possible
- Add short watering cycles during dry or warm days
- Avoid puddles
- Avoid washing seed downhill
- Adjust watering after rain
- Keep watering until germination is consistent
- Shift to deeper watering as roots grow
If you have irrigation, make sure heads are adjusted before seeding. A sprinkler that misses one corner will create one sad brown corner. For help with residential lawn establishment, visit More info about residential hydroseeding.
First Mowing, Fertilizing, and Traffic Rules
Wait until the grass is tall enough and the soil is firm enough before mowing. A common target is when grass reaches about 3 to 4 inches high.
For the first mow:
- Use a sharp blade
- Mow when soil is not soggy
- Remove only the top portion of the grass
- Avoid tight turns that tear young roots
- Keep mower traffic light
Traffic rules matter too. Keep people, pets, and equipment off the new lawn as much as possible until roots are established. Heavy use too early can create ruts, bare spots, and compacted soil.
Follow-up fertilization may be needed depending on the seed mix, soil test, and starter fertilizer used in the slurry.
Common Mistakes That Cause Poor Results
Most hydromulch failures come from preventable mistakes, such as:
- Skipping soil preparation
- Using the wrong seed mix
- Applying too little mulch
- Skipping tackifier on slopes
- Spraying before a heavy storm
- Letting the mulch dry out
- Overwatering until seed washes away
- Ignoring compacted soil
- Mowing too early
- Allowing pets or foot traffic too soon
- Using low-quality seed or materials
- Failing to repair washouts quickly
The biggest mistake is assuming hydromulch eliminates maintenance. It reduces risk, but it still needs water and protection.
Frequently Asked Questions About Hydromulch Seeding
How Long Does Hydromulch Seed Take to Germinate?
Hydromulch seed can begin germinating in about one week or more, depending on the seed species, soil temperature, moisture, and weather.
General timing:
- Perennial ryegrass: often among the fastest
- Tall fescue: moderate germination speed
- Fine fescue: moderate, depending on conditions
- Kentucky bluegrass: slower but valuable for dense turf
Many lawns show strong coverage in about a month when watering and weather cooperate. First mowing often happens shortly after the lawn reaches proper height and density.
Is Hydromulch Seeding Environmentally Friendly?
Hydromulch seeding can be an environmentally responsible option when done correctly.
Benefits include:
- Reduced soil erosion
- Less sediment runoff into drains and waterways
- Biodegradable mulch options
- Better water retention than bare seed
- Less dust from exposed soil
- Ability to use native or low-maintenance seed blends
- Less transportation and handling compared with sod
- Faster revegetation of disturbed soil
For commercial and construction sites, erosion control is not just about appearance. Keeping soil on site helps protect storm drains, nearby landscapes, and local water quality.
Can You DIY Hydromulch Seeding?
Small DIY hydroseeding kits exist, and some equipment can be rented. For tiny repairs, a homeowner may be able to handle basic seeding. But for full lawns, slopes, commercial properties, or erosion-prone areas, professional application is usually the safer choice.
DIY challenges include:
- Equipment access
- Proper slurry mixing
- Correct mulch rate
- Even spraying
- Tackifier selection
- Soil preparation
- Watering setup
- Cleanup
- Avoiding clogs
- Managing slopes safely
If the job is large enough to require real hydromulch equipment, it is usually large enough to benefit from professional experience.
Conclusion
Hydromulch seeding is one of the most effective ways to establish grass on bare soil, especially when erosion control, uniform coverage, and fast germination matter. The process is simple to understand but important to execute correctly: inspect the site, prepare the ground, choose the right seed, mix the slurry, spray evenly, then water and monitor until the lawn is established.
For properties in Belmont, Boston, Brookline, Canton, Dedham, Hyde Park, Milton, Needham, Newton, Norwood, Roslindale, Walpole, Watertown, and surrounding Boston Metro-West communities, hydromulch seeding can be a smart solution for new lawns, construction recovery, slopes, and commercial grounds.
At Lawn Care Plus Inc., we bring together lawn installations, irrigation systems, grading, yard cleanups, and full-service landscape experience so the seed has the best chance to become a healthy lawn. If you are ready to start a lawn the right way, you can Schedule hydro seeding service.
