An Introduction to Composite Fencing
Composite fencing represents a modern evolution in outdoor privacy and design. It’s an innovative material engineered from a smart blend of recycled wood fibers and high-density plastics. This combination masterfully captures the warm, timeless aesthetic of natural wood but completely eliminates the demanding upkeep. Homeowners who choose composite fencing gain a durable barrier that effectively resists rot, insects, and warping, ensuring decades of reliable privacy and enduring style with minimal effort.
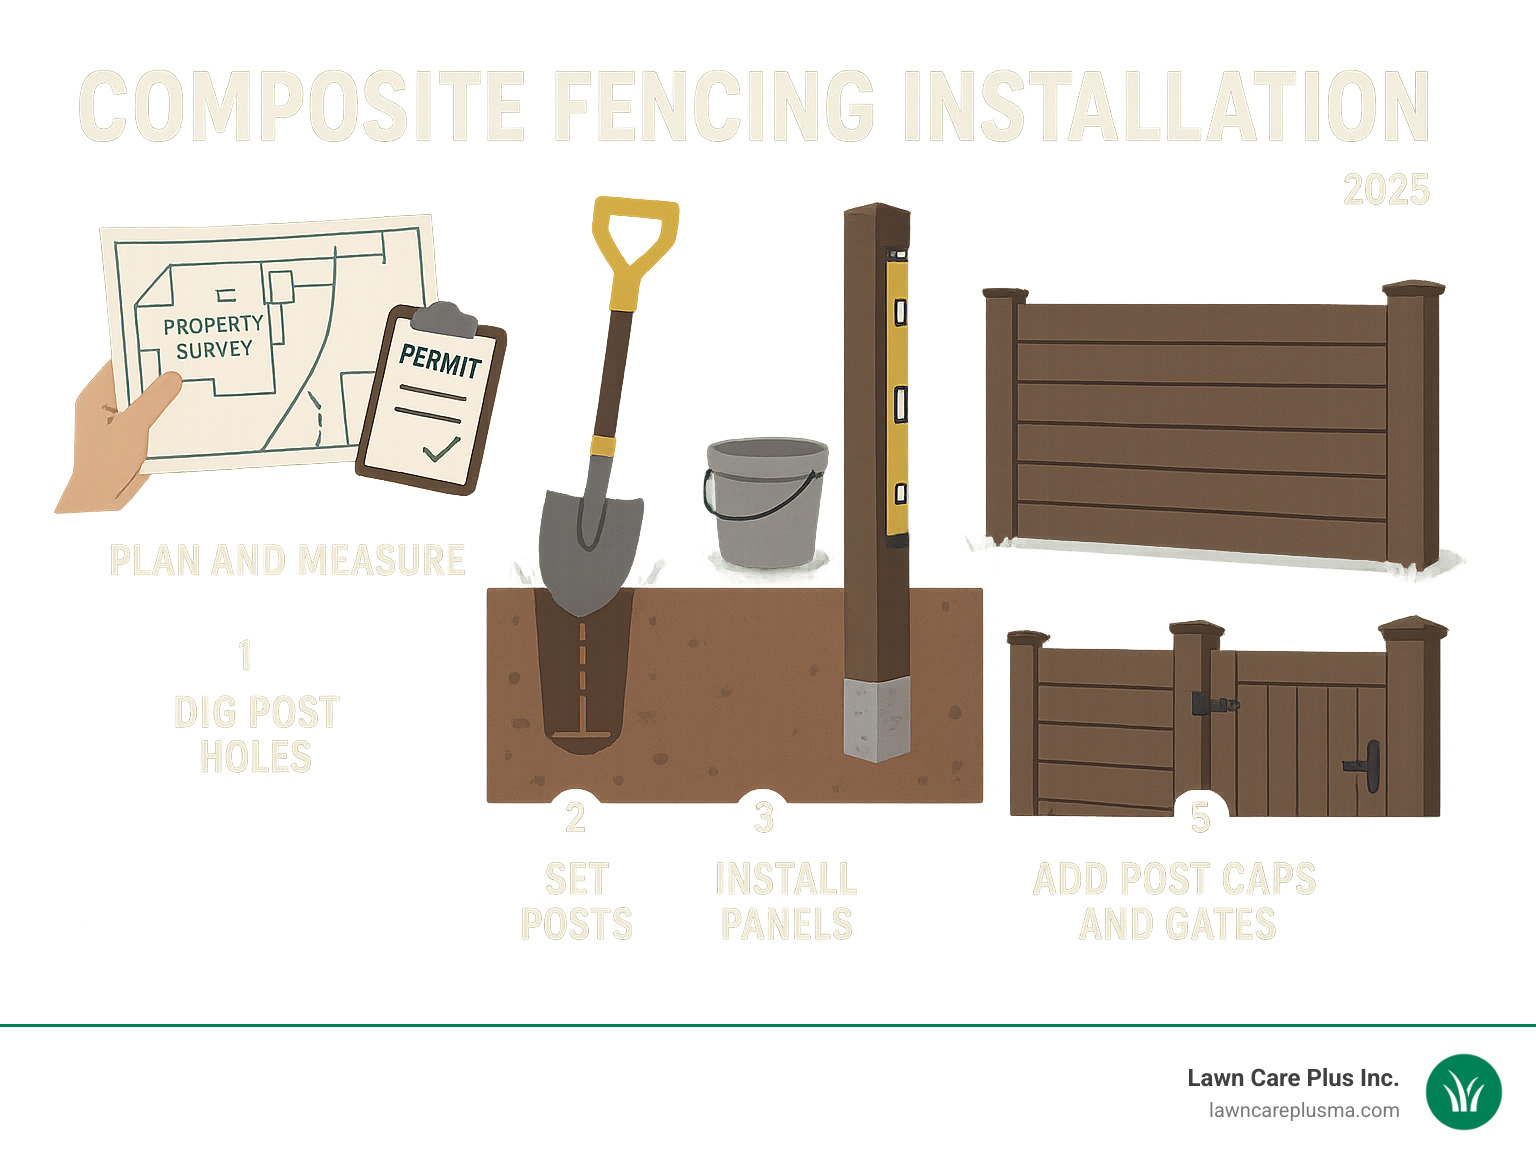
A typical composite fencing installation follows a clear, structured process:
- Plan & Prepare: Carefully measure your intended fence line, consult your property survey, and thoroughly check all local municipal and HOA regulations.
- Dig Post Holes: Excavate holes to a depth of one-third the post’s length, plus an additional 6 inches for a gravel base to ensure proper drainage.
- Set Posts: Position posts 6-8 feet apart, ensuring they are perfectly plumb before setting them securely in concrete.
- Install Panels: Attach brackets or slide the composite panels into place between the posts according to the manufacturer’s system.
- Add Finishing Touches: Complete the installation with post caps, gates, and a final rinse to remove any construction dust.
- Clean Up: Clear the worksite of all debris, then step back and enjoy your beautiful new fence!
Most high-quality composite fence systems are built to last 20-30 years, requiring only simple soap-and-water cleaning. They are typically backed by robust warranties of 10-25 years. The following sections provide a detailed guide to achieving these excellent results, whether you plan to tackle the project yourself or entrust it to the experienced team at Lawn Care Plus.
Understanding Composite Fencing: Materials, Styles, and Costs
Composite boards are a marvel of modern manufacturing, typically composed of 95% recycled materials, including wood fibers and high-density polyethylene (HDPE) plastic. These core materials are then encased in a protective, colour-fast resin cap. This multi-layer construction yields a superior fencing product that is:
- Durable: It powerfully resists common wood fence ailments like cracking, splinters, insect damage, and rot.
- Low-maintenance: Forget the endless cycle of sanding, staining, or painting. A simple wash is all it needs.
- Weather-tough: Specifically designed to withstand the harsh New England climate, it holds up exceptionally well against punishing freeze-thaw cycles, heavy snow, and humid summers.
- Eco-friendly: By using reclaimed wood and plastic, composite manufacturing helps divert a significant amount of waste from landfills.
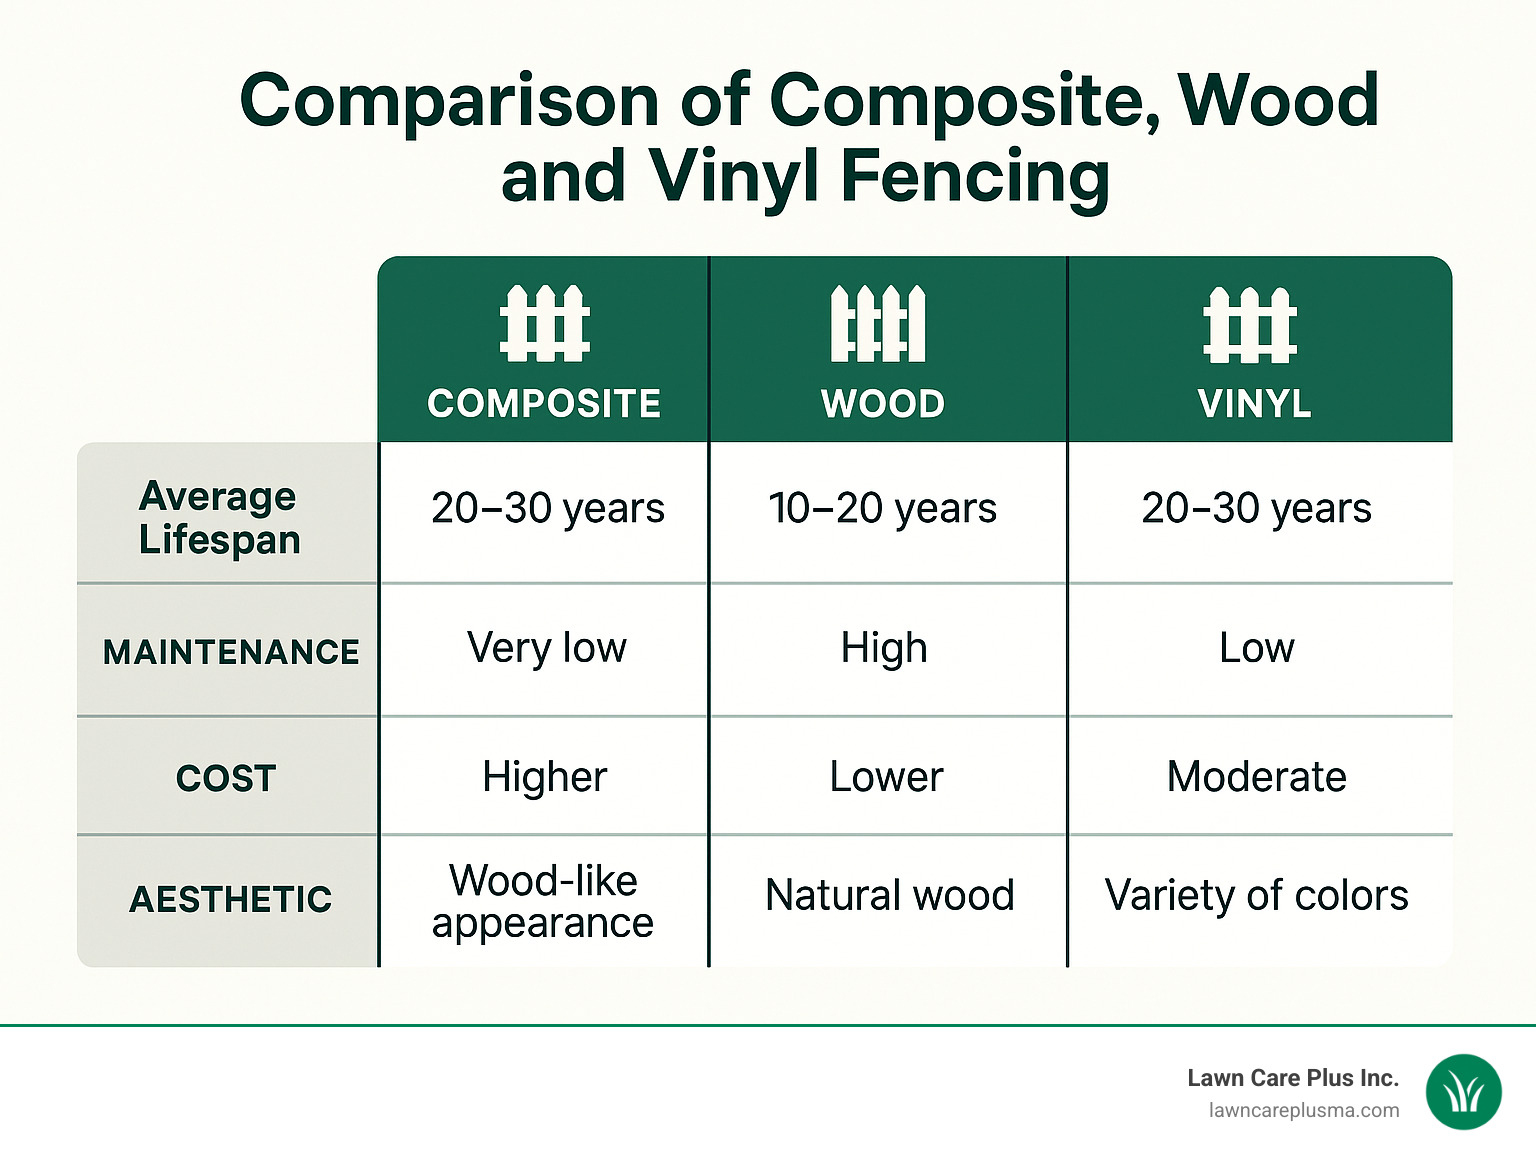
Composite vs. Wood & Vinyl (at a glance)
- Lifespan: Composite & vinyl lead with 20-30 years, while a typical wood fence may need major repairs or replacement in 10-20 years.
- Up-keep: Composite and vinyl require only a hose and mild soap. Wood, by contrast, demands re-staining or sealing every 3-5 yearsa costly and time-consuming chore.
- Up-front cost (materials + labour, broad U.S. averages gathered from public internet sources NOT pricing from Lawn Care Plus):
- Wood: $12$45 / lin.ft.
- Vinyl: $18$75 / lin.ft.
- Composite: $22$70 / lin.ft.
- Long-term value: While the initial investment is higher, composite fencing often proves more economical over its lifespan once you factor in the recurring costs and labor for wood fence maintenance and its earlier replacement.
- Sustainability: Composite shines by using recycled content. Vinyl is a petroleum-based product (PVC), and the sustainability of wood depends heavily on responsible forestry practices.
Styles & Typical Price Ranges*
- Privacy (6-8 ft): Solid, interlocking panels that offer maximum seclusion. Ideal for backyards. … $22$70 per lin.ft.
- Picket (3-4 ft): A classic, charming style perfect for front yards and garden definition. … $11$40 per lin.ft.
- Decorative (lattice or shadow-box): These styles add architectural flair, allowing for airflow and light while still providing a sense of enclosure. … $28$90 per lin.ft.
Remember to budget for gates ($200$900 for a standard pedestrian gate; $600$1,800+ for drive-through gates) and potential extra labor costs for challenging terrain like rocky soil or steep slopes.
All figures are broad U.S. averages compiled from publicly available internet data for 2025. They are not a quote from Lawn Care Plus Inc.; local conditions, material choices, and site complexity can raise or lower costs by 3x or more.
For bigger outdoor makeovers, see our full hardscaping services lineup.
Planning Your Composite Fence Project
A successful fence installation begins long before the first post hole is dug. Thorough preparation is the key to avoiding frustrating delays and costly mistakes. Start by assembling all your tools and materials to prevent last-minute trips to the hardware store.
Essential Tools: A post-hole digger or power auger, shovel, 4-ft level, measuring tape, string line with stakes, a powerful cordless drill, circular or miter saw with a composite-rated blade, rubber mallet, wheelbarrow for concrete, and, most importantly, safety gear like gloves and eye protection.
Primary Materials: Your chosen composite posts, panels or pickets, top and bottom rails, post caps, manufacturer-approved mounting brackets, color-matched screws designed for composite use, bags of quick-set concrete, and ¾-inch gravel for drainage.
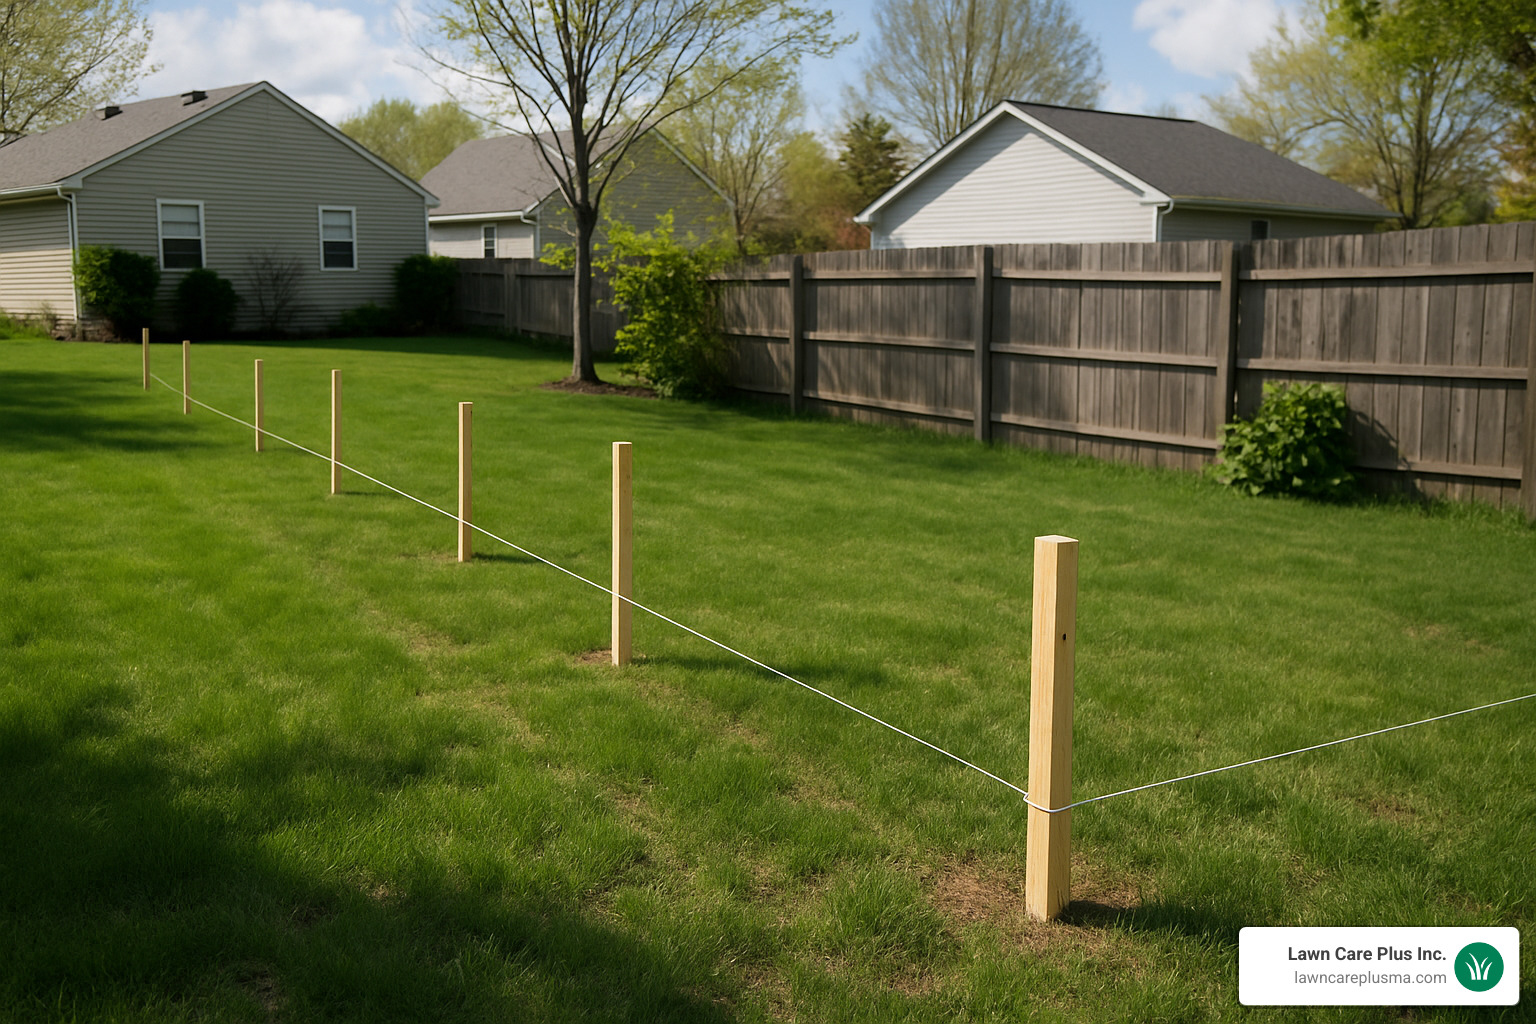
Mark the Line & Check the Rules
- Establish Your Boundaries: Use your official property survey to accurately locate your property corners. Building even a few inches onto a neighbor’s land can cause significant legal issues.
- Know the Regulations: Before buying materials, thoroughly review your town’s zoning bylaws and any Homeowners’ Association (HOA) rules. These often dictate maximum fence height, acceptable styles, and required setbacks from property lines, sidewalks, or roads.
- Call Before You Dig: This is a critical safety step. Dial 811 a few days before you plan to dig. This free service will arrange for utility companies to mark the location of underground lines for gas, water, and electricity.
- Lay Out the Fence: Drive stakes at the corners and stretch a mason’s string line tightly between them to create a perfectly straight guide. Mark the precise location for each post, typically 6 to 8 feet apart, ensuring you adjust spacing to accommodate gates.
- Plan for Slopes: If your yard isn’t level, you must decide on your installation method. A stepped fence keeps each panel level, creating step-like gaps at the bottom. A racked (or raked) fence follows the contour of the ground, requiring special angled connections but providing a more seamless look. This decision affects your material order.
Need more visuals? Watch these manufacturer installation videos.
The Step-by-Step Composite Fencing Installation Process
While you should always prioritize the specific instructions provided by your fence manufacturer, the fundamental process is consistent across most systems. The outline below covers the essential stages for a sturdy, professional-looking installation.
1. Set the Posts
The strength and longevity of your fence depend entirely on properly set posts.
- Digging: Excavate holes that are approximately 12 inches in diameter. The depth is critical: it should be at least one-third of the post’s total length, plus an extra 6 inches for a drainage base. For a 6-foot high fence using 8-foot posts, this means a hole depth of at least 38 inches.
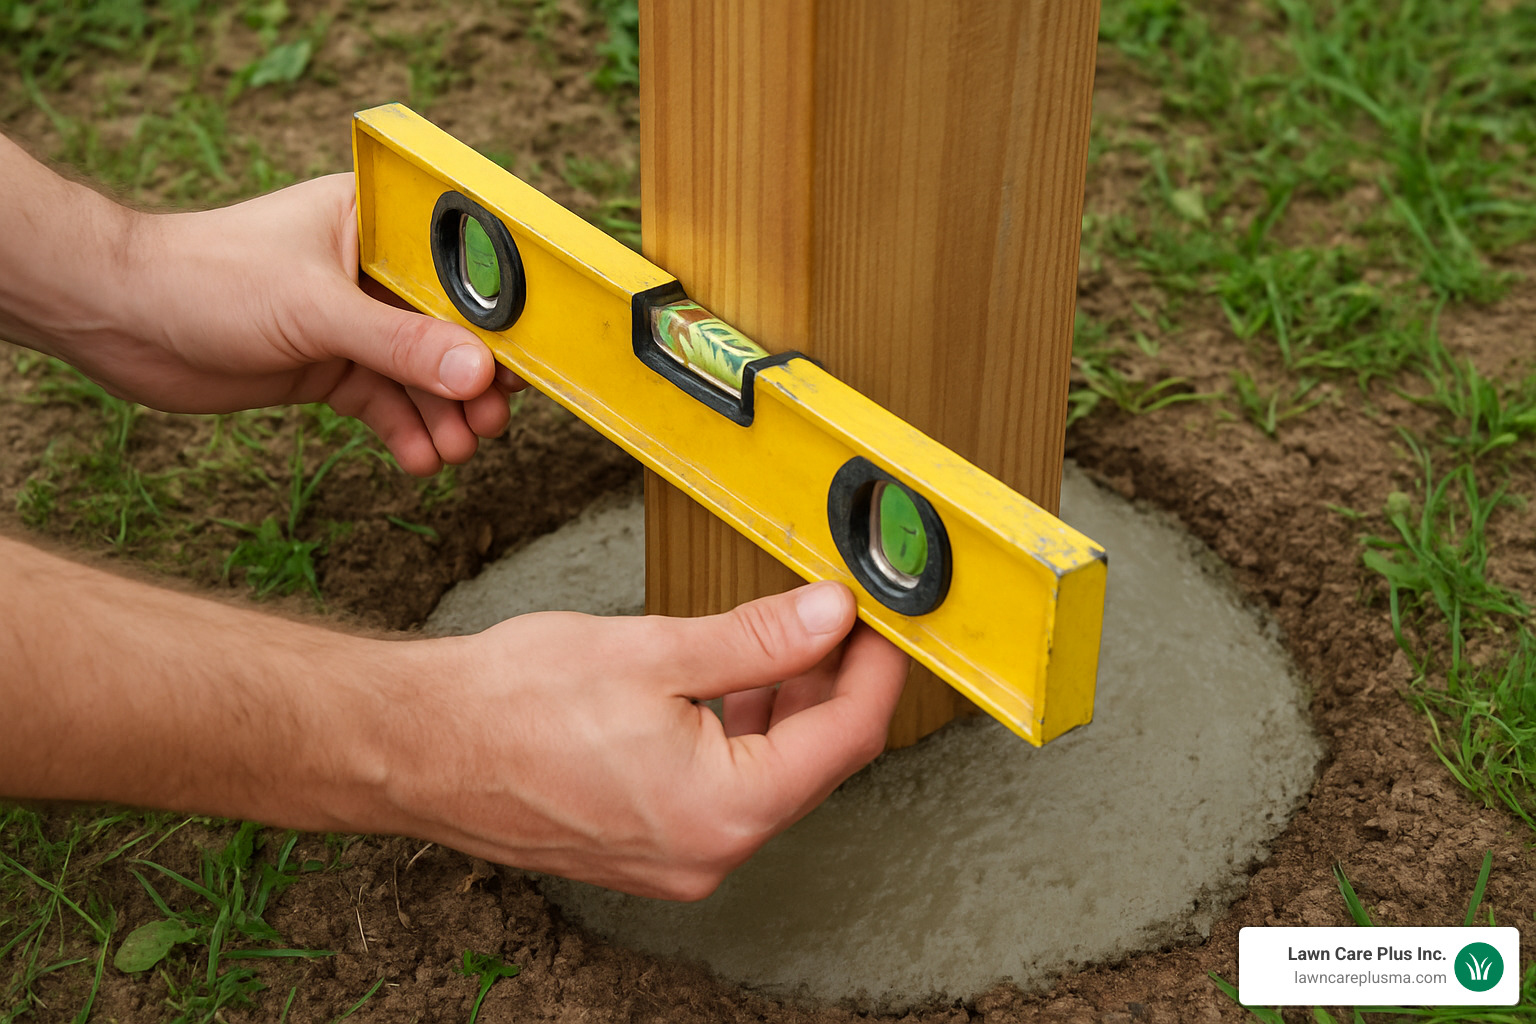
- Setting: Add 6 inches of gravel to the bottom of the hole for drainage, which helps prevent frost heave. Place the post in the center of the hole. Use a level on two adjacent sides to ensure it is perfectly plumb. While holding or bracing the post, pour the mixed concrete around it, stopping about 1 inch below ground level. Slope the top of the concrete away from the post to shed water.
- Curing: Brace the posts securely and allow the concrete to fully cure for 24-48 hours. Do not rush this step; attaching panels to uncured posts will result in a leaning fence.
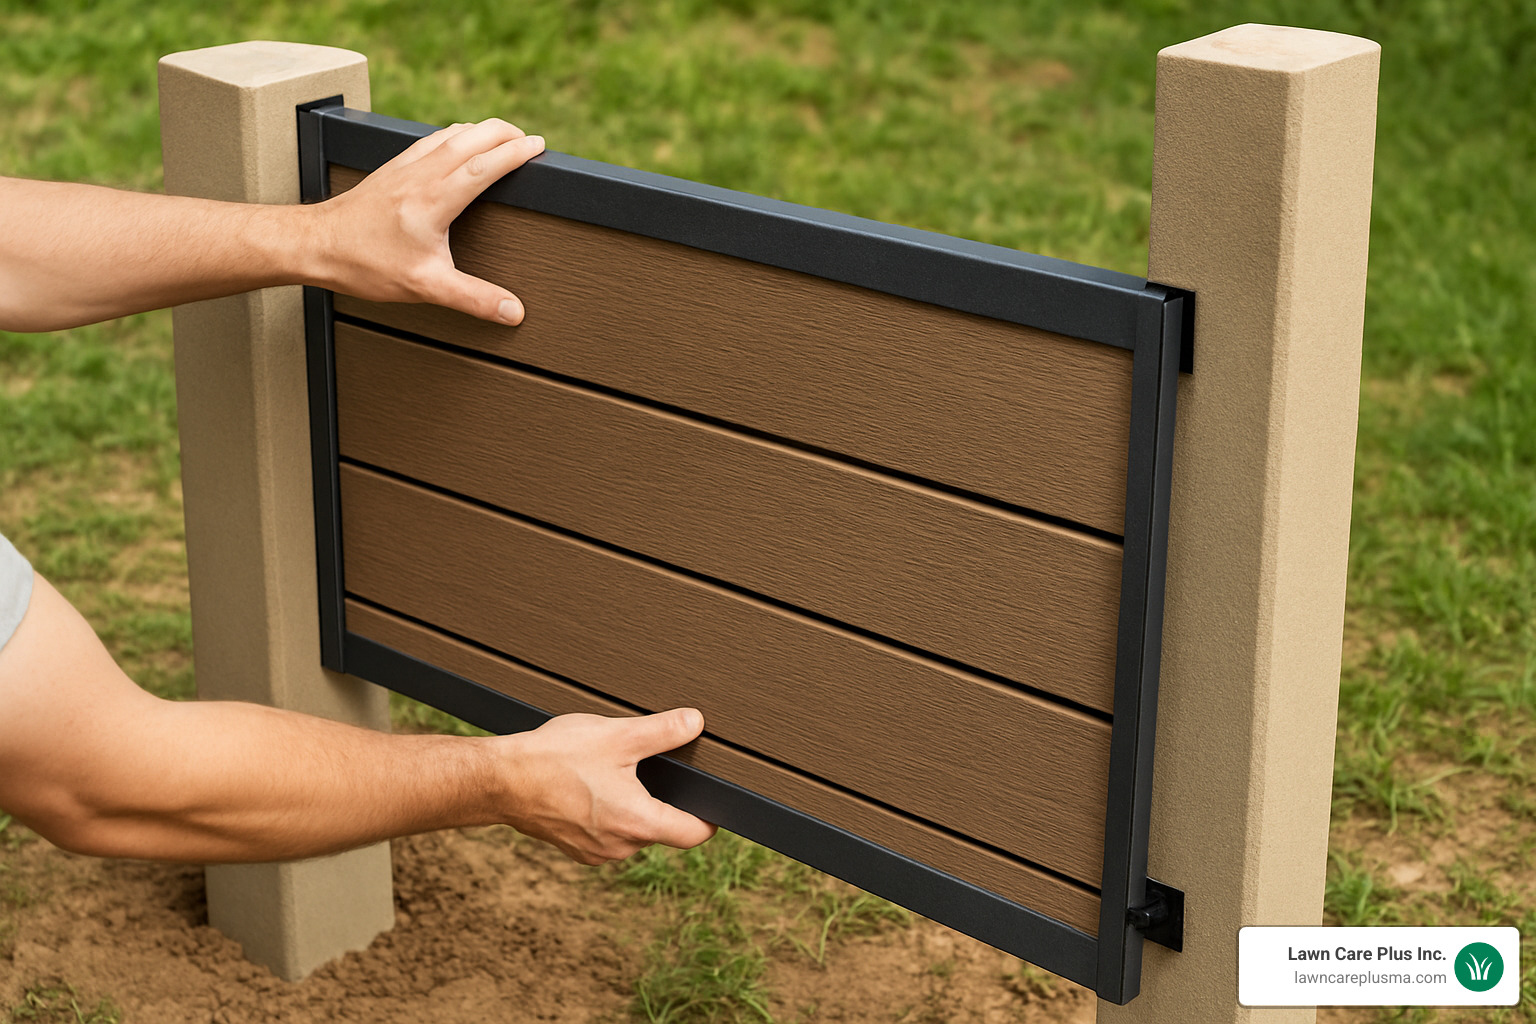
2. Hang the Panels or Pickets
Once the posts are solid, you can begin assembling the body of the fence.
- Preparation: If your system uses post sleeves, slide them over the posts before attaching any hardware.
- Brackets: Carefully measure and fasten the manufacturer-supplied brackets to the posts at the specified heights for the top and bottom rails.
- Assembly: Lift each pre-assembled panel (or install the bottom rail, individual pickets, and then the top rail) into place between the posts.
- Expansion Gaps: This is crucial for composite materials. The plastic content causes boards to expand and contract with temperature changes. You must leave a small gap—typically 1/16 inch between boards and about 4 mm between panels and posts—to accommodate this movement and prevent buckling.
- Ground Clearance: Keep the bottom rail at least 1 inch off the ground to prevent moisture wicking and allow for easy trimming.
3. Finish Up
- Post Caps: Install decorative caps on top of each post. This isn’t just for looks; it prevents water from collecting inside the post, which can cause damage over time.
- Gates: Install gates according to the kit’s specific directions. Pay close attention to the hardware placement to ensure a smooth, sag-free swing and a securely latching mechanism.
- Final Inspection: Walk the entire length of the fence line. Check and tighten any loose screws, and clean up all construction debris for a pristine finish.
Thinking about pet containment? Check out our Pet Fence Installation options.
Aftercare, Longevity & Common Pitfalls
Your composite fence is built for endurance, but proper care and avoiding common installation errors are key to maximizing its lifespan and appearance.
Routine Care
Maintaining a composite fence is remarkably simple. Twice a year, typically in the spring and fall, give it a gentle wash. Use a solution of mild soap and water with a soft-bristle brush, then rinse thoroughly with a garden hose. It’s critical to avoid high-pressure washers and harsh chemical cleaners or abrasives, as these can permanently scar the protective cap layer and may void your warranty. You can expect a slight, uniform lightening of the color in the first 3-4 months as the material weathers and settles; this is a normal process called extractive bleeding.
Most reputable brands offer extensive 10-25 year residential warranties (some are even longer) that cover defects like rotting, splitting, and insect damage. Be sure to register your product online after installation and keep your receipts and warranty documents in a safe place.
Mistakes to Dodge
- Shallow Post Holes: In Massachusetts, the frost line can be deep. Post holes that aren’t deep enough will be pushed upward by frost heave during winter, resulting in a wavy, unstable fence.
- Uneven Post Spacing: Composite fence panels are manufactured to precise dimensions. Inconsistent spacing between posts will make installation a nightmare, requiring you to cut panels and compromise the system’s integrity.
- Ignoring Property Lines: Misjudging your property line is a recipe for neighbor disputes and potential legal action that could force you to move the entire fence. Always work from a certified survey.
- Skipping Permits or HOA Approval: Assuming you don’t need permission can lead to hefty fines and even a tear-down order from your municipality or Homeowners’ Association.
- Forgetting Expansion Gaps: Composite material expands in the heat and contracts in the cold. Failing to leave adequate gaps between boards and at the posts will cause the fence to buckle and warp on hot summer days.
- Ignoring Slope Solutions: On sloped ground, simply installing standard panels creates unsightly and unsafe triangular gaps at the bottom. A proper stepped or racked installation is essential.
- Using Non-Approved Fasteners: The manufacturer specifies certain types of screws for a reason. Using the wrong ones can lead to corrosion, rust stains, and will almost certainly void your warranty.
- Nicking Boards with Lawn Trimmers: The protective cap is tough but not indestructible. Maintain the recommended 1-inch ground clearance to avoid damaging the bottom of your fence with landscaping equipment.
DIY or Pro?
For handy homeowners with the right tools, a flat yard, and ample free time, a DIY installation can save on labor costs. However, for properties with steep grades, notoriously rocky New England soil, or for anyone who wants to ensure their warranty is fully protected, hiring a professional is the wisest choice. Our crew services the Boston Metro-West area and has extensive experience with local codes and challenging terrain. See our Composite Fence Installers Near Me page for more details.
Frequently Asked Questions about Composite Fencing
Here are answers to some of the most common questions homeowners have when considering a composite fence.
How long will a composite fence last?
When installed correctly, a composite fence has a typical lifespan of 20 to 30 years, and sometimes even longer. This durability is supported by manufacturer warranties that usually range from 10 to 25 years for residential use. This is often a decade or more longer than the expected lifespan of a traditional wood fence.
Is it much more expensive than wood?
Initially, yes, the upfront cost is higher. National averages place professionally installed composite fencing around $22-$34 per linear foot, compared to about $15 for a standard wood fence. However, this doesn’t tell the whole story. When you factor in the long-term costs of wood—including purchasing stain or sealant every 3-5 years, brushes, cleaners, and your own labor time (or the cost of hiring someone)—the total cost of ownership for composite often becomes more favorable over time.
Will the color fade over time?
Composite fencing is highly fade-resistant, but not completely fade-proof. You should expect a natural, one-time weathering process in the first 3-6 months after installation, where the color will lighten slightly to its permanent shade. After this initial period, the color is exceptionally stable for the life of the fence, thanks to the UV inhibitors in the protective cap.
Can you paint or stain a composite fence?
It is strongly advised not to paint or stain a composite fence. The material is designed to be maintenance-free, and its non-porous surface does not hold paint well, leading to peeling and flaking. Furthermore, applying any paint or stain will almost certainly void the manufacturer’s warranty.
Get a Flawless Finish with Professional Installation
A composite fence is a significant investment in your property’s value, security, and aesthetic appeal. To ensure you get the full 20-30 year lifespan and a flawless finish, a professional installation is paramount. A pro understands the critical nuances of proper post depth for our region’s climate, the exact expansion gaps needed to prevent buckling, and the specific requirements of local building permits. Most importantly, a professional installation ensures your valuable manufacturer’s warranty remains fully intact.
For homeowners throughout Belmont, Newton, Walpole, and the greater Boston Metro-West area, Lawn Care Plus Inc. is the trusted choice for expert composite fencing installation. Our experienced team is adept at navigating the unique challenges of New England properties, from digging in rocky soil to designing neat solutions for tricky slopes. We handle all the complexities, allowing you to simply relax while we construct a beautiful, durable, and code-compliant fence that will improve your home for decades.
Contact us today to discuss your project and get a professional estimate!
