Transform Your Outdoor Space with a Beautiful Brick Patio
Picture yourself relaxing on a warm summer evening, cool drink in hand, surrounded by friends on your charming brick patio. Sounds perfect, doesn’t it? The good news is that creating this outdoor oasis is absolutely within your reach as a weekend DIY project.
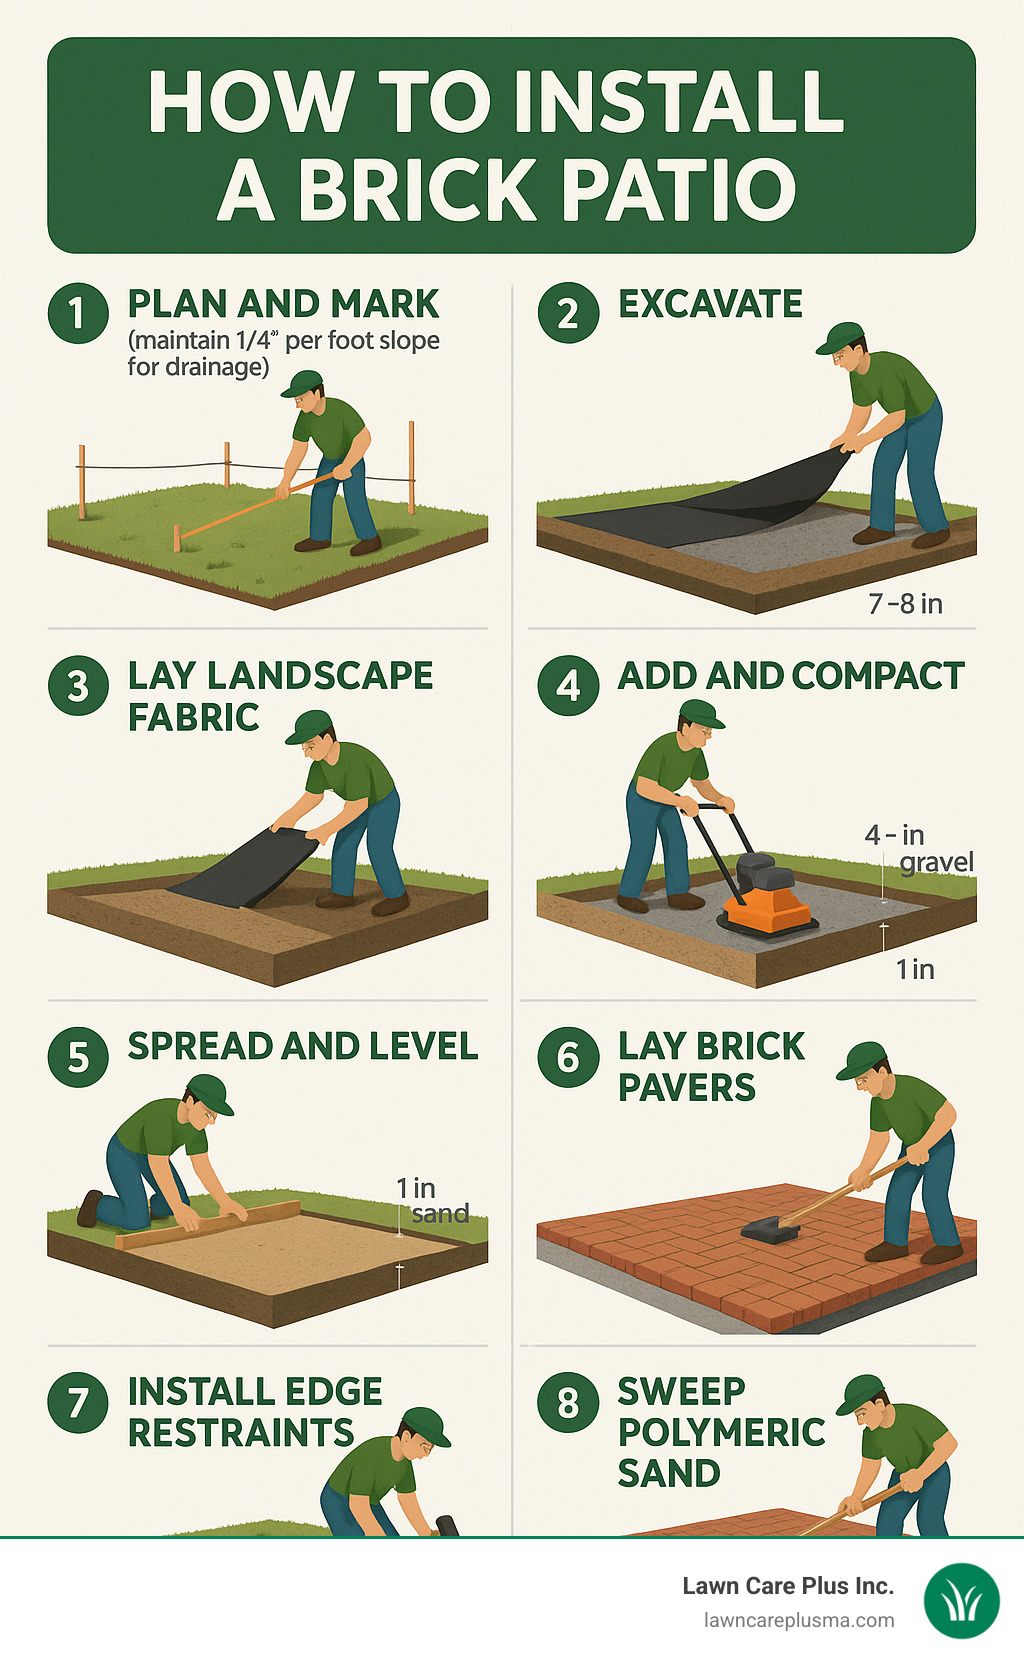
How to install a brick patio isn’t just about laying some bricks on the ground—it’s about crafting an outdoor living space that will serve you for decades. The process involves eight straightforward steps that transform your yard into a functional, beautiful extension of your home:
- Plan and mark your patio area (maintaining that crucial ¼” per foot slope for proper drainage)
- Excavate 7-8 inches deep to make room for your foundation layers
- Lay landscape fabric to create a natural weed barrier that saves you maintenance headaches later
- Add and compact 4 inches of gravel base for stability
- Spread and level 1 inch of sand as your brick’s bedding layer
- Lay brick pavers in your chosen pattern—from simple to elaborate
- Install edge restraints to prevent future shifting
- Sweep polymeric sand into joints and mist with water to lock everything in place
As This Old House aptly notes, “Prepping the site can be exhausting, but laying the brick pavers goes pretty quickly.” That’s the honest truth! The digging and base preparation might leave you a bit sore, but there’s something incredibly satisfying about seeing those bricks come together in a pattern before your eyes.
While you could hire professionals (and we at Lawn Care Plus would be happy to help), tackling this project yourself delivers both substantial savings and a hefty dose of pride. Most homeowners can complete a standard 10×10-foot patio in just 2-3 days with basic tools—a shovel, level, rubber mallet, and a plate compactor that you can easily rent for the weekend.
The secret to a brick patio that stands the test of time isn’t fancy techniques—it’s proper preparation. That solid foundation prevents the common issues that plague poorly-installed patios: shifting, settling, and the constant battle with weeds. Follow our guide step by step, and you’ll create a stable, beautiful outdoor space that not only improves your property’s value but provides the perfect backdrop for countless family memories.
Looking for inspiration beyond brick? Explore these related outdoor space changes:
– flagstone patio installation
– covered patios near me
– patio designers near me
With a little planning and a weekend of work, you’ll have a gorgeous brick patio where you can enjoy morning coffee, family barbecues, or quiet evenings under the stars. Ready to roll up your sleeves and get started? Let’s explore the details.
Benefits, Planning & Design Essentials
A brick patio isn’t just a beautiful addition to your yard—it’s a smart investment in your home’s future. When properly installed, these charming outdoor spaces can last for decades while significantly boosting your property’s curb appeal and value. Homeowners are often pleasantly surprised to learn that well-designed outdoor living spaces typically recover 60-80% of their cost when selling a home, making them one of the best exterior improvements for boosting the resale value of your property.
“A clay brick paver patio adds charm, functionality, and value to your outdoor living space while offering a rewarding DIY project,” our hardscaping experts often tell clients. This perfect blend of beauty and practicality explains why brick patios remain one of the most requested hardscaping projects for Boston Metro-West homeowners.
Before you grab that shovel, though, let’s talk planning. At Lawn Care Plus Inc., we’ve seen how proper preparation prevents headaches down the road. First, consider location and size carefully—the most common mistake is building too small. Once you add furniture, planters, and a grill, that cozy nook can feel downright cramped!
Drainage is absolutely critical—your patio must slope away from your house at ¼ inch per linear foot to prevent water pooling that could damage your foundation. Many homeowners in Massachusetts also overlook local codes and permits. Towns like Newton, Brookline, and Watertown often have specific requirements for hardscaping projects, so check with your building department before starting.
Always call 811 to have underground utilities marked before digging—hitting a gas or electric line can turn your weekend project into a costly disaster. Finally, take time selecting materials that complement your home’s exterior. The right brick color and texture can make your patio feel like it’s always been part of your landscape design.
Looking for inspiration for smaller yards? Check out these Patio Design Ideas for Small Backyards that maximize limited space.
Choosing the Right Layout & Pattern
The layout and pattern of your brick patio dramatically impact both its appearance and structural integrity. While rectangular patios are the simplest to build, curved or circular designs create visual interest that can transform your outdoor space.
Shape Options: While rectangular patios require minimal cutting and are perfect for beginners, curved designs add flowing elegance to your landscape. Circular patios create stunning focal points but demand precise layout skills.
Pattern Choices: Your brick arrangement isn’t just about looks—it affects stability too. The running bond pattern (like a brick wall with staggered joints) offers clean simplicity. The herringbone pattern, with bricks laid at 45° or 90° angles creating V-shapes, provides exceptional structural strength for high-traffic areas. The basketweave pattern, where pairs of bricks are laid perpendicular to each other, creates a woven appearance that’s both attractive and beginner-friendly.
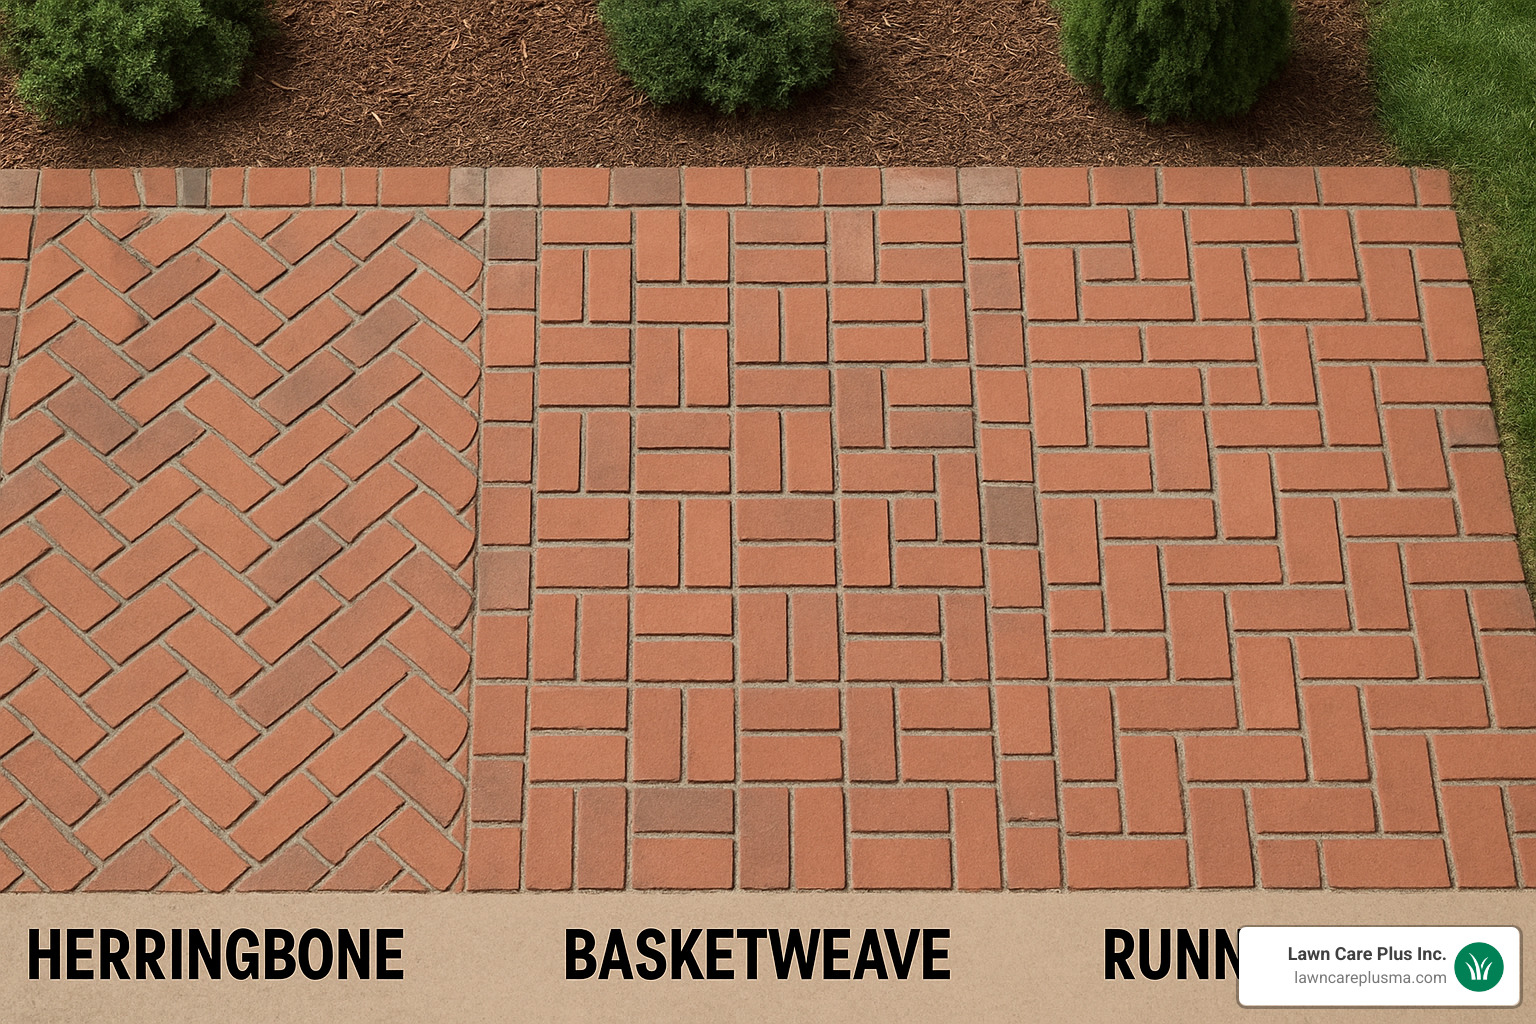
“Using a basketweave pattern minimizes brick cutting for a clean installation,” as The Spruce wisely notes. This makes it particularly suitable for first-time DIYers who might be nervous about making precise cuts.
For a natural, professional look, consider mixing bricks from different pallets to avoid color streaking. Your pattern choice affects your material needs—some patterns produce more waste during cutting than others.
Calculating Square Footage & Slope
Getting your measurements right saves time, money, and frustration. For a basic rectangular patio, simply measure the length and width in feet, then multiply these numbers to calculate square footage. Always add 5-10% extra for waste, cuts, and breakage.
Working with an irregular shape? No problem! Break the area into rectangles, calculate each separately, and add them together.
Here’s a pro tip: To ensure your layout is perfectly square, measure diagonally from corner to corner. If both diagonal measurements match, your corners are square. If not, adjust your layout until they match. This simple check prevents headaches later.
Proper drainage is non-negotiable for a lasting patio. Your brick surface must slope away from your house at ¼ inch per linear foot. For a 10-foot patio, this means the far edge should be 2.5 inches lower than the edge nearest your house. To establish this slope, set up batter boards and mason’s line around your patio perimeter, then use a line level to ensure the correct gradient.
“A brick patio should slope away from the house at a rate of 1/4 inch per linear foot to ensure proper drainage,” confirms industry research. This slight slope is barely noticeable to the eye but makes all the difference in preventing water from pooling on your patio or seeping toward your foundation.
For more detailed information about costs, check out our guide on the Cost to Install Paver Patio which breaks down expenses for different materials and sizes.
Tools, Materials & DIY Budget Calculator
Ready to transform your backyard into a brick patio paradise? Let’s gather everything you’ll need for a smooth installation. As we like to say at Lawn Care Plus Inc., “A well-prepared DIYer is a successful DIYer!”
The Tool Lineup
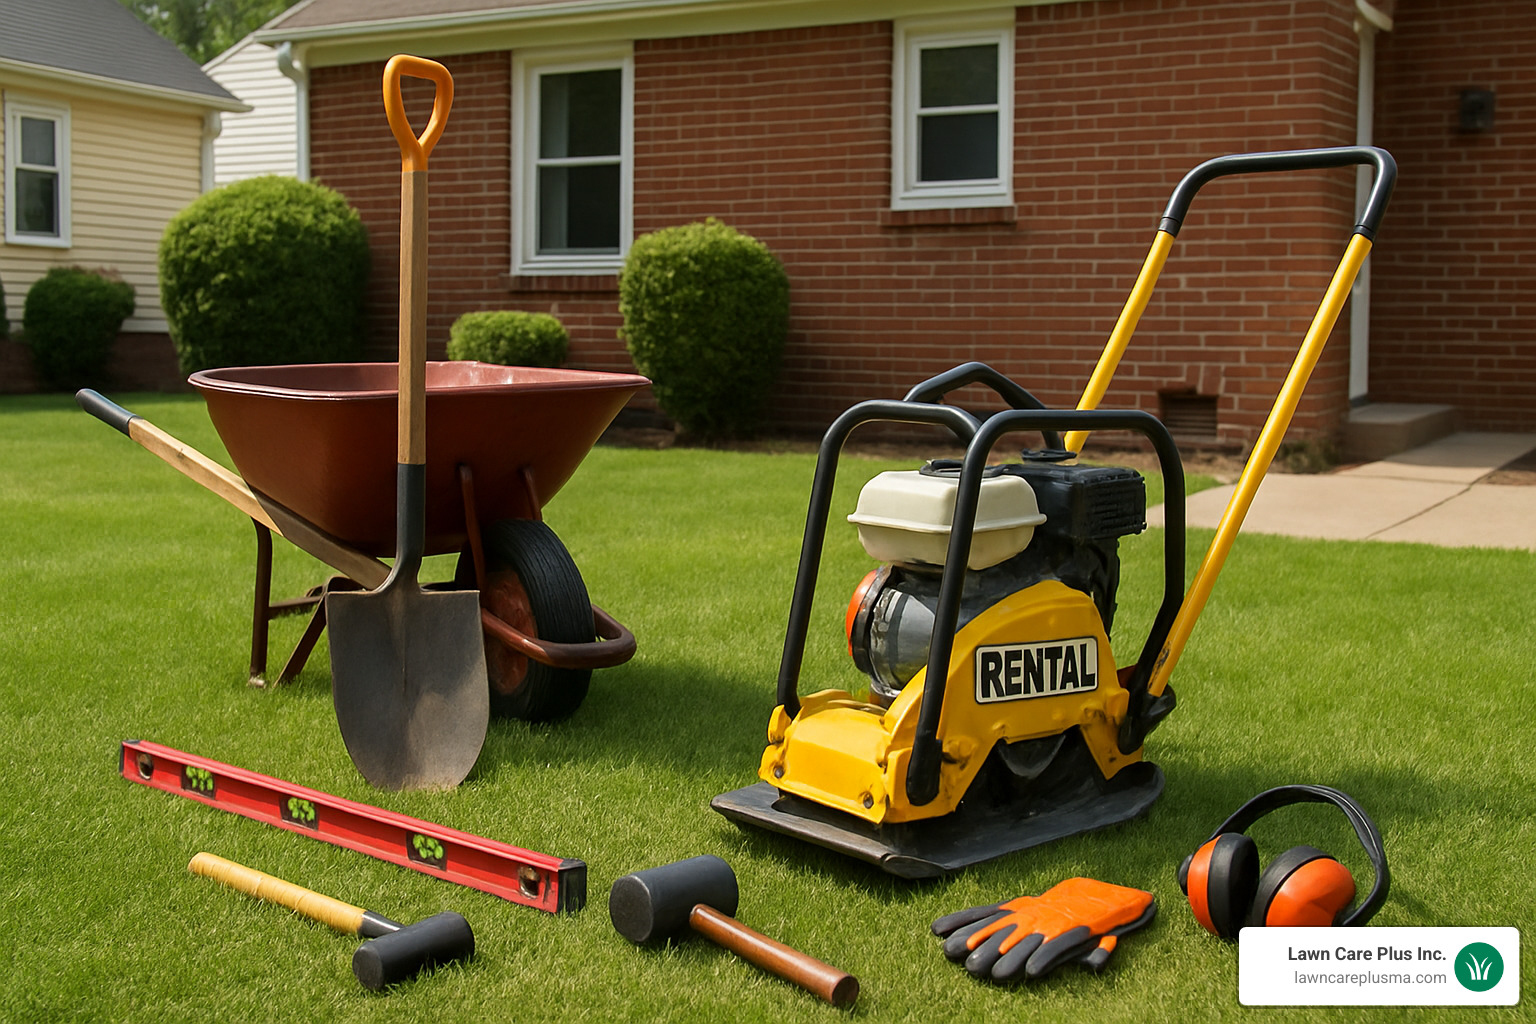
Every great patio project starts with the right tools. You’ll want to have a sturdy shovel and spade for excavation work, plus a wheelbarrow to haul materials around your yard. For accurate measurements, grab a tape measure, some stakes, and mason’s line to mark your patio boundaries.
“The first time I used a plate compactor, I was amazed at how quickly it firmed up the base,” shares one of our Newton clients. While you could attempt to hand-tamp your base, renting a plate compactor will save your back and ensure professional-quality compaction. Most of our Metro-West customers find that renting a plate compactor for a weekend is the way to go.
Don’t forget safety gear! Gloves, eye protection, and knee pads will make your project much more comfortable. You’ll also need a carpenter’s level, line level, rubber mallet, garden rake, and a 2×4 board for screeding sand. For cutting bricks, either rent a masonry saw or use a brick splitter for simpler cuts.
Materials Shopping List
For a typical 10×10-foot patio (100 square feet), you’ll need approximately:
- 450-500 standard paving bricks (those classic 4×8 inch ones)
- ¾ cubic yard of crushed gravel for your 4-inch base
- ¼ cubic yard of coarse sand for the 1-inch bedding layer
- 40-50 linear feet of edge restraint to keep everything in place
- 1-2 bags of polymeric sand for those finishing touches
- Landscape fabric to block weeds from below
- Stakes for securing your edging
As one hardscaping resource points out, “For a 60-square-foot patio, you’ll need about 60 12-inch by 12-inch paver stones, 20 cubic feet (or 3/4 cubic yards) of gravel, and one-third as much sand by volume.” Simply adjust these quantities based on your patio size.
New vs. Reclaimed Bricks: The Great Debate
Here in the Boston area, we’re fortunate to have access to beautiful reclaimed bricks with history and character. But are they right for your project? Let’s compare:
| Feature | New Bricks | Reclaimed Bricks |
|---|---|---|
| Appearance | Uniform color and size | Weathered, varied character |
| Cost | Moderate | Often less expensive |
| Installation | Consistent dimensions make layout easier | May require more sorting and fitting |
| Durability | Designed for paving applications | May be softer if not originally pavers |
| Environmental Impact | Higher carbon footprint | Eco-friendly reuse |
“On Sunday I turned a wild hair and decided to lay a reclaimed brick patio—ten hours of work and three years of planning later, here’s exactly how we did it,” shared one Brookline homeowner. Many of our clients love the unique, aged look that reclaimed bricks bring to their outdoor spaces.
Budget-Friendly Tips
To keep costs manageable, consider these Lawn Care Plus Inc. insider tips:
- Rent don’t buy the specialty tools like plate compactors and masonry saws
- Shop around for materials—prices can vary significantly between suppliers
- Consider phased purchases if you’re concerned about budget
- Calculate materials carefully to avoid expensive overbuying
Many of our Watertown clients have successfully completed beautiful brick patios on modest budgets by following these guidelines and checking out resources like our guide on the Cost to Install Paver Patio.
The right preparation makes all the difference when learning how to install a brick patio. With these tools and materials ready to go, you’re well on your way to creating an outdoor space that will bring joy for years to come!
How to Install a Brick Patio: Step-by-Step Guide
Ready to transform your outdoor space? Let’s roll up our sleeves and get to work! The actual installation process is where all your planning pays off. Follow these steps carefully and you’ll create a brick patio that will be the envy of your neighborhood for years to come.
Step 1 – Mark & Excavate the Site
The foundation of a great patio starts with proper marking and digging:
Start by marking your patio perimeter with stakes, mason’s line, or spray paint. Double-check that your layout is perfectly square by measuring diagonally from corner to corner – these measurements should match!
“I learned the hard way that skipping the diagonal check can leave you with a crooked patio,” shares one homeowner. “Take the extra five minutes to measure twice.”
Before you dig, call 811 at least 72 hours ahead to have underground utilities marked. Safety first! Then, grab your flat shovel and remove all sod and organic material from the area.
Now for the real workout – excavate to a depth of 7-8 inches. This depth accommodates your gravel base (4 inches), sand layer (1 inch), brick thickness (2-2.5 inches), and a bit extra for settling. Remember to slope the excavation away from your house (¼ inch per foot) for proper drainage.
Finally, compact that soil thoroughly with a plate compactor. Your future patio’s stability depends on this step, so don’t rush it!
Step 2 – Build a Stable Base
A solid base prevents future headaches like shifting, settling, and uneven spots:
First, lay landscape fabric over your excavated area, extending a few inches beyond your patio edges. This simple step prevents weeds from crashing your patio party and keeps your base materials separate from the soil below.
Next, add your crushed gravel in layers of about 2 inches at a time. Compact each layer thoroughly before adding the next – this is where renting that plate compactor really pays off! Work in a systematic pattern, overlapping your passes to ensure complete compaction.
“Compact the gravel with a plate compactor until it feels solid underfoot with no movement,” advises a hardscaping expert. “If you notice soft spots, add more gravel, level, and compact again.”
Keep checking your grade with a long, straight board and level to maintain that crucial ¼-inch-per-foot slope. Before final compaction, lightly mist the gravel with water to help the stones lock together for maximum stability.
Step 3 – Screed the Sand Layer
The sand layer is your patio’s cushion, providing a smooth bed for your bricks:
Start by setting up screed guides across your compacted base. Many pros use 1-inch diameter electrical conduit pipes for this, placing them parallel to each other about 6-8 feet apart.
Spread coarse sand between the guides, slightly higher than your 1-inch target depth. Then grab a straight 2×4 board and use it as a screed, pulling it across the guides to level the sand perfectly. Work methodically across the area, creating a flat, even surface.
Once you’ve finished an area, carefully remove the guides and fill those voids with additional sand. And remember – do not walk on or disturb your beautifully screeded sand! All that hard work can be undone with a single misplaced footstep.
A light misting of water can help stabilize the sand before laying bricks, but don’t soak it – just a gentle spritz will do.
Step 4 – Lay Bricks & Create Patterns
Now for the fun part – seeing your patio take shape brick by brick:
Begin in one corner (usually the one closest to your house for rectangular patios) and place each brick by gently setting it into the sand. Never slide or drag the bricks – this disturbs your carefully prepared sand bed.
Give each brick a firm tap with a rubber mallet to seat it properly, and check for level frequently both along rows and across multiple bricks. Maintain consistent spacing between bricks (typically ⅛ to ¼ inch) using plastic spacers if needed.
Follow your chosen pattern carefully. For a basketweave, place pairs of bricks perpendicular to each other. For herringbone, position bricks at 45° angles to the edge. A running bond pattern looks like a traditional brick wall, with each row offset by half a brick.
“The basketweave pattern is my go-to recommendation for first-time DIYers,” notes a Lawn Care Plus Inc. specialist. “It looks great and requires minimal cutting, which saves time and frustration.”
When you reach edges that require cutting, use a masonry saw or brick splitter. Always wear eye protection and gloves when cutting. To minimize dust, wet saws are ideal – consider renting one if you’ll be making numerous cuts.
Step 5 – Lock In & Finish
The final steps secure your hard work and create that professional, finished look:
Install edge restraints around your patio’s perimeter. These can be plastic edging secured with spikes, metal edging, or even a concrete haunch. This critical step keeps your bricks from spreading and shifting over time.
Next, sweep polymeric sand into the joints between bricks. Work it in thoroughly with a push broom, making multiple passes in different directions until the joints are filled. Polymeric sand hardens when activated by water, creating solid joints that resist weeds and ant infestations.
Compact the entire surface using a plate compactor with a rubber mat attachment (to protect your bricks). This settles the sand deeper into the joints and levels any slightly high bricks. Add more polymeric sand as needed and compact again until all joints are completely filled.
Carefully remove all excess sand from the brick surfaces before misting with water to activate the polymeric sand. Follow the manufacturer’s instructions precisely – typically, you’ll apply enough water to dampen the sand without washing it out.
Allow your patio to dry completely according to the sand manufacturer’s recommendations (usually 24 hours) before using it. Finally, backfill around the edges with soil and plant grass or ground cover to beautifully conceal your edging.
How to Install a Brick Patio in 10 Steps
For weekend warriors looking for a concise plan of attack, here’s your timeline:
Day 1 – Preparation
1. Mark out patio area and check for square
2. Call 811 and wait for utility marking
3. Excavate to proper depth (7-8 inches)
4. Compact subsoil thoroughly
Day 2 – Base Construction
5. Lay landscape fabric
6. Add, level, and compact gravel base
7. Install edge restraints where accessible
Day 3 – Brick Installation
8. Screed sand layer
9. Lay bricks in chosen pattern
10. Add polymeric sand, compact, and mist
This timeline works well for a typical 10×10 foot patio with average DIY skills. Larger or more complex designs might require an extra day or two, and that’s perfectly fine – it’s better to take your time and get it right!
How to Install a Brick Patio on a Budget
Living in the Boston Metro-West area doesn’t mean you need deep pockets for a beautiful patio. Try these money-saving approaches:
Hunt for reclaimed bricks at local construction sites, salvage yards, or online marketplaces. These often cost less and bring unique character to your project. “The worn, weathered look of our reclaimed brick patio tells a story that new bricks simply can’t match,” shares one Newton homeowner.
Rent equipment instead of buying it. A plate compactor might cost hundreds to purchase but only a fraction of that to rent for a weekend. The same goes for masonry saws and other specialized tools you’ll rarely use again.
Do the labor yourself – professional installation typically accounts for 50-60% of project costs. With a friend or two helping, you can tackle this over a weekend and save substantially.
If budget is tight, consider phasing your purchases over time or starting with a smaller patio that you can expand later. At Lawn Care Plus Inc., we believe a well-built smaller patio trumps a larger one with cut corners.
Choose simpler patterns like basketweave that minimize cutting and waste. Every brick you don’t have to cut saves time, reduces waste, and preserves your sanity!
Your patio is an investment in your home and outdoor lifestyle. Taking the DIY approach means you can create a beautiful, durable space while keeping costs manageable.
Maintenance, Troubleshooting & FAQs
Congratulations on your beautiful new brick patio! The hard work is done, but a little ongoing care will ensure your outdoor space remains stunning for decades. Think of your patio as a long-term investment that pays dividends with minimal upkeep.
“My brick patio is celebrating its 20th birthday this year, and it still looks fantastic with just basic maintenance,” shares one Massachusetts homeowner. “It’s been the backdrop for countless family barbecues and quiet morning coffees.”
Regular Maintenance Routine
Keeping your brick patio looking its best is surprisingly simple. Sweep debris regularly to prevent staining and stop organic material from breaking down and providing a foothold for weeds. A good stiff broom is your patio’s best friend!
When pollen season hits or after storms, give your patio a gentle rinse with a garden hose to remove finer particles. If you’re dealing with stubborn dirt, a pressure washer on its lowest setting works wonders – just keep the nozzle at least 12 inches from the surface to avoid damaging the bricks or washing out the joint sand.
Despite your best efforts, you might spot an occasional weed. Remove these promptly by hand or with a natural weed killer that won’t stain your beautiful bricks. The key is catching them early before their roots can establish.
Every 2-3 years, you’ll want to reapply polymeric sand to any joints that appear to be losing their fill. This simple step prevents weeds and keeps your bricks firmly in place. During the same maintenance session, consider applying a quality masonry sealer to improve the brick color and provide protection against stains and weather damage.
Seasonal Care Tips
Your patio needs different attention as the seasons change, especially in our Massachusetts climate. During winter, use only plastic snow shovels to clear snow, as metal can chip and scratch your beautiful bricks. Also, be cautious with de-icing products – many contain salts that can damage both bricks and the polymeric sand in your joints. Instead, consider pet-safe ice melters or even sand for traction.
When spring arrives, it’s the perfect time for a thorough cleaning to remove winter’s residue and check for any bricks that may have shifted during freeze-thaw cycles. Early spring inspection lets you address minor issues before they become major problems.

Troubleshooting Common Issues
Even the best-installed patios may develop minor issues over time. Here’s how to address them:
If you notice settled or uneven areas, don’t panic. This is typically an easy fix. Carefully remove the affected bricks, add sand to level the base, and reset the bricks. Tap them gently with a rubber mallet to ensure they’re properly seated.
For persistent weed growth despite regular maintenance, a deeper intervention might be needed. Remove the problematic bricks, add fresh landscape fabric underneath, and reinstall. Follow up with a complete joint refill using quality polymeric sand.
New brick patios sometimes develop a white, powdery substance called efflorescence. This natural mineral deposit usually weathers away on its own within a few months. For stubborn cases, specialized efflorescence cleaners are available at most hardware stores.
Stains happen – especially if your patio hosts regular cookouts! Most fresh stains come clean with dish soap and a scrub brush. For oil stains, try making a poultice with baking soda and water, applying it to the stain, and letting it draw out the oil as it dries. For tougher stains, brick-specific cleaners are your best bet.
“Brick patios built well are long-lasting and timeless,” notes a hardscaping professional from our team at Lawn Care Plus. “Many of our clients in Newton and Brookline have patios that have outlasted their decks twice over.”
Frequently Asked Questions
How deep should I dig for the patio base?
You’ll want to excavate about 7-8 inches deep for a standard brick patio in Massachusetts. This depth accommodates your 4-inch gravel base, 1-inch sand layer, the thickness of your bricks (typically 2-2.5 inches), plus a small allowance for settling.
This depth is particularly important in our New England climate, where freeze-thaw cycles can wreak havoc on shallow installations. “I learned the hard way with my first patio,” admits one Watertown resident. “I skimped on the base depth, and after two winters, it looked like a roller coaster. Proper depth is worth every bit of extra digging effort.”
Do I need a permit to build a brick patio?
Permit requirements vary throughout the Boston Metro-West area. Generally speaking, ground-level patios under 200 square feet that aren’t attached to your house often don’t require permits. However, local regulations can be surprisingly specific.
In Newton, for example, patios may count toward your property’s impervious surface limits. Brookline has setback requirements that might affect placement. And Watertown may have specific drainage considerations depending on your location.
We always recommend checking with your local building department before starting your project. At Lawn Care Plus Inc., we’re happy to help our clients steer these requirements – it’s much better to check first than to face potential fines later!
What’s the average DIY cost range for a 10’×10′ patio?
For a standard 10×10-foot brick patio (100 square feet), DIY material costs typically fall into three tiers:
Economy option using basic concrete pavers will generally run between $600-$800 for materials. These provide a clean, functional surface at a budget-friendly price point.
Mid-range options using standard clay pavers typically cost $800-$1,200 for materials. These offer better durability and a more authentic brick appearance.
Premium options using high-end brick or natural stone can range from $1,200-$2,400 for materials. These premium materials provide distinctive character and exceptional longevity.
These estimates cover materials only and are based on internet research of average costs. The biggest potential savings comes from doing the installation yourself, as professional installation typically adds significant cost to the project.
“Many of our clients in Brookline start with a smaller premium patio rather than a larger basic one,” notes our team at Lawn Care Plus. “They find that quality materials make such a difference in the overall look that they prefer to build something smaller but more beautiful, with the option to expand later.”
Conclusion
There’s something deeply satisfying about stepping back and admiring a brick patio you’ve built with your own hands. The change from a plain patch of yard to an neat outdoor living space is truly remarkable—and now you know exactly how to install a brick patio that will stand the test of time.
The secret to a lasting patio isn’t in the bricks themselves, but in what lies beneath. Those hours spent carefully excavating, compacting gravel, and screeding sand might not be the most glamorous part of the project, but they’re absolutely essential for creating a patio that won’t shift, settle, or develop annoying dips after the first winter.
For our neighbors throughout the Boston Metro-West area, we at Lawn Care Plus Inc. understand that sometimes DIY projects can become overwhelming. Maybe you’ve hit unexpected ledge during excavation, or perhaps your schedule simply doesn’t allow for the 2-3 days needed to complete the project properly. That’s perfectly okay! Our experienced hardscaping team has installed countless brick patios across Newton, Brookline, Watertown, and surrounding communities.
Whether you need advice on selecting the perfect pattern for your space, assistance with just the heavy lifting parts of the project, or prefer to have our professionals handle the entire installation, we’re here to help. We’ve seen how a thoughtfully designed and properly constructed brick patio can transform a property—not just in terms of curb appeal, but in how families actually use and enjoy their outdoor spaces.
A well-built brick patio isn’t merely an aesthetic upgrade; it’s an investment that pays dividends both in property value and in creating countless memories with family and friends. Imagine summer evenings spent dining al fresco, weekend mornings with coffee and a book, or simply having a beautiful space to unwind after a long day. These moments of connection and relaxation are what make the effort of installation so worthwhile.
We hope this guide has given you the confidence and knowledge to tackle your own brick patio project. And remember, should you encounter any challenges along the way or decide professional installation would better suit your needs, Lawn Care Plus Inc. is just a phone call away, ready to help create the outdoor space you’ve been dreaming of.
More info about hardscaping services
