Transform Your Yard with New Grass Installation
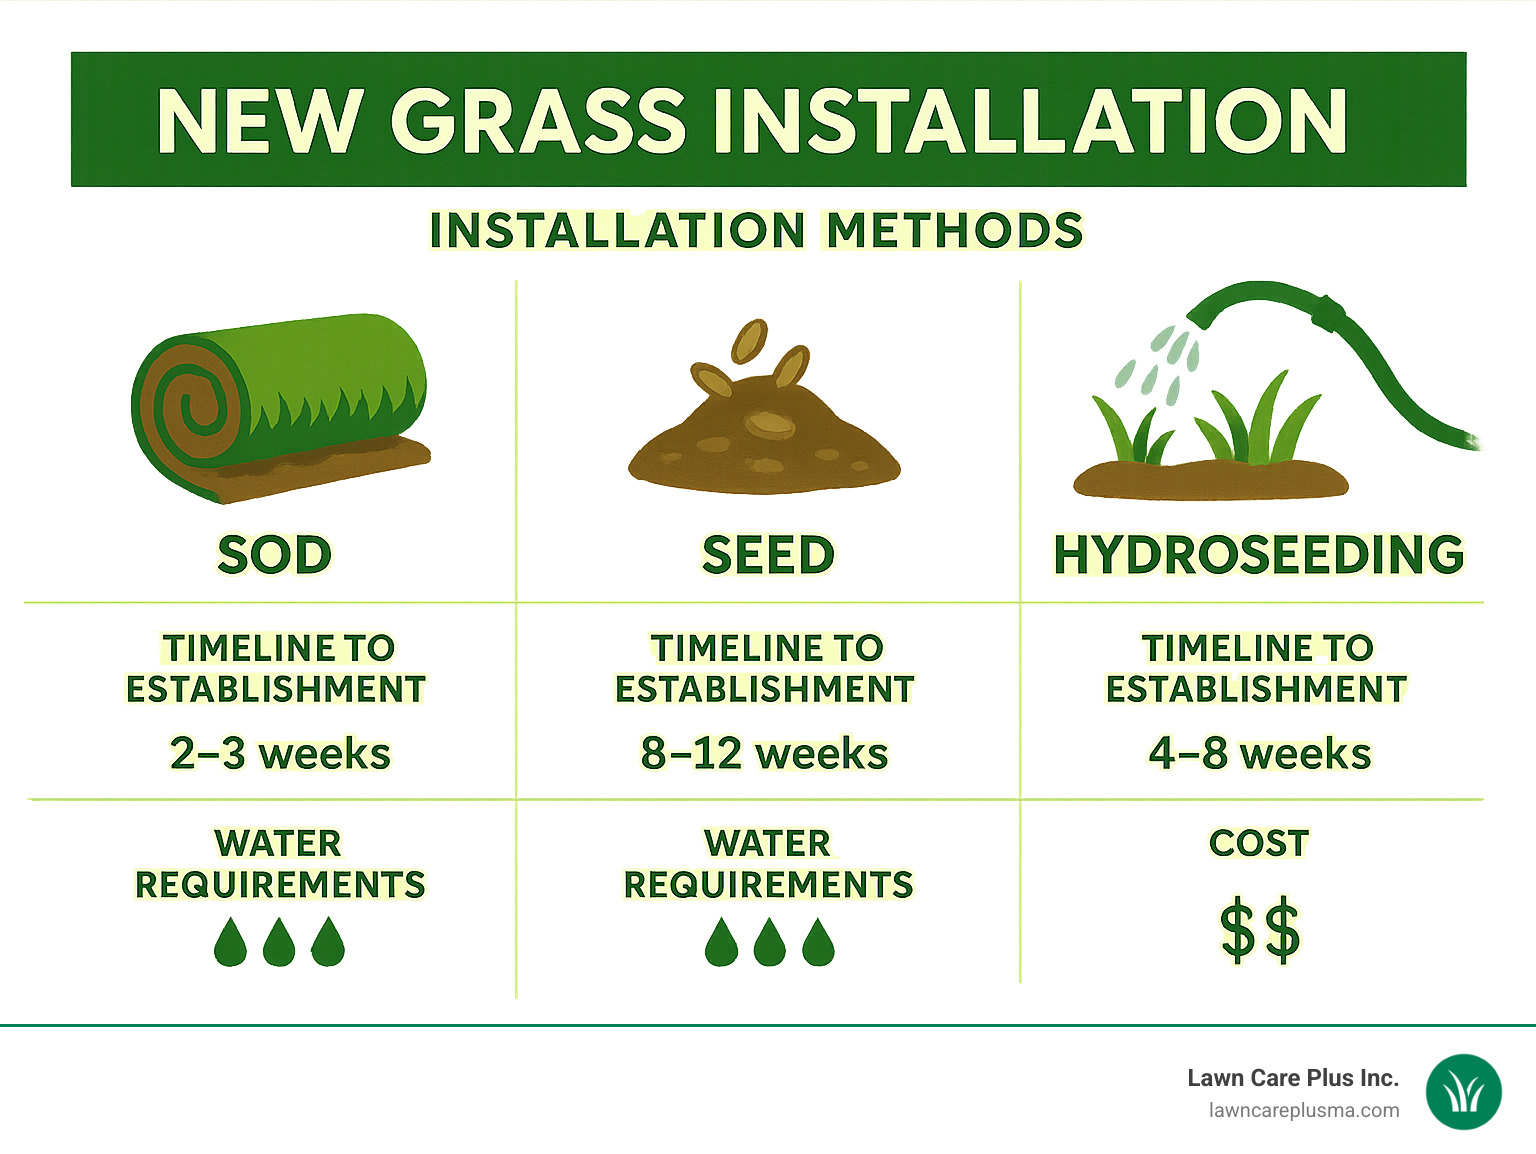
New grass installation can be completed in 3 simple ways:
1. Sod – Pre-grown grass with roots attached to soil, provides instant lawn
2. Seed – Less expensive but takes 4-8 weeks to establish
3. Hydroseeding – Sprayed seed mixture, faster germination than regular seed
Time to usable lawn:
– Sod: 2-3 weeks (limited walking)
– Seed: 8-12 weeks
– Hydroseeding: 4-8 weeks
Want a luxurious lawn that makes your neighbors green with envy? Installing new grass can transform any yard from patchy and worn to lush and vibrant in as little as a weekend (for sod) or a few weeks (for seed). Whether you’re starting fresh with bare soil or replacing an existing lawn, a successful new grass installation requires proper planning, preparation, and ongoing care.
Almost every property boasts a patch of grass, but creating one that thrives takes more than just scattering seed or laying sod. The process is relatively straightforward if you follow the right steps, but as one landscaper noted, “Although installing a lawn seems straightforward, there are a number of pitfalls involved that may not be obvious at first glance.”
This guide will walk you through everything you need to know about installing new grass like a professional, from choosing the right installation method to preparing your soil and maintaining your new lawn through its critical establishment period.
When installed correctly, a new lawn not only improves your property’s curb appeal but also provides practical benefits like erosion control, temperature reduction, and a comfortable outdoor living space for your family to enjoy.
New grass installation vocabulary:
– cost for new grass
– how to care for new sod
– how to prepare ground for sod
New Grass Installation Methods: Sod, Seed, Hydroseed & Artificial Turf
Dreaming of a lush, green carpet of grass but not sure how to get there? When it comes to new grass installation, Massachusetts homeowners have several exciting options to transform their outdoor spaces. Each method offers a unique balance of time, cost, and effort that can be custom to your specific needs.
“When you just can’t wait for a new lawn, choose sod over seeds,” shares Mark Paine, a lawn installation expert we’ve worked with. “But if budget is your primary concern, seeding might be the better option.”
Let’s explore your options for creating that perfect lawn:
| Installation Method | Time to Establishment | Initial Cost | Maintenance | Best For |
|---|---|---|---|---|
| Sod | 2-3 weeks | Highest | Medium | Instant results, erosion control |
| Seed | 8-12 weeks | Lowest | High (initially) | Budget-conscious, specific grass varieties |
| Hydroseeding | 4-8 weeks | Medium | Medium-High | Large areas, slopes |
| Artificial Turf | Immediate | Very High | Very Low | Low maintenance, high-traffic areas |
Sod gives you that instant gratification of a complete lawn right away. It’s particularly valuable for controlling erosion on slopes or when you need a usable yard quickly. The pre-grown grass comes with roots attached to a thin layer of soil, creating an immediate change when laid properly.
Seeding takes patience but rewards you with a lawn that’s often more resilient long-term. It’s significantly more affordable than sod and allows you to select specific grass varieties perfectly suited to your yard’s unique conditions. The downside? You’ll need to baby those seeds for weeks, keeping them consistently moist and protected from hungry birds.
Hydroseeding offers a middle ground, using a sprayed mixture of seed, mulch, fertilizer, and binding agents. This method speeds up germination compared to traditional seeding and provides excellent coverage on difficult slopes. It’s particularly effective for larger properties where laying sod would be prohibitively expensive.
Artificial turf has come a long way from the plastic-looking options of yesteryear. Today’s synthetic grass can look surprisingly natural while eliminating mowing, watering, and fertilizing. It’s perfect for high-traffic areas or spots where growing conditions are challenging. The significant upfront investment is offset by years of minimal maintenance.
Want to explore these options in depth? Check out our detailed guide on how to install a new lawn or browse insights from fellow DIYers at DIY lawn forum.
Choosing the Best Grass for Your Yard
The secret to a thriving lawn starts with selecting the right grass for your specific conditions. Here in the Boston Metro-West area (USDA hardiness zones 6a and 6b), we’re in what turf experts call a “transition zone” – where both cool-season and warm-season grasses can grow, though cool-season varieties typically perform better in our New England climate.
“If you thought grass was simple, think again,” says Daniel McClure, a turf specialist. “The right grass species for your yard depends on your specific sun exposure, soil conditions, and how you plan to use your lawn.”
For Massachusetts properties, we typically recommend these cool-season grass options:
Kentucky Bluegrass creates a dense, lush carpet that handles moderate to heavy foot traffic beautifully, but needs at least 6 hours of direct sunlight daily. It’s the showstopper of lawn grasses when well-maintained.
Fine Fescue varieties are the shade champions, thriving where other grasses struggle. They require less fertilizer and water than other options, making them environmentally friendly choices for partially shaded yards.
Perennial Ryegrass establishes quickly (sometimes germinating in just 5-7 days) and stands up well to heavy use, making it perfect for active families. It’s often mixed with Kentucky Bluegrass for a resilient combination.
Tall Fescue deserves special mention for its exceptional drought tolerance and adaptability to various soil conditions. Its deep root system helps it stay green even during dry spells, requiring less supplemental watering.
At Lawn Care Plus Inc., we often recommend custom grass blends that combine these varieties to create lawns that handle our region’s unique challenges. Want personalized advice? Explore our guide on How to Choose the Best Type of Grass for Your New Lawn.
Environmental Impact & Maintenance Differences
Your new grass installation choice affects not just your yard’s appearance but also its environmental footprint and maintenance requirements.
Natural grass lawns typically need about 1-1.5 inches of water weekly during the growing season. Newly installed grass demands even more attention – seeded lawns might need light watering several times daily, while fresh sod requires daily deep watering for the first week before gradually tapering off.
Fertilizer needs vary significantly too. Both sod and seed benefit from starter fertilizer (typically an 18-24-12 blend) at installation. Established lawns then require regular seasonal feeding to maintain their lush appearance, with cool-season grasses generally needing more attention in spring and fall.
Artificial turf stands apart in this category – it requires no water beyond occasional rinsing to remove debris and no fertilizer whatsoever. However, this convenience comes with trade-offs. Synthetic lawns can heat up significantly in summer (sometimes 20-50°F hotter than natural grass), don’t provide habitat for beneficial insects, and lack natural grass’s ability to filter rainwater and reduce runoff.
For environmentally conscious homeowners in our Massachusetts service area, we often suggest drought-tolerant grass varieties like tall fescue, which require less water once established. Another eco-friendly approach is implementing a partial lawn, where grass covers high-use areas while other spaces feature native plants or ground covers that need minimal resources.
The perfect balance between beauty, function, and environmental responsibility depends on your specific priorities. Our team at Lawn Care Plus Inc. can help you steer these choices to create a lawn that meets your needs while respecting our New England environment.
Site & Soil Preparation: The Foundation of Success
The success of your new grass installation largely depends on proper site preparation. As the saying goes in the landscaping world, “Spend 90% of your time on preparation and 10% on installation.”
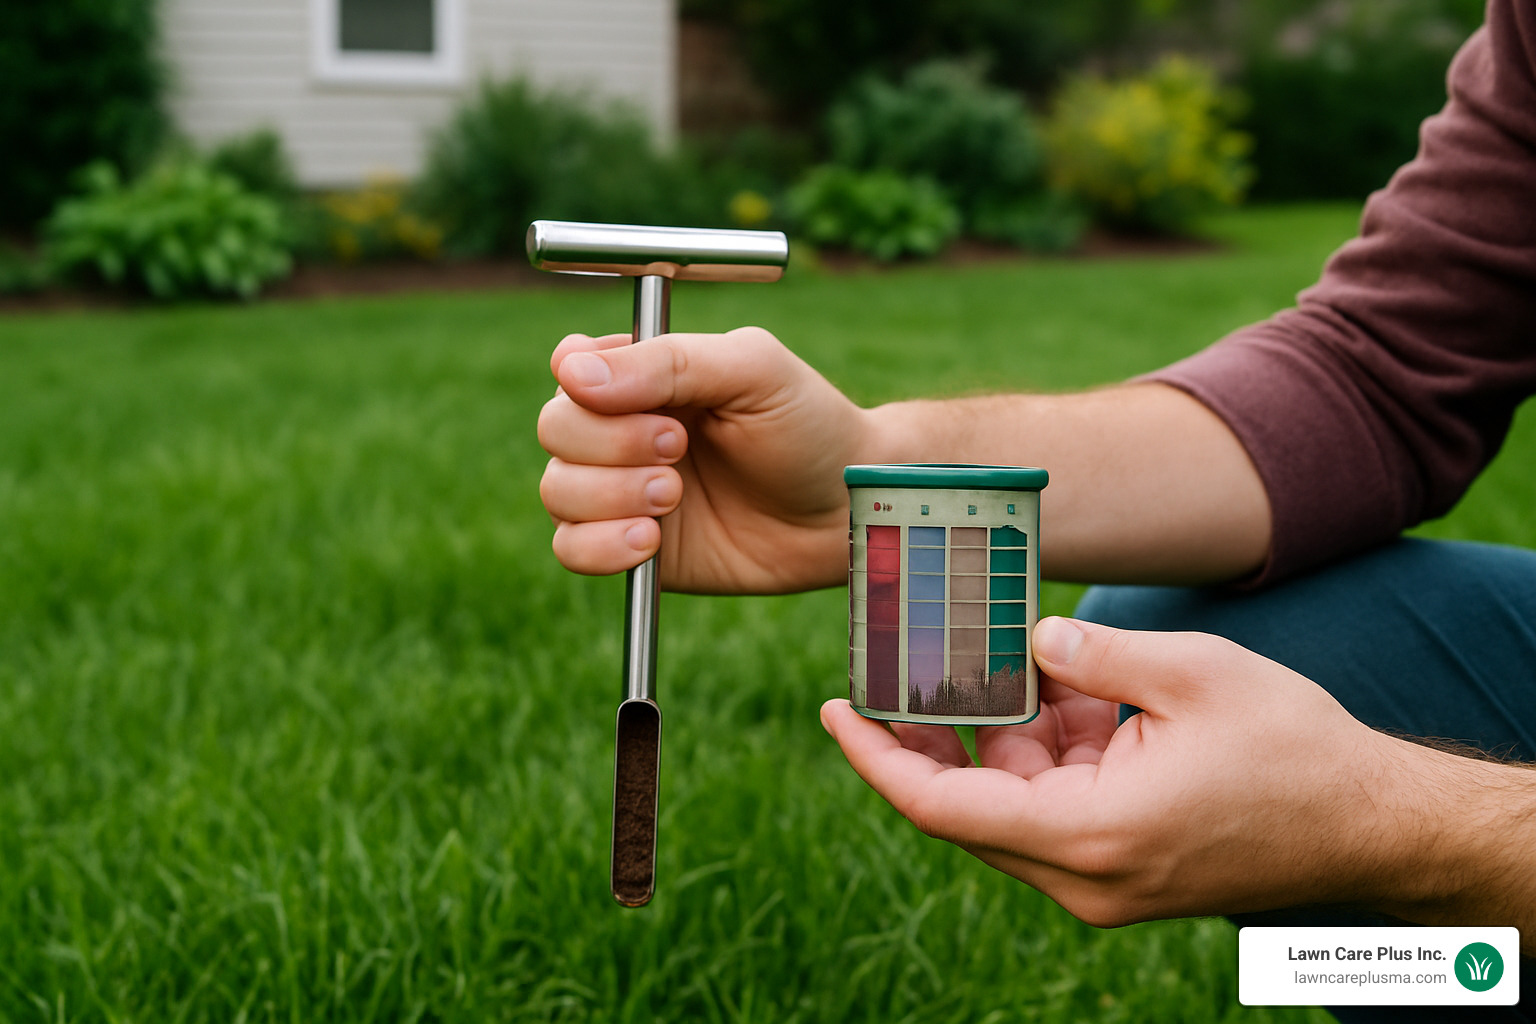
Soil Testing: The Critical First Step
Before breaking ground on any new grass installation, take time to conduct a soil test. This simple step reveals the hidden story beneath your yard – is your soil too acidic or alkaline? Does it lack essential nutrients? Is it primarily clay, sand, or the ideal loam?
Most grasses thrive in soil with a pH between 6.0-7.0. You can pick up a simple testing kit at your local garden center, or for more detailed results, send samples to the University of Massachusetts Soil Testing Laboratory. Within 1-2 weeks, you’ll receive specific recommendations for amendments custom to your yard’s unique needs.
“Getting your soil tested is like having a doctor check your health before starting a new exercise program,” explains our lawn care specialist. “It tells you exactly what your soil needs to support healthy grass.”
Removing the Existing Lawn
Ready to replace that patchy, weedy lawn? You’ve got several options, each with its own timeline and effort level.
A sod cutter offers the fastest solution, neatly removing old turf in strips – perfect for weekend warriors with larger lawns. One of our Newton customers shared, “Renting a sod cutter saved us days of backbreaking work and gave us a clean slate for our new lawn.”
For those with more time, applying a non-selective herbicide will kill existing vegetation within 7-14 days. If you prefer an organic approach, sheet mulching with cardboard or newspaper covered by compost works wonderfully, though it requires 2-3 months of patience. Similarly, smothering with compost kills grass while enriching your soil for future planting.
Soil Preparation Steps
Once you’ve cleared the area, it’s time to create the perfect foundation for your new grass. Start by removing all debris – those rocks, sticks, and old grass chunks might seem harmless, but they’ll interfere with root development.
Next, till the soil to a depth of 6-8 inches. This breaks up compaction and creates a welcoming environment for tender new grass roots. Based on your soil test results, now’s the time to add amendments: lime raises pH in acidic soil, sulfur lowers pH in alkaline soil, and compost (about 2-3 inches) improves organic content for all soil types. For heavy clay soils common in parts of Massachusetts, adding sand can improve drainage.
Proper grading is crucial – aim for a slight slope away from buildings (about 1 inch drop per 4 feet of distance) to prevent water from pooling near your foundation. Once graded, lightly compact the soil with a water-filled roller, then give it a final rake to create a smooth seedbed.
If you’re installing sod, make your final grade about 1 inch below surrounding hardscapes like sidewalks and driveways to accommodate the thickness of the sod.
Handling Uneven Ground and Drainage Issues
Poor drainage can doom even the most carefully installed lawn. In low-lying areas, add topsoil with high sand content (60-70% sand) to raise depressions, then compact lightly and check the level. For significant depressions that consistently collect water, consider installing a drain tile.
Sloped areas present their own challenges. For mild slopes, install sod horizontally across the slope and secure with garden staples to prevent sliding. Steeper inclines might require terracing or erosion control matting under seed.
Heavy clay soil, which is common in parts of Boston’s Metro-West area, requires special attention. “After installing French drains and properly grading our yard, the new sod took root beautifully,” shared a client in Brookline. “Previous attempts at growing grass in our clay soil always resulted in patchy, waterlogged areas.”
The solution for clay soil often involves tilling to break up compaction, adding organic matter and coarse sand, and possibly core aeration before seeding. For persistently wet areas, French drains can make all the difference.
Tools & Materials Checklist
For a successful DIY new grass installation, you’ll need the right tools for the job. Basic equipment includes a rake (both garden and landscape styles), shovel, wheelbarrow, measuring tape, garden hose with sprinkler, and a lawn roller (which can be rented).
Sod installation requires a few specialized tools: a sod cutter for removing the old lawn, a sharp utility knife or sod knife for trimming pieces, an edging tool for clean borders, and a sod roller for ensuring good soil contact.
If you’re seeding, you’ll want a broadcast spreader for even distribution, a seed roller or tamper to ensure good seed-to-soil contact, and straw or erosion control blankets to protect seeds from washing away.
Don’t forget materials like quality topsoil (if needed), compost, starter fertilizer with an 18-24-12 ratio, and lime or sulfur based on your soil test results. And of course, your chosen grass in the form of sod pallets or seed.
For larger projects, consider renting equipment rather than purchasing. Many of our customers in towns like Newton and Needham find that renting a sod cutter or rototiller for a weekend is more economical than buying these tools for a one-time project.
Taking time with proper soil preparation might seem tedious, but it’s truly the foundation of a successful lawn. As one of our long-time customers puts it, “The difference between my previous patchy lawn and my lush new grass came down to one thing – I finally took the time to prepare the soil properly.” For more detailed guidance, check out our guide on How to Prepare Ground for Sod.
Step-by-Step DIY New Grass Installation
Now that you’ve prepared your site properly, it’s time for the actual new grass installation. The process varies depending on whether you’re using sod, seed, or hydroseeding.
Installing Sod: The Quick-Result Option
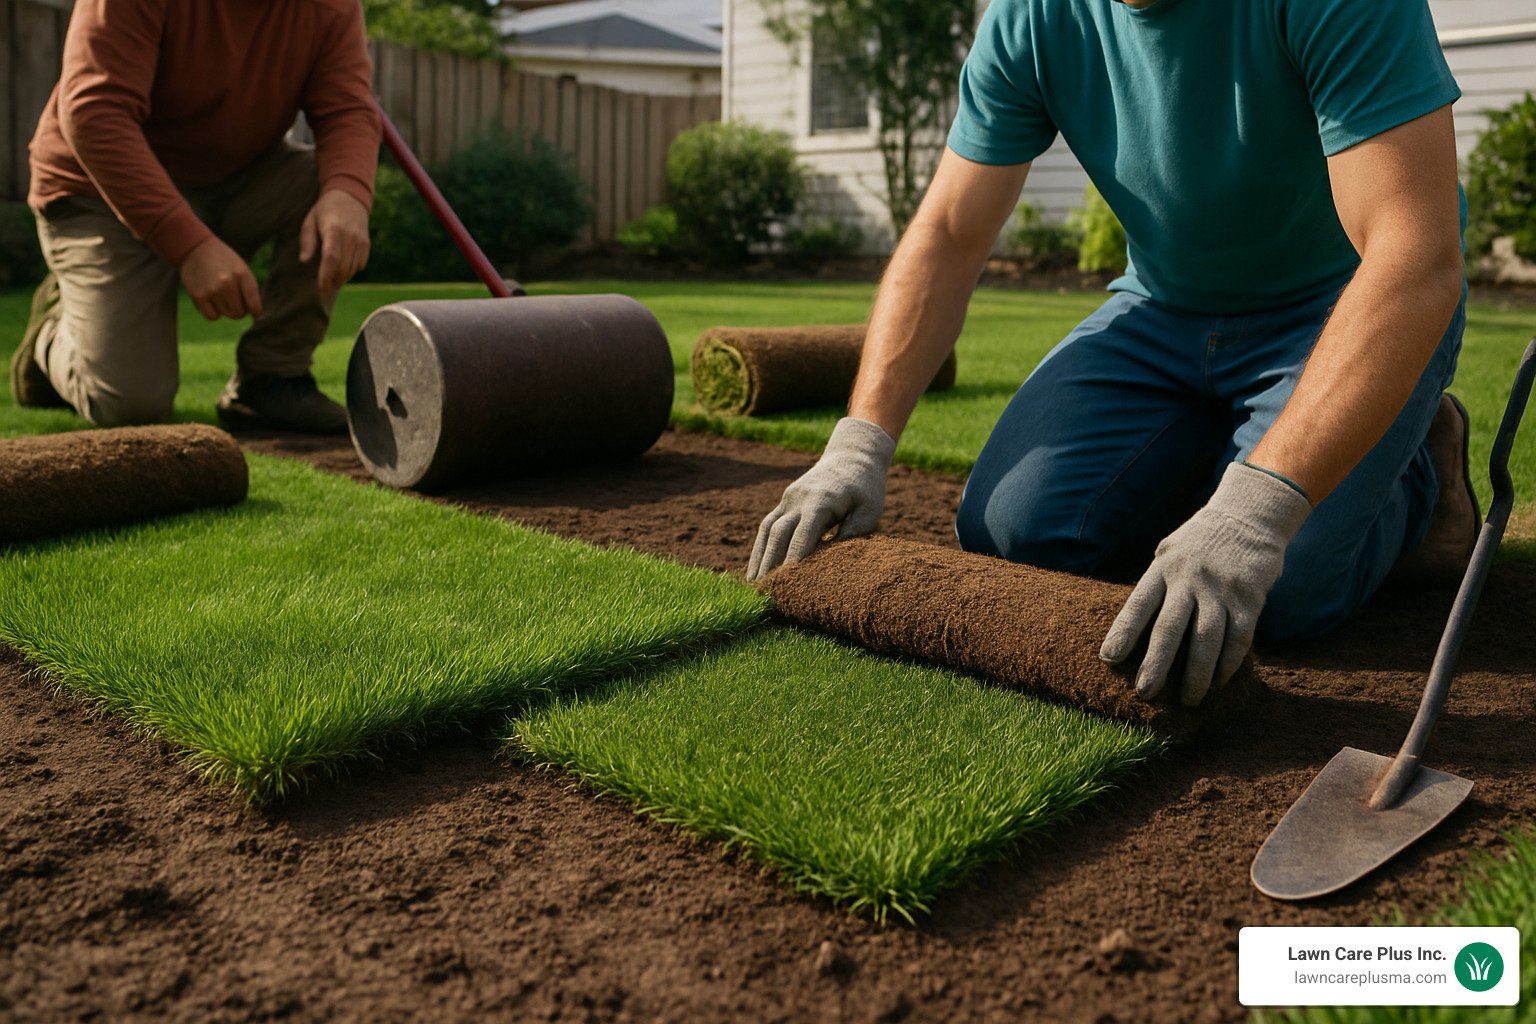
Sod provides that instant gratification many homeowners crave, but it requires careful handling to ensure success. Think of laying sod like putting together a giant, living puzzle where timing matters.
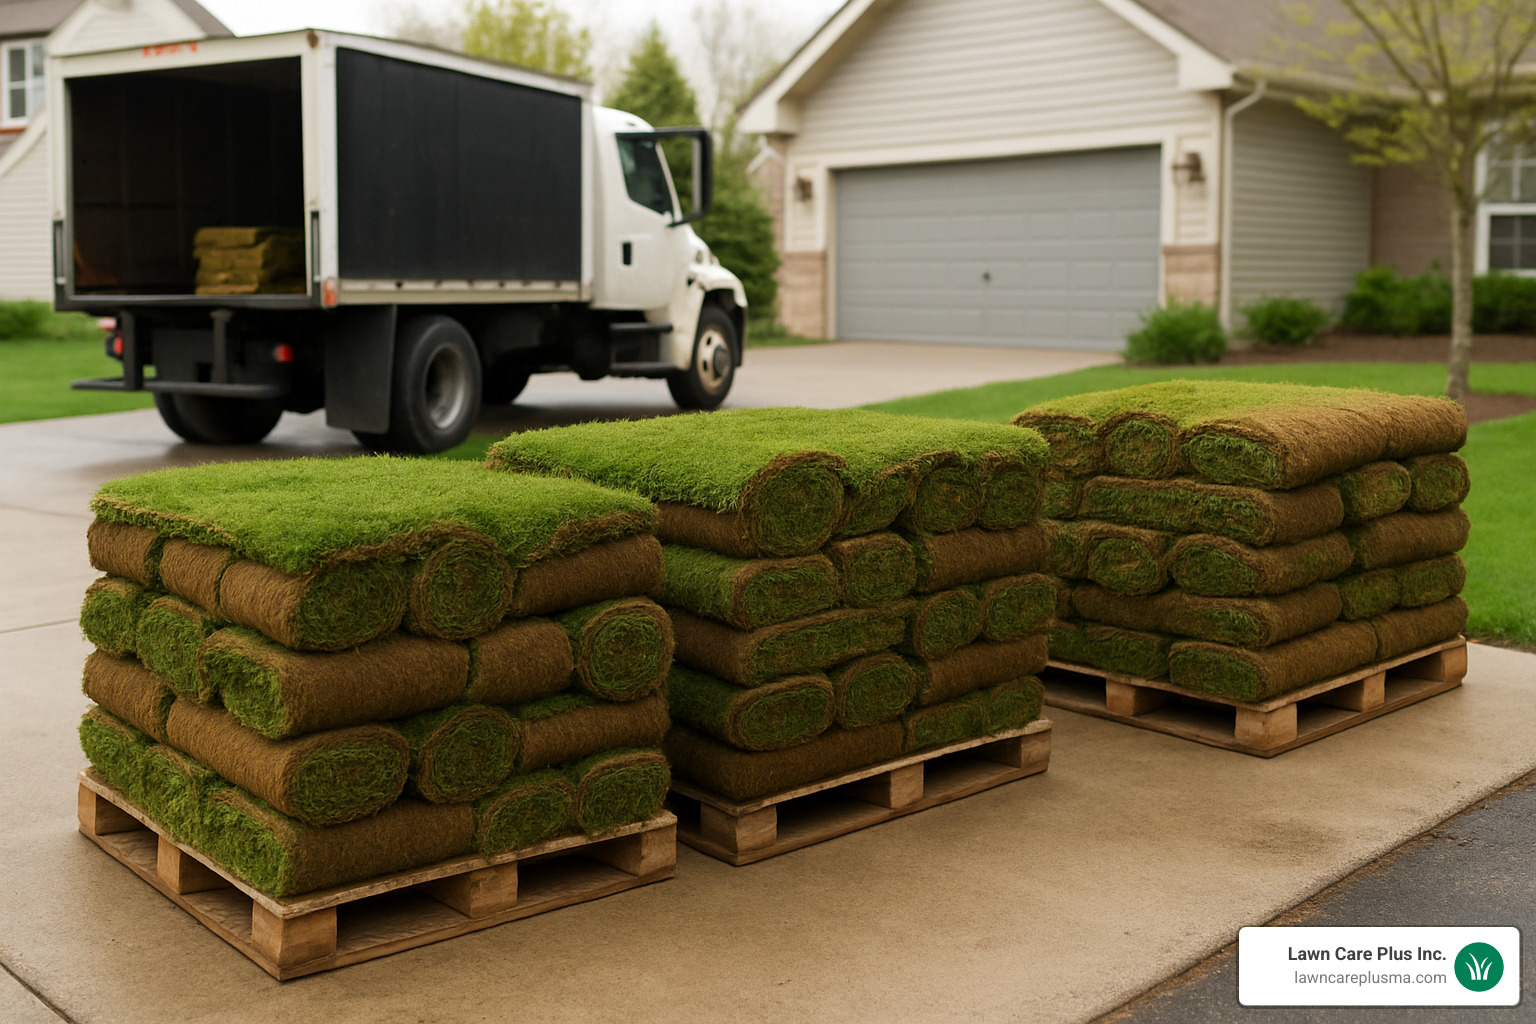
First, schedule your delivery carefully. You’ll want to install sod within 24 hours of its arrival. As one of our landscapers often tells clients, “Leaving grass stacked on pallets is like leaving groceries in a hot car – it stresses the product quickly.”
Before laying the first piece, lightly dampen your prepared soil surface. This creates a welcoming environment for the sod’s roots. Start along a straight edge – a driveway, sidewalk, or even a string line you’ve created as a guide.
The secret to professional-looking results lies in the brick pattern layout. Stagger your seams just like a brick wall by starting your second row with a half piece. This prevents those telltale lines that scream “amateur installation” and creates a more seamless finished lawn.
When placing each piece, ensure the edges touch snugly without overlapping. Those gaps might seem tiny now, but they’ll become noticeable dead spots as the edges dry out. For a perfect fit around obstacles, use a sharp utility knife to trim pieces as needed.
One tip our Massachusetts customers appreciate during summer installations: water as you go. On warm days, water every 200 square feet as you progress rather than waiting until the end. Your sod will thank you for it.
After laying all your sod, roll the entire lawn using a lawn roller about one-third filled with water. This critical step removes air pockets and ensures good soil-to-root contact. Follow immediately with a thorough watering until the soil beneath is completely moist.
A delighted client in Belmont shared: “Following these exact steps, we transformed our yard in a weekend. The brick pattern layout made a huge difference in how seamless the final lawn looked.”
Seeding: The Budget-Friendly Approach
If you’re patient and budget-conscious, seeding offers excellent value. The process takes longer but can result in a lawn that’s just as beautiful as sod.
Start with a perfectly prepared seed bed where soil is loose to a depth of 1/4 inch and free of debris. Apply a starter fertilizer evenly according to package directions – this gives those tiny seeds the nutrients they need to sprout vigorously.
When spreading seed, use a broadcast spreader for even distribution. A pro tip is to apply half your seed walking in one direction, then the remaining half walking perpendicular to your first application. This crosshatch pattern prevents bare spots and ensures complete coverage.
After spreading, lightly rake the area to incorporate seed into the top 1/8 inch of soil. Don’t bury the seed too deeply! Then use a lawn roller (empty or only slightly filled) to press the seed into soil for optimal germination conditions.
A thin layer of straw or seed mulch (about one bale per 1,000 square feet) helps retain moisture and prevents seeds from washing away during watering. This protective blanket also discourages birds from treating your lawn as an all-you-can-eat buffet.
The most critical phase comes next: watering. Begin immediately with a fine spray that won’t wash away seeds. For the next 7-21 days (depending on grass type), you’ll need to water 3-4 times daily for about 10 minutes each session until germination occurs. The soil surface should remain consistently moist but not soggy.
For more detailed guidance, check out our guide on How to Install a New Lawn from Seed.
Hydroseeding: The Middle-Ground Solution
Hydroseeding beautifully bridges the gap between traditional seeding and sod. This method combines seed, mulch, fertilizer, and water in a slurry that’s sprayed onto prepared soil.
While DIY hydroseeding equipment is available for rent, many homeowners in the Boston area opt for professional application due to the specialized equipment required. Either way, you’ll still need properly prepared soil following the same steps as for regular seeding.
The magic happens when the hydroseed components mix together – seed, mulch, fertilizer, water, and tackifier (a sticky substance that helps the mixture adhere to soil) combine in the hydroseeder tank to create a lawn-in-a-spray.
Once applied evenly across your prepared area, allow the mixture to dry completely before any foot traffic. The distinctive green or blue coloring lets you easily see coverage and helps retain heat, often resulting in faster germination than traditional seeding.
Consistent moisture remains key to success, so keep the area regularly watered until germination occurs. The papery mulch in hydroseeding helps retain moisture, but don’t let that fool you into skipping watering sessions.
Learn more about this innovative approach on our Hydroseeding page.
Artificial Turf Installation: The Low-Maintenance Choice
For those seeking a permanently green solution with minimal upkeep, artificial turf has come a long way from the plastic-looking options of the past.
Installation begins with excavating 3-4 inches of existing soil, followed by adding 2-3 inches of crushed stone or road base. This foundation needs thorough compaction using a plate compactor to create a firm, stable base that won’t settle unevenly over time.
Some installations benefit from a thin cushioning layer of sand or rubber infill before rolling out the turf. When unrolling your turf, ensure the pile direction (the way the blades lean) remains consistent throughout – this prevents a patchwork appearance.
Secure the perimeter using landscape staples or nails, and join sections with seaming tape and adhesive for an invisible transition. The finishing touch involves spreading sand or rubber granules between the blades and brushing the turf with a stiff broom to stand the blades upright.
Pro Tips & Common Mistakes to Avoid
After helping countless homeowners across the Boston Metro-West area with new grass installation, we’ve identified several common pitfalls that can derail your lawn project.
Timing is everything when installing a new lawn. Installing sod more than 24 hours after delivery can lead to yellowing and failure to root properly. Similarly, seeding cool-season grasses during summer heat or installing during drought conditions sets your lawn up for struggle from day one.
Technical errors can haunt you long after installation day. Gaps between sod pieces create permanent lines in your lawn, while overlapping edges create raised areas that dry out quickly. With seeding, applying too deeply prevents germination, while sparse application results in a patchy lawn.
Watering missteps rank among the most common problems we see. Inadequate initial watering after installation can doom even perfectly installed grass. One customer in Newton learned this lesson the hard way: “I waited too long to water after laying sod on a hot July day. By evening, the edges were already curling and browning. I had to double my watering efforts for the next week to save it.”
Be careful not to mow too soon or too short – new grass needs time to establish strong roots before facing the stress of mowing. And applying the wrong type of fertilizer can burn tender new growth. For comprehensive guidance on post-installation care, visit our guide on How to Care for New Sod.
With proper installation techniques and a little patience, your DIY new grass installation can yield professional results that transform your property’s appearance and enjoyment factor. And remember, if you find yourself overwhelmed at any point, Lawn Care Plus Inc. is just a phone call away, ready to help with every aspect of your lawn project.
Costs, Timelines & After-Care for New Grass Installation
Understanding the investment required for new grass installation helps set realistic expectations for your project. When our customers in the Boston Metro-West area ask about costs, we always provide a complete picture of both the financial commitment and the timeline to enjoy their new lawn.
Average Prices for New Grass Installation
While every yard is unique, these general market averages give you a starting point for budgeting (note that these figures represent industry averages, not Lawn Care Plus Inc. pricing):
For sod installation, expect materials alone to cost between $0.31 and $0.82 per square foot. If you’re hiring professionals for a complete installation, the price typically ranges from $1.00 to $2.50 per square foot for new lawns. Resodding existing lawns costs more—usually $2.00 to $4.50 per square foot—because it includes the removal of the old lawn.
Seed installation is more budget-friendly, with materials costing just $0.05 to $0.20 per square foot. Professional hydroseeding runs about $0.10 to $0.30 per square foot, while a complete professional seeding service might range from $0.40 to $1.20 per square foot.
Don’t forget to factor in related expenses that might apply to your project. Topsoil typically costs $12 to $55 per cubic yard, while old lawn removal can add $0.88 to $1.84 per square foot. Land leveling might cost $1 to $3 per square foot, and a soil test runs between $20 and $100. If you’re considering a sprinkler system installation, budget between $1,650 and $3,600 depending on your yard’s size and configuration.
As one of our Wellesley clients shared, “I initially only budgeted for the sod itself but realized I needed topsoil and drainage work too. Having the complete picture upfront would have helped me plan better.”
Your specific costs will vary based on your yard’s unique characteristics. A sloped property in Chestnut Hill might need additional erosion control, while heavy clay soil in Watertown could require extensive amendments. When you See Pricing In Your Area, you’ll get a clearer picture of local costs.
Watering & Fertilizing Schedule
The care you provide in the weeks after installation largely determines your new grass installation’s success. We’ve refined this schedule through years of experience with Massachusetts lawns:
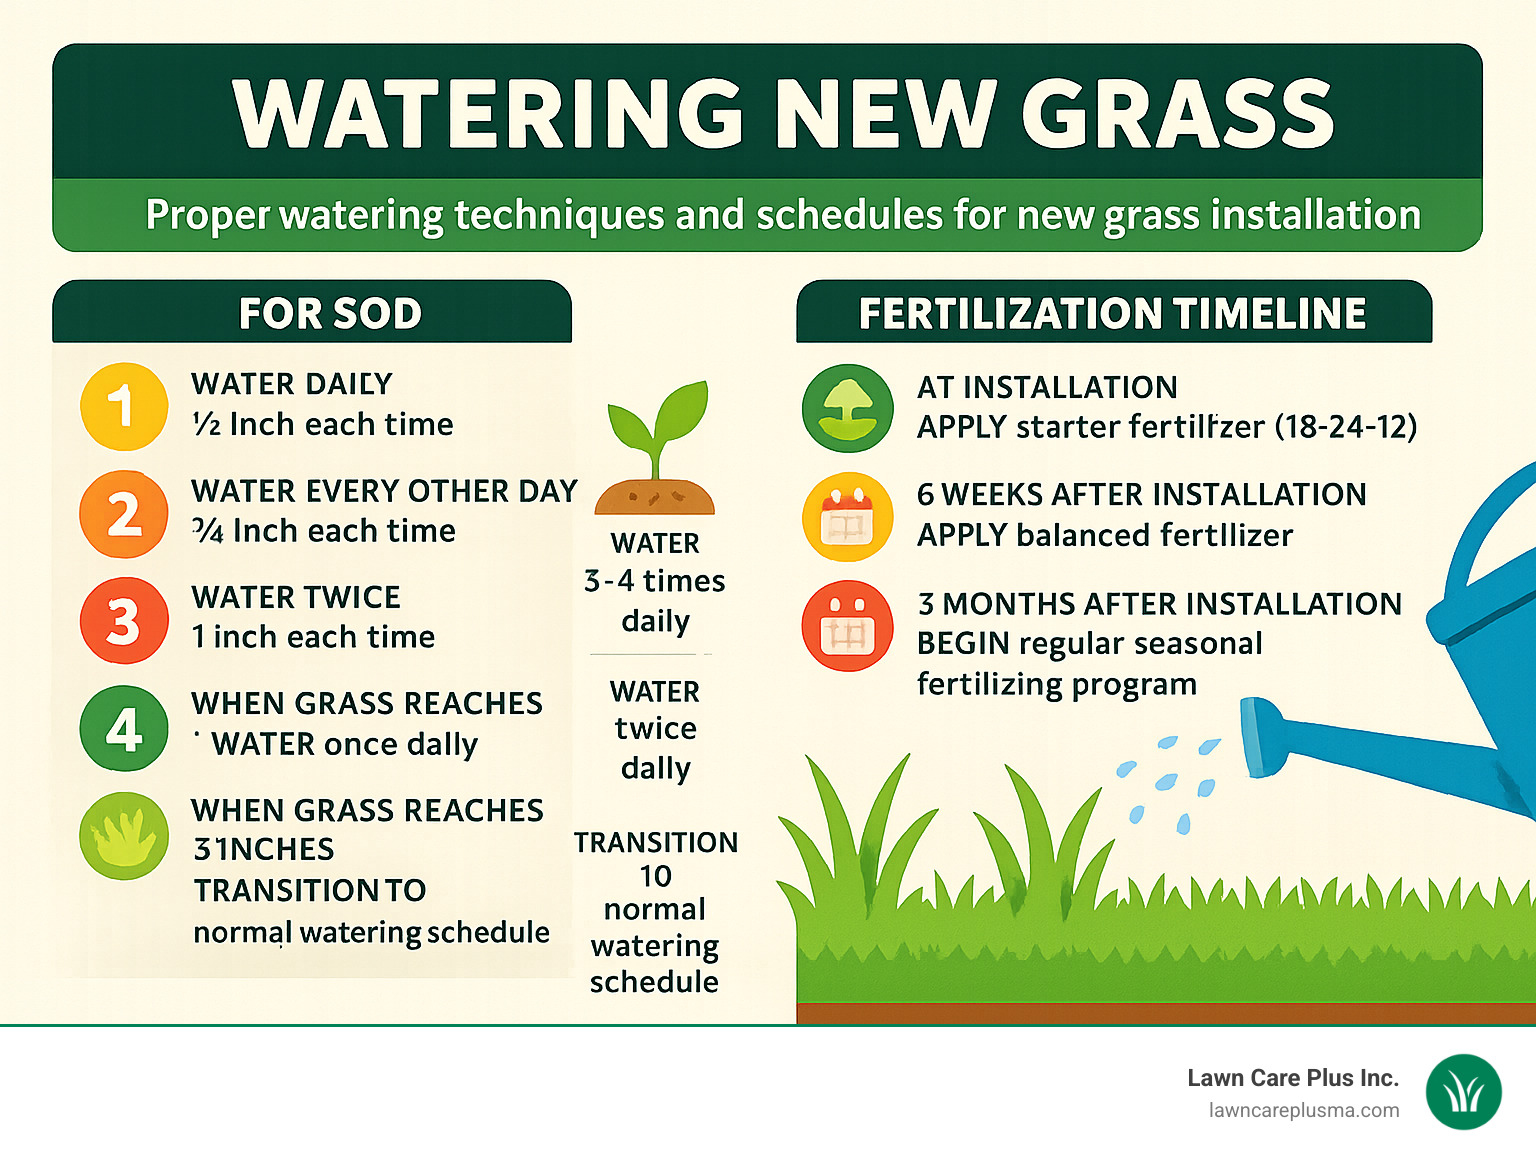
For sod, water daily during the first week, providing 1/2 inch each time. In week two, water every other day with 3/4 inch each session. By week three, reduce to twice weekly with 1 inch applications. From week four onward, once weekly watering of 1-1.5 inches should suffice.
Seed requires more frequent attention. Until germination, water 3-4 times daily for 5-10 minutes each session. After germination, reduce to twice daily for 10 minutes each. When grass reaches 1 inch tall, water once daily. Once it’s 3 inches tall, transition to a normal watering schedule.
For fertilization, apply starter fertilizer (18-24-12) at installation. Follow up with balanced fertilizer (16-16-16) six weeks later. Three months after installation, begin your regular seasonal fertilizing program.
“Following the watering schedule precisely made all the difference,” shared a Brookline homeowner. “My previous attempt at seeding failed because I wasn’t consistent with watering during the critical first weeks.”
New England’s changeable climate requires adjustments to this schedule. Increase watering frequency during heat waves, reduce or skip after significant rainfall, and adjust seasonally with more in summer and less in fall.
Sod roots typically begin growing within days, but full establishment takes about two weeks. Seed germination varies by grass type—ryegrass may appear in 5-7 days while Kentucky bluegrass might take 14-30 days before you see the first green shoots.
The investment in proper aftercare pays dividends. As one Newton client told us, “The difference between my neighbor’s lawn and mine is night and day. We both installed sod the same weekend, but I followed the watering schedule religiously while they traveled and missed several days. A year later, my lawn is lush and uniform while theirs still has patches.”
Frequently Asked Questions about New Grass Installation
How long before I can mow or walk on new grass?
Patience is truly a virtue when it comes to your new grass installation. It’s tempting to walk out and enjoy your new lawn immediately, but giving it time to establish proper roots is essential.
For sod installations, you can begin light foot traffic after about 2-3 weeks when the roots have started to take hold. However, wait until 3-4 weeks before regular use like family gatherings or games of catch. When it comes to mowing, wait until your grass reaches 3-4 inches tall, typically 2-4 weeks after installation. Set your mower height to 2.5-3 inches for those first few cuts to avoid stressing the young lawn.
If you’ve gone the seeding route, you’ll need considerably more patience. Stay completely off seeded areas until after the third mowing—really, no exceptions! Your first mowing should happen when the grass reaches about 3-3.5 inches, which typically takes 4-8 weeks after seeding. Regular use should wait until 8-12 weeks post-seeding.
“One of the biggest mistakes homeowners make is walking on or mowing new grass too soon,” explains a lawn care specialist. “This can pull young grass plants from the soil before they’re established.”
What’s the best season for new grass installation in New England?
Timing is everything when it comes to new grass installation in Massachusetts. Our New England climate creates very specific windows of opportunity for success.
For cool-season grasses (which are best suited for Massachusetts lawns):
Early fall—from late August to mid-October—is absolutely the prime time for all installation methods. The soil still retains warmth from summer, encouraging strong root development, while cooler air temperatures reduce stress on the tender new grass. Natural rainfall tends to be more consistent, weed competition decreases, and your grass gets a longer establishment period before facing summer heat.
Early spring (April to mid-May) ranks as your second-best option, though you may face more weed competition and have less time before summer heat arrives.
Summer installations are generally best avoided due to heat stress and increased disease pressure—unless you’re prepared for very diligent watering and monitoring.
A Jamaica Plain customer shared her experience: “We installed sod in early September, and by the following spring, it looked like it had been there for years. The fall installation gave it time to develop deep roots before summer.”
Can I lay new grass over an existing lawn?
While it might seem like a clever time-saving shortcut, the answer is a firm no, it’s not recommended.
Installing new grass over existing turf creates a perfect storm of problems. New grass simply can’t develop proper roots through the old turf layer. The existing lawn creates an uneven surface with bumps and depressions that will be noticeable in your finished lawn. The old grass competes aggressively for nutrients and water that your new grass needs. As the old grass inevitably decays underneath, it creates air pockets and settlement issues. Perhaps worst of all, any weeds, pests, and diseases present in your old lawn will happily transfer to your new one.
Instead, take the time to properly remove the existing lawn using a sod cutter, herbicide, or smothering method before installation. This extra step dramatically increases your chances of success.
One Needham homeowner learned this lesson the hard way: “I tried laying sod over parts of my old lawn to save time. Within months, those sections were patchy and uneven, while the areas where I removed the old grass completely thrived.”
At Lawn Care Plus Inc., we’ve seen countless lawn installation projects across the Boston Metro-West area, and proper preparation consistently makes the difference between a showpiece lawn and a disappointing one. Taking the time to do things right from the start saves both frustration and money in the long run.
Conclusion
There’s something truly magical about a successful new grass installation. That moment when you step back and see your once-patchy yard transformed into a lush, green carpet is worth every drop of sweat equity you’ve invested. Whether you’ve opted for the instant gratification of sod, the budget-friendly approach of seed, or the middle-ground solution of hydroseeding, your new lawn will improve both your property’s value and your quality of life.
After helping countless homeowners across the Boston Metro-West area create their dream lawns, we’ve seen how proper planning and execution make all the difference. The satisfaction on a client’s face when they see their children playing on a thick, healthy lawn for the first time is what drives our passion for lawn care.
Remember these golden rules for lasting success:
– Choose wisely: Select grass varieties that thrive in Massachusetts’ unique climate and match your yard’s specific conditions
– Prepare thoroughly: The time invested in soil preparation pays dividends for years to come
– Install with care: Follow best practices for your chosen installation method
– Water consistently: Establishing proper irrigation habits during the first few weeks is critical
– Practice patience: Resist the urge to use your new lawn until it’s fully established
Throughout communities like Newton, Needham, Brookline, and beyond, we’ve witnessed the change that a properly installed lawn brings to a property. There’s a certain pride that comes from nurturing bare soil into a vibrant outdoor space where memories will be made for years to come.
Of course, new grass installation is a significant undertaking. While many homeowners enjoy the DIY approach, others prefer to leave it to professionals who understand the nuances of New England’s soil conditions and climate challenges. If you find yourself in the latter camp, Lawn Care Plus Inc. is ready to help turn your lawn dreams into reality. Our experienced team has installed hundreds of lawns across the Boston Metro-West area, navigating everything from rocky soil to challenging slopes.
For more information about our professional lawn installation services or to schedule a consultation, visit our lawn care services page or contact us today.
Your perfect lawn is waiting – whether you create it yourself or partner with our team, the green space of your dreams is just a season away.
